Updated on
Microsoft 365 (Student Accounts)
Create Microsoft 365 accounts on your student domain, add them to intakes, programmes or other groups you choose, send their login details via email or text.
SELMA can give every newly enrolled student their own Microsoft 365 account automatically. It creates the account on your student domain, adds the student to the Microsoft 365 groups you choose (a group for their intake, a group for their programme, and any other groups you list), and sends them their username and a temporary password.
Before You Start
Student accounts use the same Azure app as the Microsoft 365 integration's Account-Level Configuration. If you have not set that up yet, follow Microsoft 365 (Account-Level Emails) - Setup up to the point where the Application (client) ID, Directory (tenant) ID and Client Secret are saved in SELMA and the connection test passes.
You do not need to send emails through Microsoft 365 to use student accounts - the two features are independent.
You will also need:
- A student domain - the domain student usernames are created on, for example learner.example.ac.nz. It must be a verified domain in your Microsoft 365 tenant.
- A licence SKU ID (optional) - the licence students should get, for example Office 365 A1 for Students (314c4481-f395-4525-be8b-2ec4bb1e9d91). Microsoft lists the education SKU IDs at https://learn.microsoft.com/en-us/microsoftteams/sku-reference-edu. Leave it blank if you prefer to license students yourself.
Azure App Permissions
The Azure app needs a few more permissions than emailing does, because it creates users and groups.
In the Azure portal, open the app → API permissions → Add a permission → Microsoft Graph → Application permissions, and add:
| Permission | Why SELMA needs it |
|---|---|
| User.ReadWrite.All | Create the student's account, and look it up again if a set-up was interrupted |
| Group.ReadWrite.All | Find the intake, programme and other groups, and create any that don't exist yet |
| GroupMember.ReadWrite.All | Add the student to their groups |
| LicenseAssignment.ReadWrite.All | Give the licence to the groups SELMA creates (only needed if you set a licence SKU ID) |
Once the permissions are added, an admin needs to Grant admin consent for them.
Optional - User Administrator role: if a set-up is interrupted after Microsoft 365 created the account, SELMA recognises the account on the next attempt and sets a new temporary password for it. Microsoft only allows an app to set passwords if the app has the User Administrator role (Microsoft Entra → Roles and administrators → User Administrator → Add assignments → the app). Without the role, everything else still works; in that rare case SELMA links the account and leaves a note asking you to reset the student's password in Microsoft 365 yourself.
Screenshot to add: the User Administrator role's Add assignments screen with the app selected (Microsoft Entra).
Setting Up Student Accounts in SELMA
Go to SELMA Settings (cog, top-right) → Integrations → Configure the Microsoft 365 integration, and expand Student Microsoft 365 accounts.
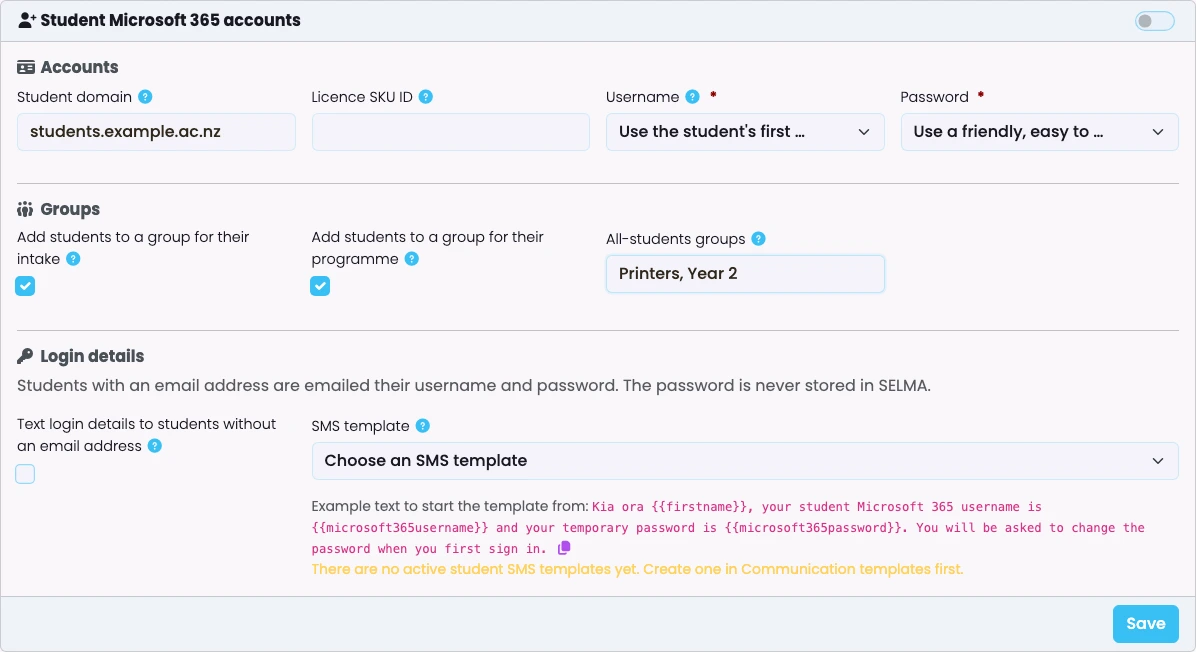
Fill in the settings below and click Save. Every setting has a ? you can hover over for help.
Then switch on Student Microsoft 365 accounts (top-right of the card). The switch saves straight away - you don't need to click Save for it. It can only be switched on once a student domain has been saved; if not, SELMA says so and the switch flips back off.
Accounts
| Setting | What it does |
|---|---|
| Student domain | The domain usernames are created on, e.g. learner.example.ac.nz. Required. |
| Licence SKU ID | The licence given to the groups SELMA creates. Students get the licence through their group. Leave blank to license groups yourself. |
| Username | The student's name: the first three letters of their preferred name (or first name), the first three letters of their surname, and a number - e.g. Jonathan Smith becomes jonsmi1@…, the next Jonathan Smith jonsmi2@…. Macrons, spaces and punctuation are removed. The student's NSN: e.g. 123456789@…. Students without an NSN can't be given an account in this mode. |
| Password | Recommended (strong): 10 random letters, numbers and symbols. Friendly: easy to read out or text, e.g. Bak47392 (no vowels or digits that look alike). Either way, the student must change it the first time they sign in. |
Groups
Choose which groups students join - use any combination, or none:
| Setting | What it does |
|---|---|
| Add students to a group for their intake | Adds each student to a group for their intake, named after the intake and its SELMA ID, e.g. Hospitality Feb 2026 (812). On by default. |
| Add students to a group for their programme | Adds each student to a group for their programme, named after the programme with "New Zealand Certificate in" shortened to "NZC", e.g. NZC Hospitality (Level 3). |
| All-students groups | Groups every student is also added to, e.g. a printer group. Separate several with commas, e.g. Canon, Year 2, Domestic. Use each group's name or its object ID. Leave blank for none. |
How groups are found:
- SELMA looks for an existing group first (by its email alias, which is the group name with spaces and punctuation turned into underscores). If you already have a group with that name - for example an existing printer group - students are simply added to it. SELMA never changes or licenses groups it didn't create.
- If no group exists, SELMA creates one (a Microsoft 365 group), with "(created by SELMA)" at the end of its description, and gives it the licence SKU if one is set. Microsoft can take a few seconds to finish setting up a new group, so SELMA waits and tries the licence again if needed.
- SELMA remembers each group once it has found or created it, so renaming the group in Microsoft 365 afterwards is fine.
Licences: students get their licence through the groups SELMA creates. If you switch off both intake and programme groups, SELMA creates no licensed groups, so license students another way (for example by licensing one of your all-students groups yourself).
Login Details
| Setting | What it does |
|---|---|
| (always on) | Students with an email address are emailed their username and password. |
| Text login details to students without an email address | Sends the login details by SMS instead, to the student's mobile number (unless they have opted out of texts). |
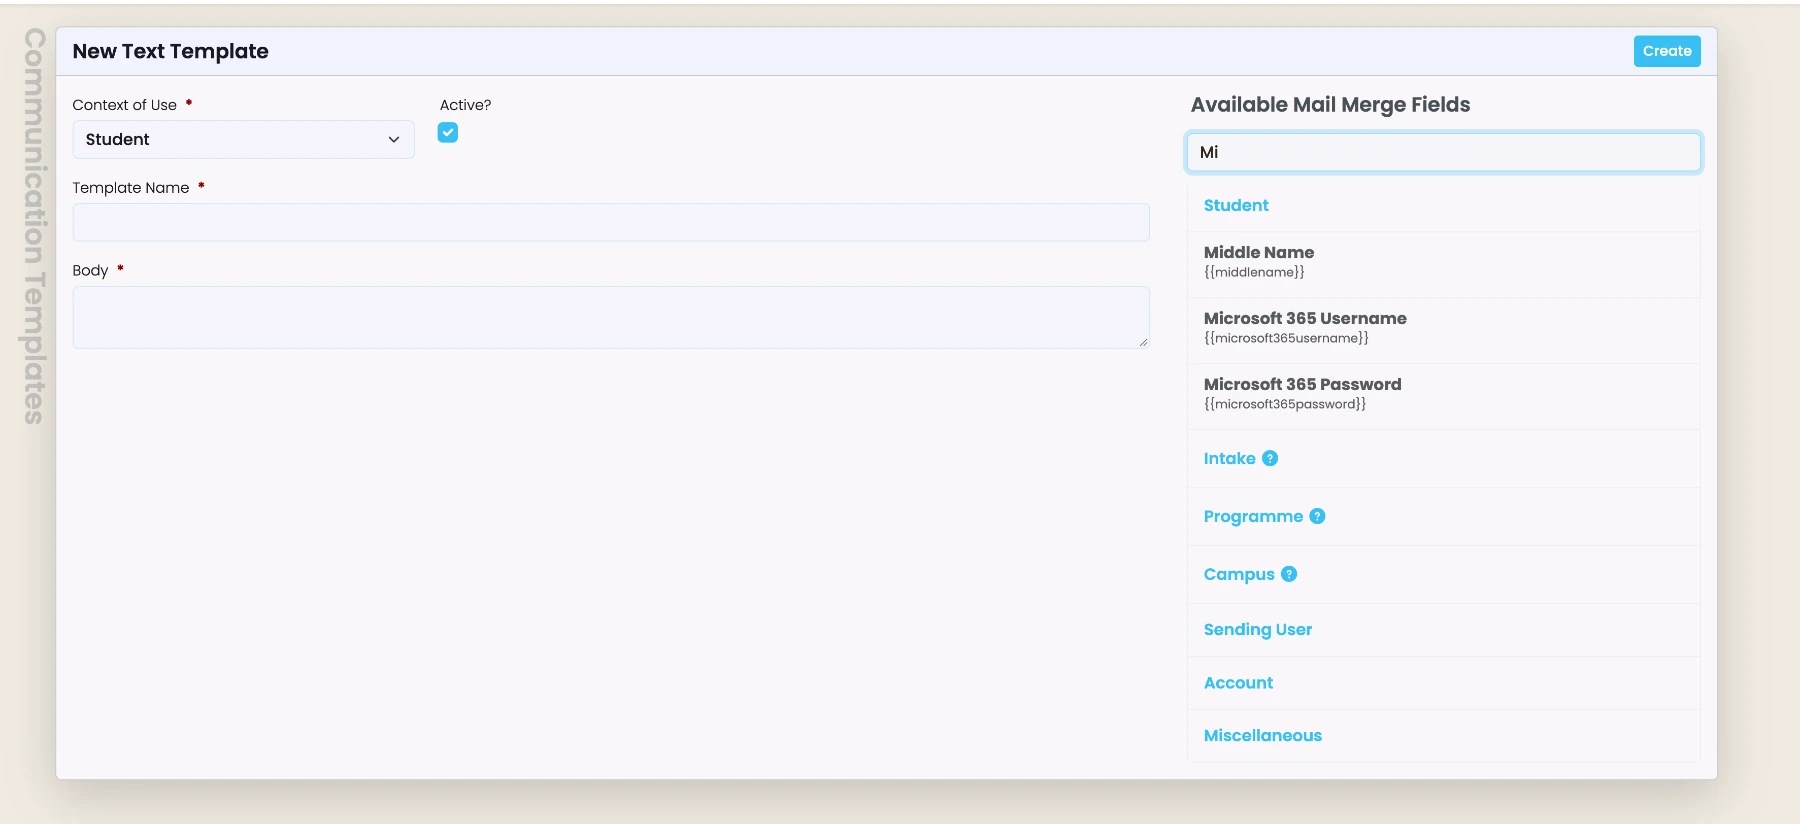
| SMS template | The SMS template to send. Create it in Communication templates first (type: text, use case: Student) and use the Microsoft 365 Username and Microsoft 365 Password mail merge fields where the login details should go. |
Under the SMS template there is example text you can copy with the copy icon and paste into a new template:
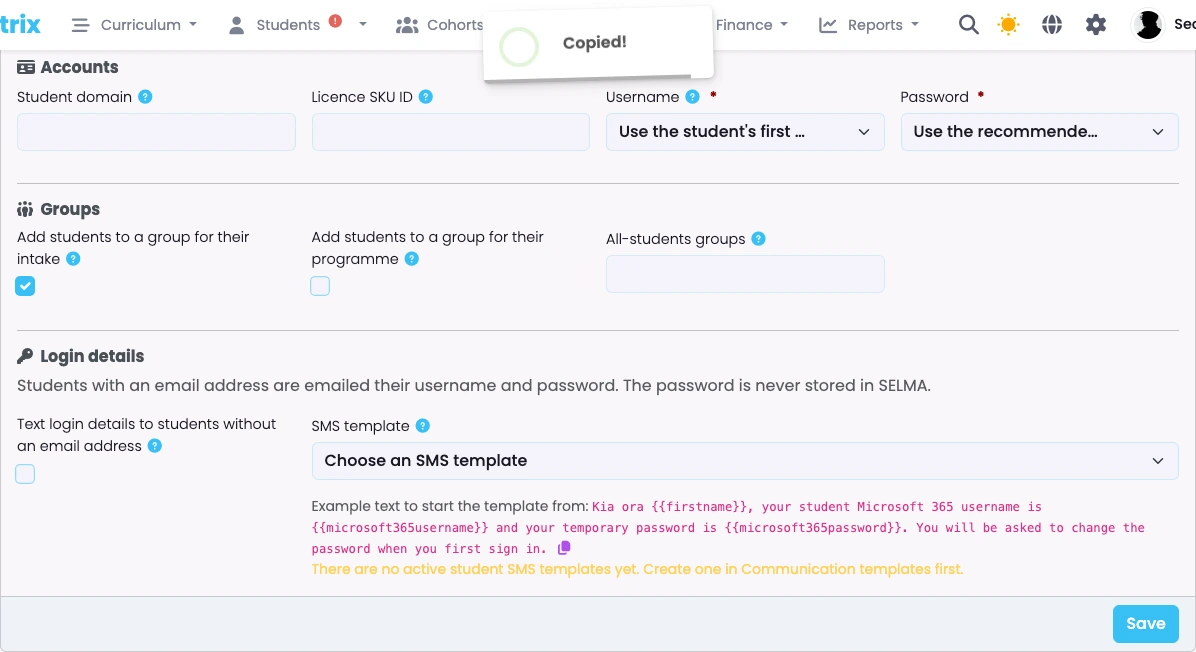
Once student accounts are switched on, the two login details fields are listed under Student in the template editor's Available Mail Merge Fields (search for "Microsoft 365"). They are only filled in by the login details message - in any other message they are left as they are.
The password is never stored in SELMA. It is only sent to the student. If a student loses it, reset it in Microsoft 365.
What Happens When a Student Is Enrolled
A minute or so after a student is enrolled into an intake, SELMA:
- Creates their Microsoft 365 account, if they don't have one yet. Their username is saved on the student record.
- Sends their login details by email (or SMS, see above).
- Adds them to the groups you chose - their intake group, programme group and all-students groups - creating and licensing any intake or programme group that doesn't exist yet.
- Leaves a note on the student when staff need to know:
| Note | Priority | Meaning |
|---|---|---|
| Microsoft 365 account created | Low | The account was created and the login details were sent. |
| Microsoft 365 login details not sent | High | The account was created, but the student has no email address and SMS is off (or the message failed). Reset the password in Microsoft 365 and give it to the student. |
| Microsoft 365 account not set up | High | Something stopped the set-up. The note says why - see Troubleshooting below. |
A student who already has an account (e.g. enrolling in a second intake) keeps it: SELMA only adds them to their groups for the new enrolment and sends nothing.
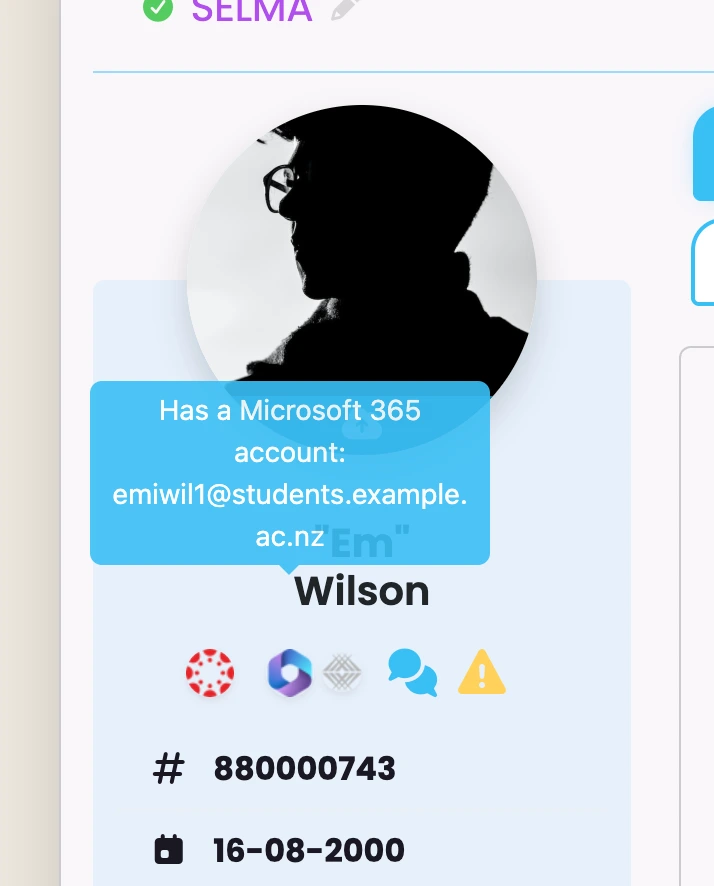
Students with a Microsoft 365 account show the Microsoft 365 icon in the icon tray on their record. Hover over it to see their username.
Create a Student Account Now
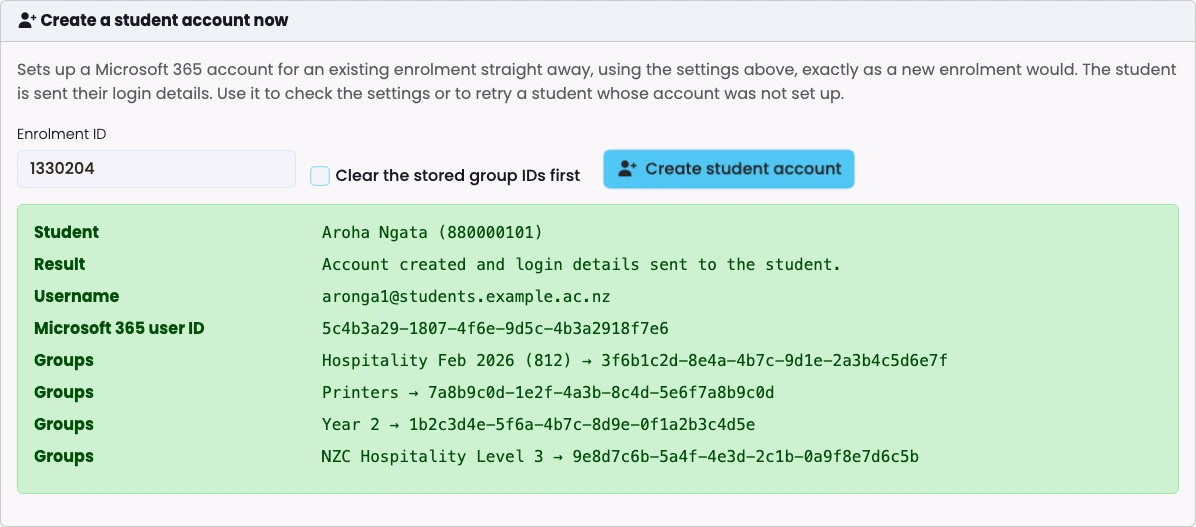
Users with full (top-level) permissions see a Create a student account now card under the settings. Enter an Enrolment ID and click Create student account to run the same set-up straight away. Use it to check your settings, or to retry a student whose set-up failed once you've fixed the cause.
The result shows the student, what happened, their username and Microsoft 365 user ID, and each group with its Microsoft 365 group ID. The password is never shown - it is sent to the student as normal.
If the student already has an account, only their groups are updated:
If something goes wrong, the reason is shown:
Clear the stored group IDs first makes SELMA look the student's groups up by name again - only needed if groups were deleted or replaced in Microsoft 365.
Troubleshooting
| Message | What to do |
|---|---|
| No student domain is set… | Enter the Student domain in the settings and save. |
| Student … has no NSN, which the username is made from… | Add the student's NSN, then use Create a student account now. Or switch the Username setting to the student's name. |
| Student … has no first name or surname… | Add the student's name, then retry. |
| The Microsoft 365 username … is already used by someone else. | Another person in your tenant already has that NSN username. Check the student's NSN, or sort out the existing account in Microsoft 365. |
| Microsoft 365 would not … (error 401): … | The Account-Level credentials are wrong or the client secret has expired. Update them and test the connection. |
| Microsoft 365 would not … (error 403): Insufficient privileges… | The Azure app is missing a permission, or admin consent wasn't granted. See Azure App Permissions. |
| Microsoft 365 would not license the group … | SELMA already waits and retries while Microsoft finishes setting up a new group. If it still fails, no licences of that SKU are left or the SKU ID is wrong. SELMA licenses the group on the next attempt once fixed. |
| Something unexpected went wrong… | Contact SELMA support - the details have been logged for us. |
Failures also appear in the Microsoft 365 integration's log on the same page.
Changes from SELMA V2
- Everything is set up on the integration page - no hidden settings, hard-coded domains or SMS templates.
- Passwords are no longer stored in SELMA or shown on the student's Miscellaneous tab; they are only sent to the student.
- Intake and programme groups can each be switched on or off, and students can also be added to any number of other groups, including groups you already have.
- Only groups SELMA creates are licensed.
- Login details can be texted to students without an email address, using the Microsoft 365 Username and Password mail merge fields.
- Students with an account show a Microsoft 365 icon on their record.
New students will now get their Microsoft 365 account automatically when an enrolment is created in SELMA.
Last updated