Programmes are the structured educational pathways or qualification process through which learners can develop specific skills, and receive recognised certification from your institution.
A qualification can be awarded as a certificate, diploma, bachelor’s degree, etc.
On this page:
- Create New Programme
- Programme | Compliance Tab
- Programme | Fees Tab
- Programme | Components Tab
- Programme | Intakes Tab
Create New Programme
There are a few steps required to create a new Programme with complete and relevant information.
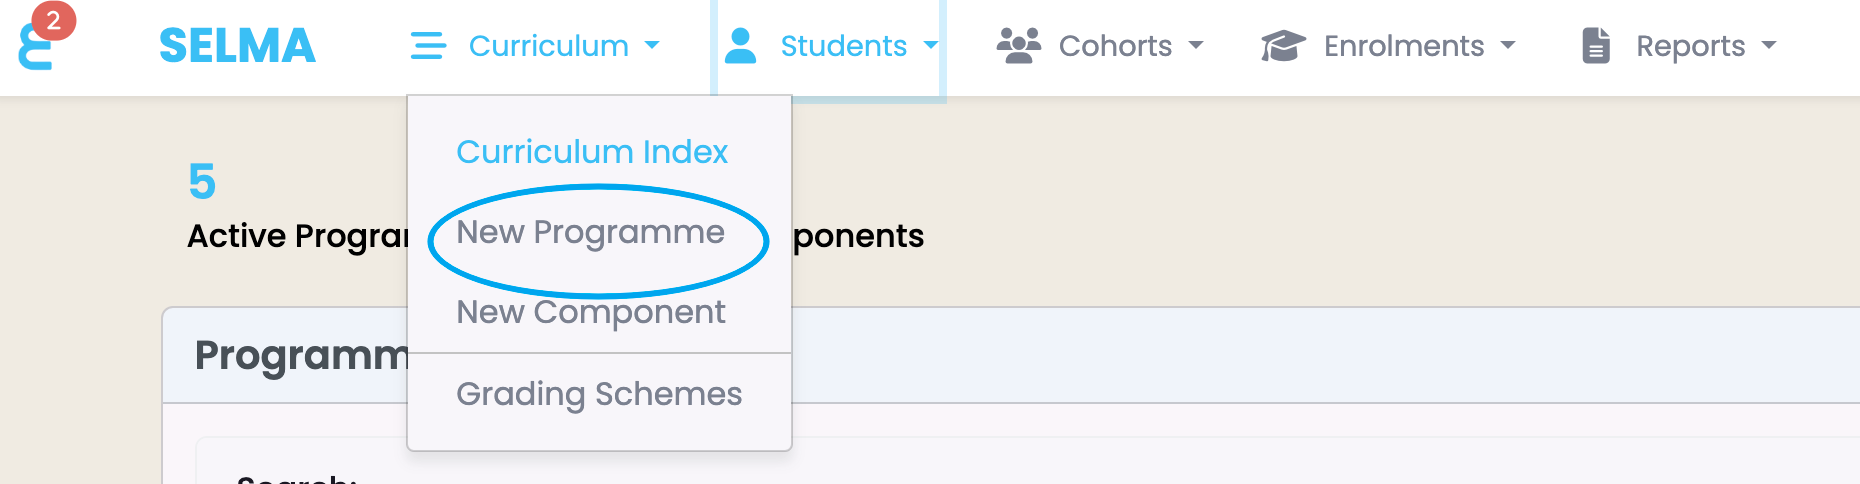
Navigate to “Curriculum and select “New Programme” (Figure 1.).
Figure 1. Hovering where it says “Curriculum” in the top navigation bar shows a list of pages. Select “New Programme” (blue).
On the “New Programme” information page, you can name the Programme and fill out the required fields marked by red asterisks.
When done, click the “Create” button (Figure 2.).
The system should then open the Programme profile you have just created.
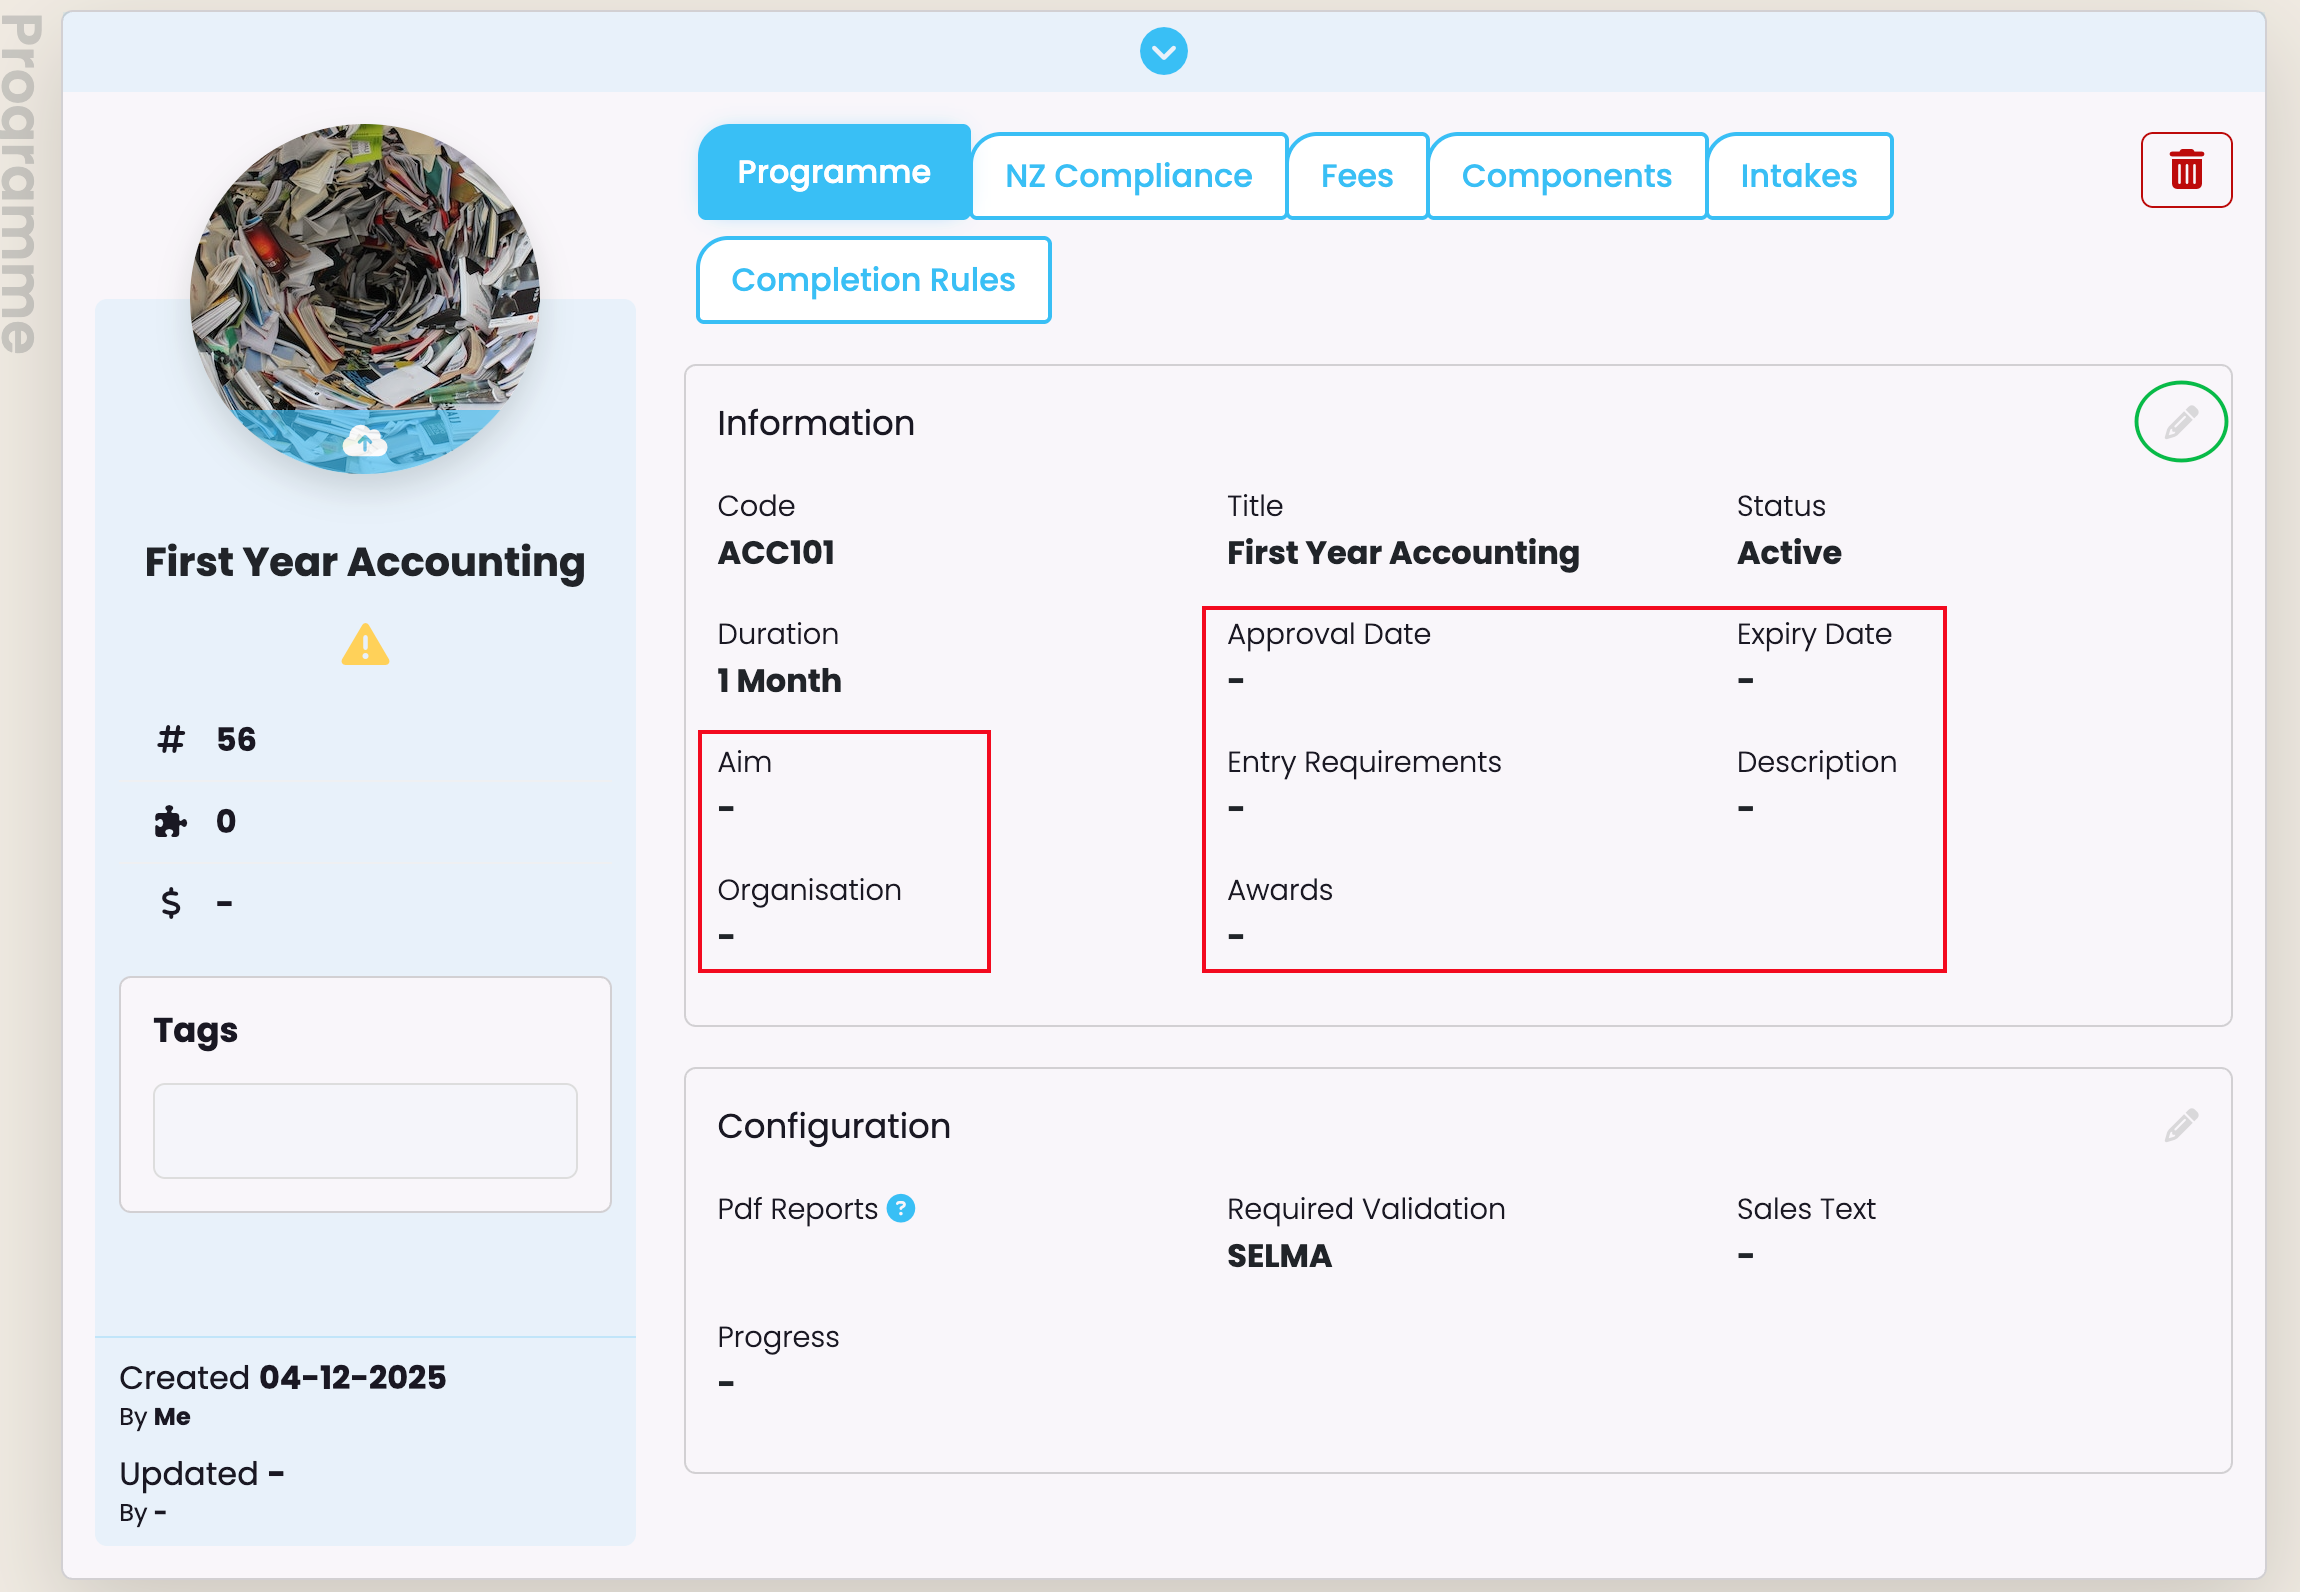
Fill out the remaining Programme information by clicking on the pencil icon to edit (Figure 3.) and the disk icon that replaces it to save changes.
Figure 2. When all required fields are filled out, click the “Create” button (blue) to save the information.
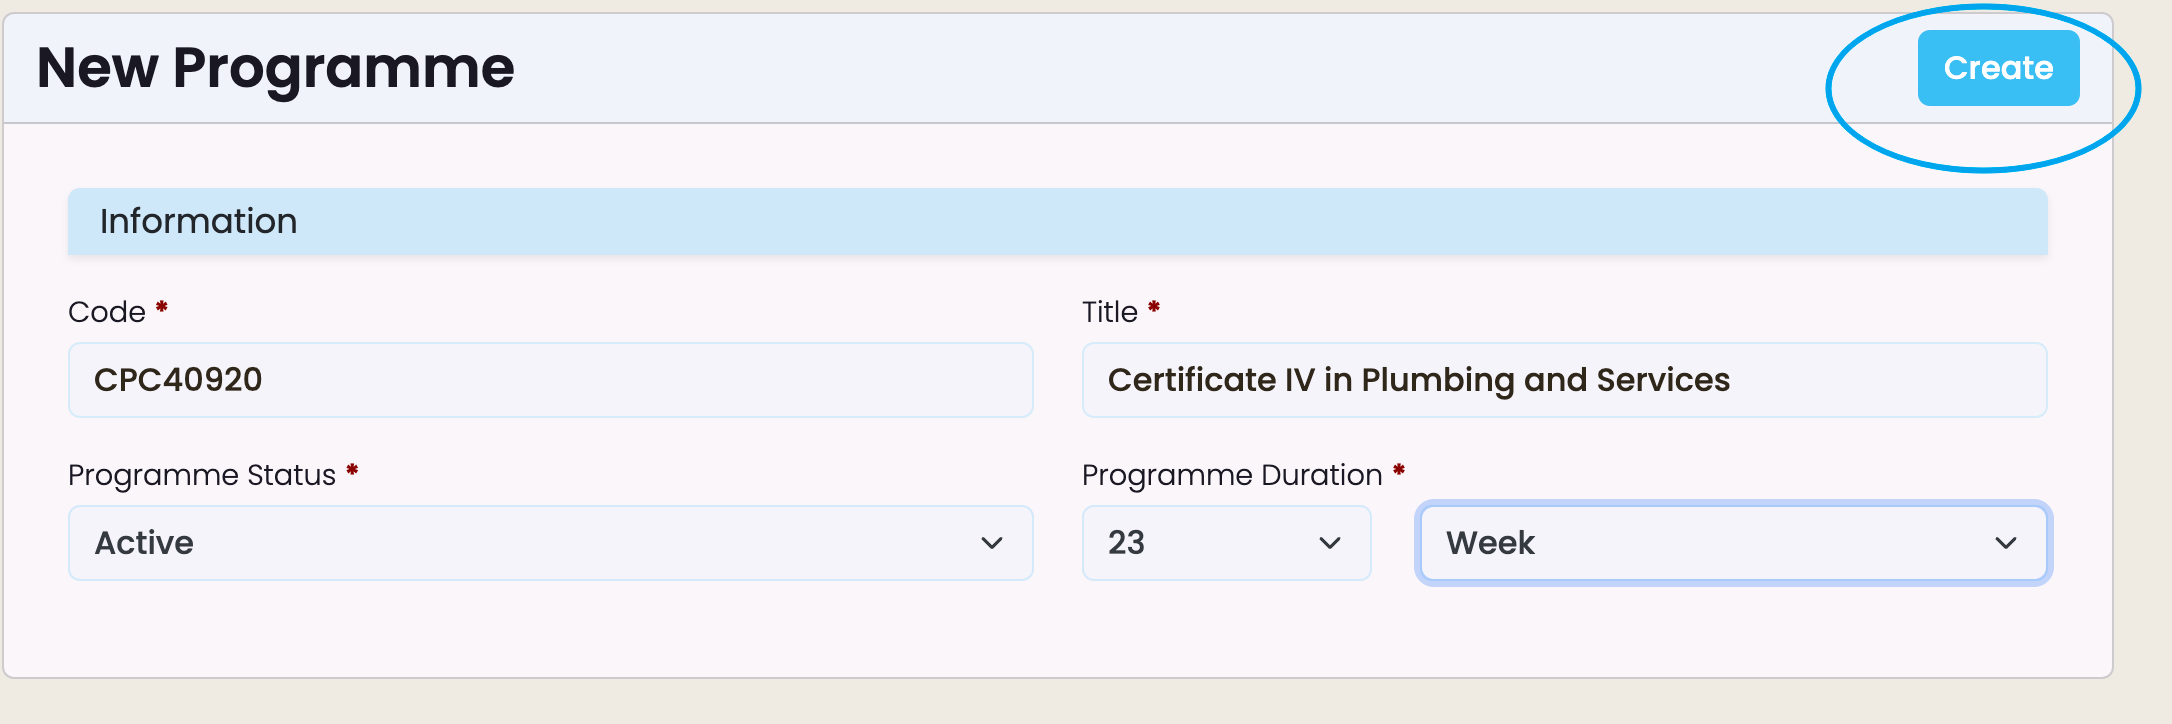
Figure 3. You will see other empty fields to populate after creating a new Programme (red). Click the pencil icon to edit (green).
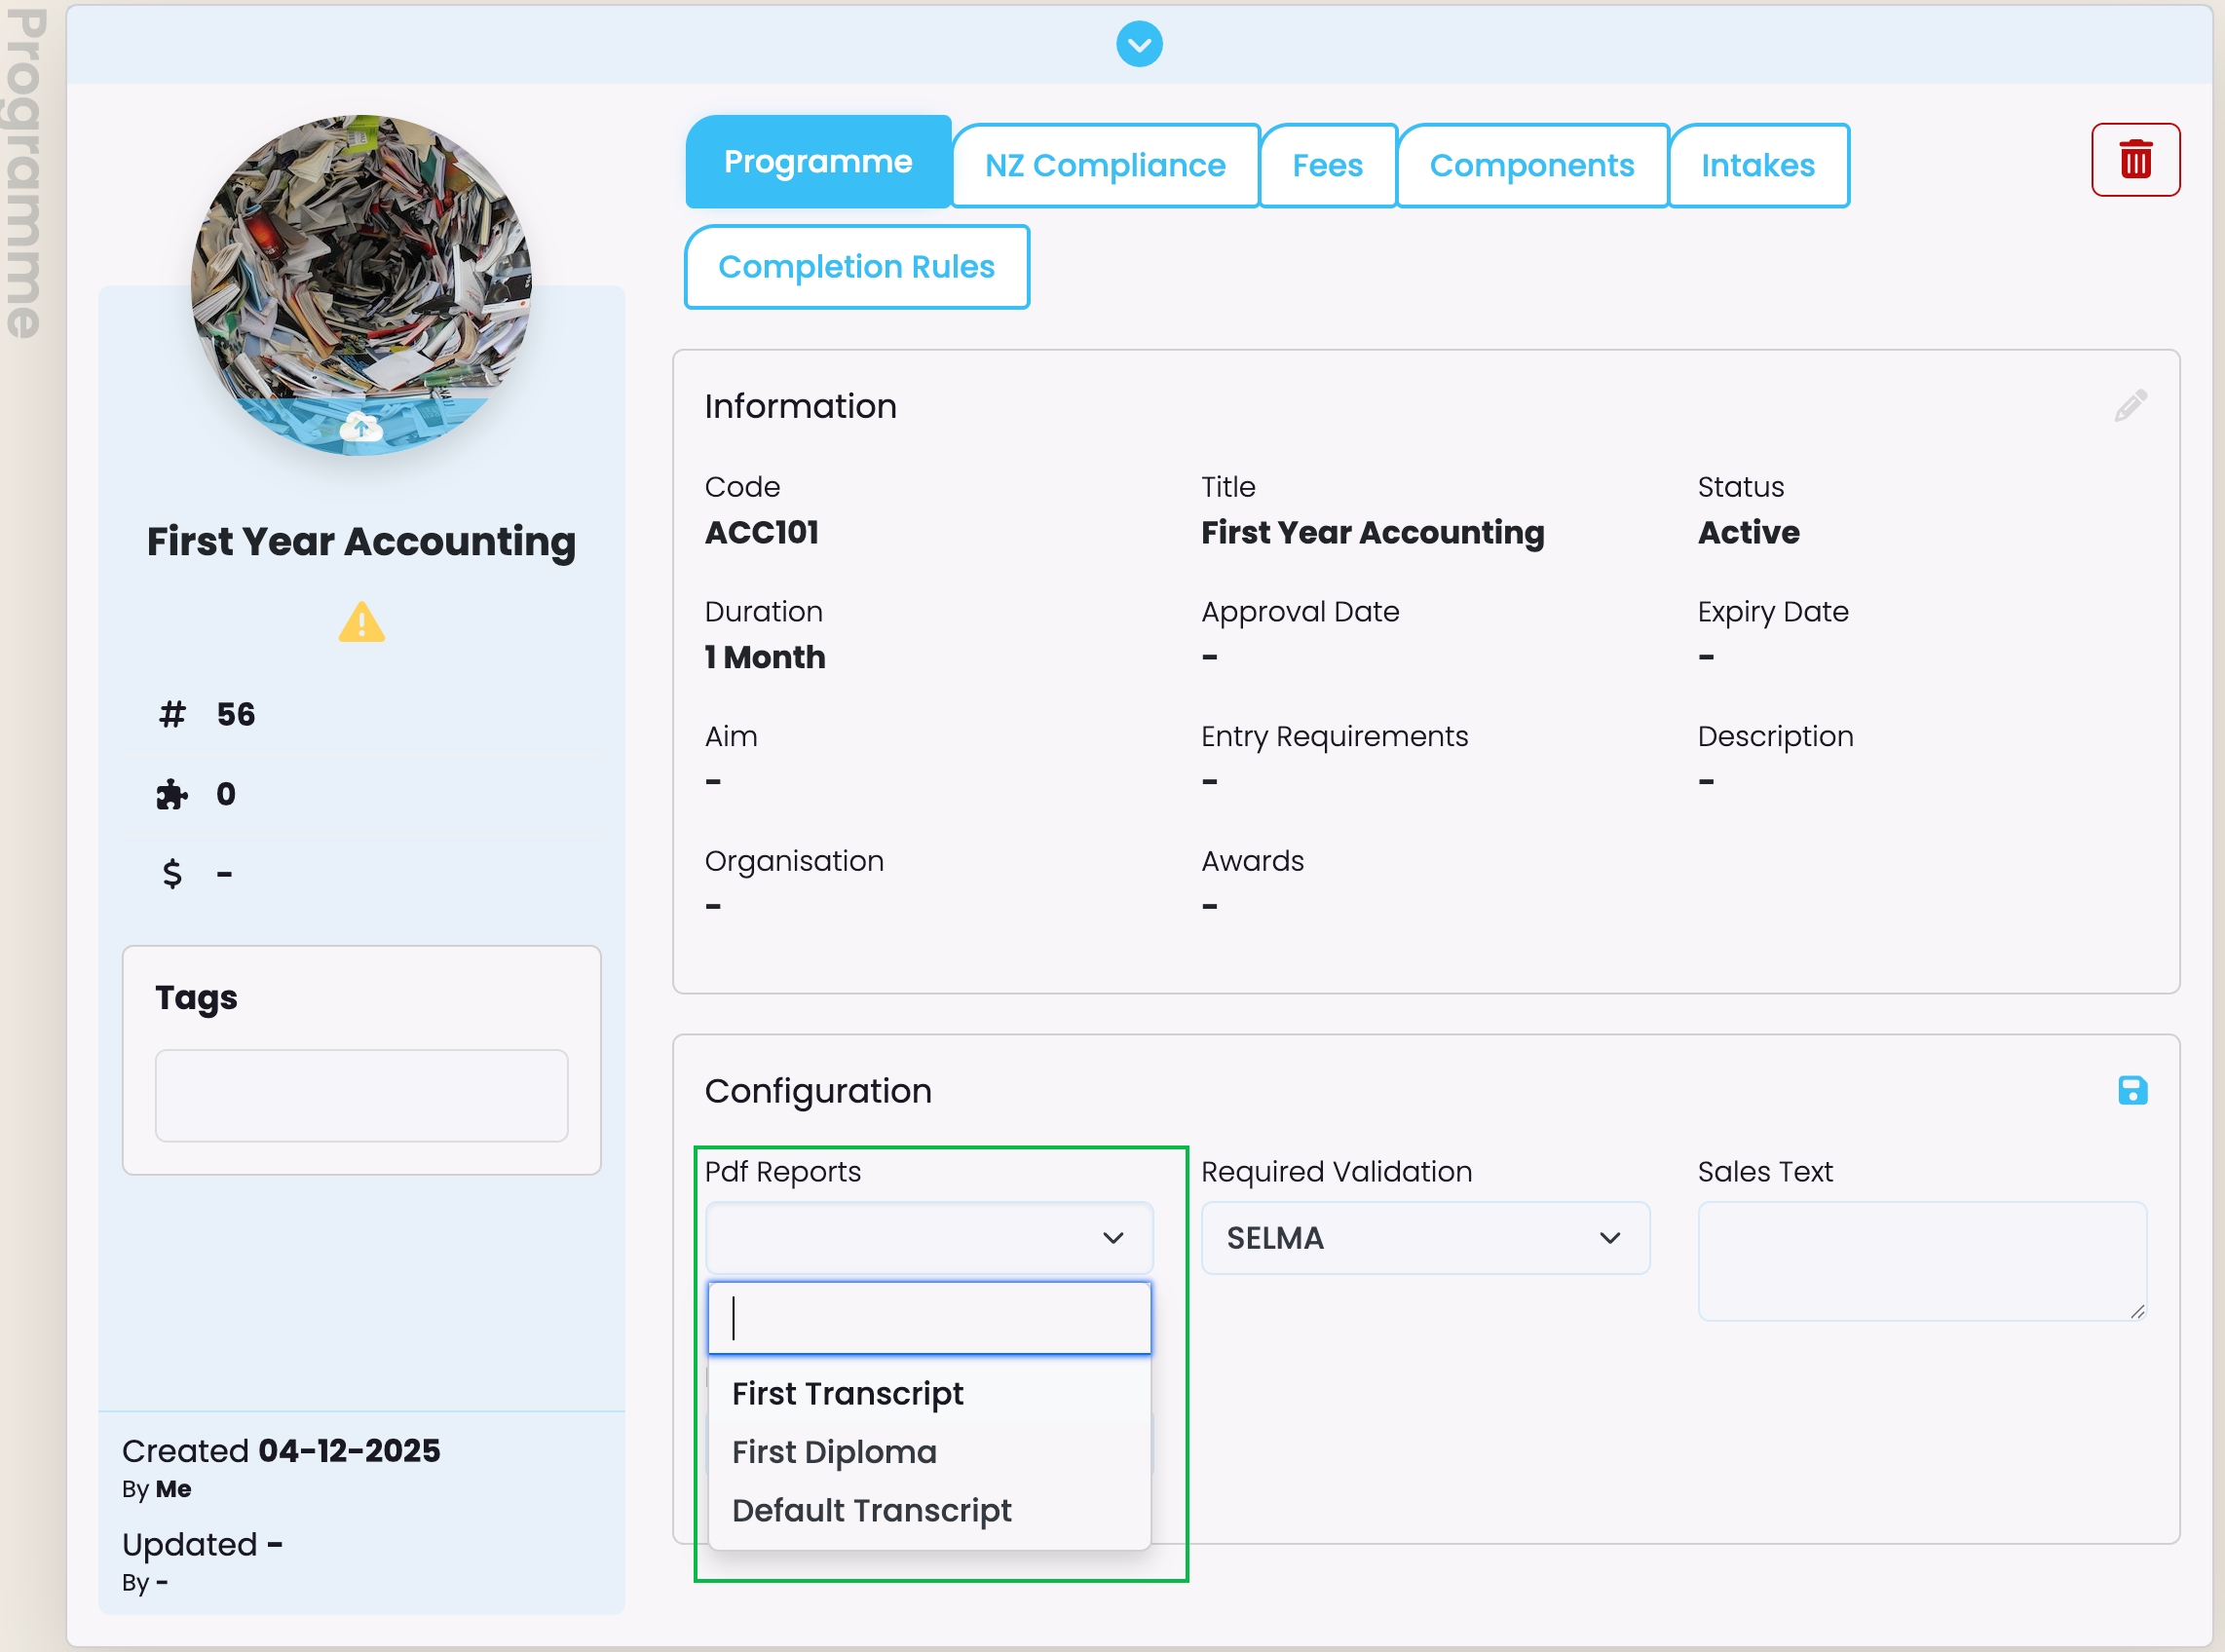
Edit the Configuration Section
In this section, you can multi-select default PDF Report templates, such as transcripts or diplomas. Custom templates are also found here, should you need SELMA to develop a custom-built report template for your institution.
- Please Contact SELMA Support to request a custom-built report template.
Note: Selecting specific report templates, here, displays them to be used at the enrolment level, at the exclusion of the ones not selected. If you would like to configure all report templates at the enrolment level, please leave this field blank (Figure 4).
Figure 4. A multi-selection dropdown list of report templates to be used later, at the enrolment level.
Programme | Compliance Tab
NZ Compliance
The NZ Compliance tab is visible to New Zealand providers only, and must be filled out accurately (Figure 5.).
Note: In order to set-up an NZ Compliance Programme with the correct values, it is highly recommend to have your Programme Approval document on hand, or your DXP Ngā Kete (formerly STEO) open in your browser.
Figure 5. A Programme’s “NZ Compliance” tab showing relevant information.

Note: To create an NZQA Qualification, please refer to NZ Compliance – NZQA Qualifications in this resource for more information.
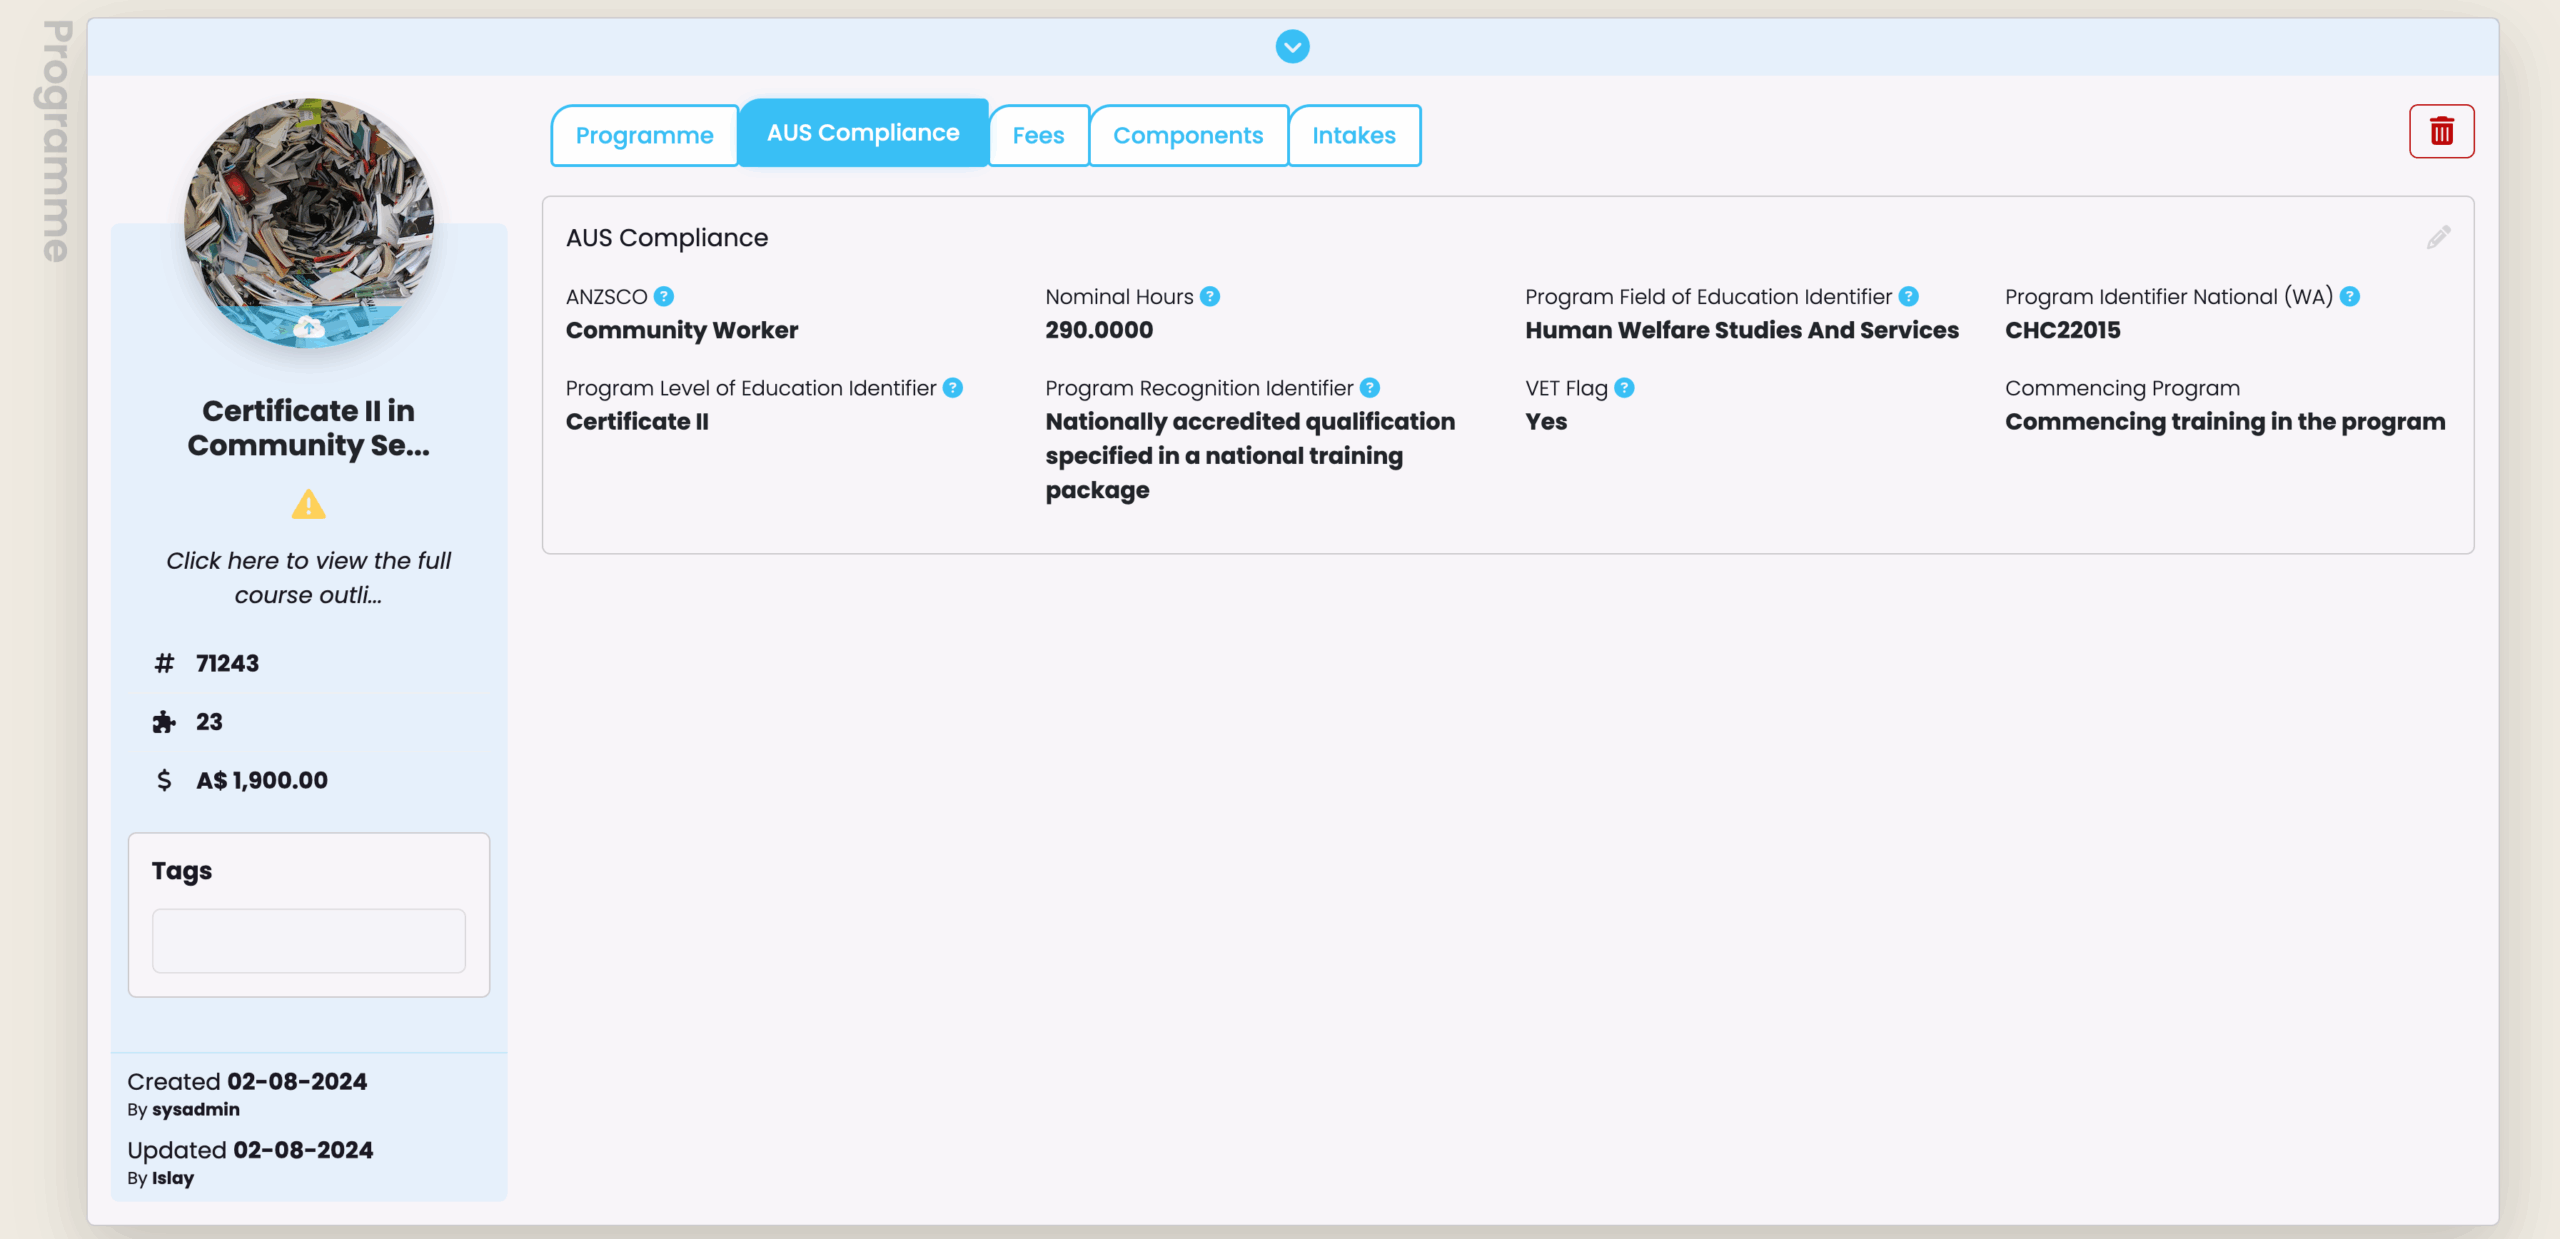
AUS Compliance
The AUS Compliance tab is visible to Australian providers only, and must be filled out accurately (Figure 6.).
Note: In order to set-up an AUS Compliance Programme with the correct values, it is highly recommended to have your Programme Approval document on hand.
Figure 6. A Programme’s “AUS Compliance” tab showing relevant information.
Programme | Fees Tab
To list fees associated with a Programme, navigate to the Fees tab and click the “+Add” button to save all relevant details (Figure 7.).
Note: Adding Fees at the Programme level means one total sum will be inherited by associated Intakes and Enrolments, later.
Figure 7. The Fees tab (green) shows an empty grid table. Add all relevant details using the “+Add” button (red).

Programme | Components Tab
When creating a new programme, no components will be available for mapping – course components must be created separately. Please refer to the Components section in the Resource Centre.
.
Once components have been created, you can now add them to your Programme from the Components tab.
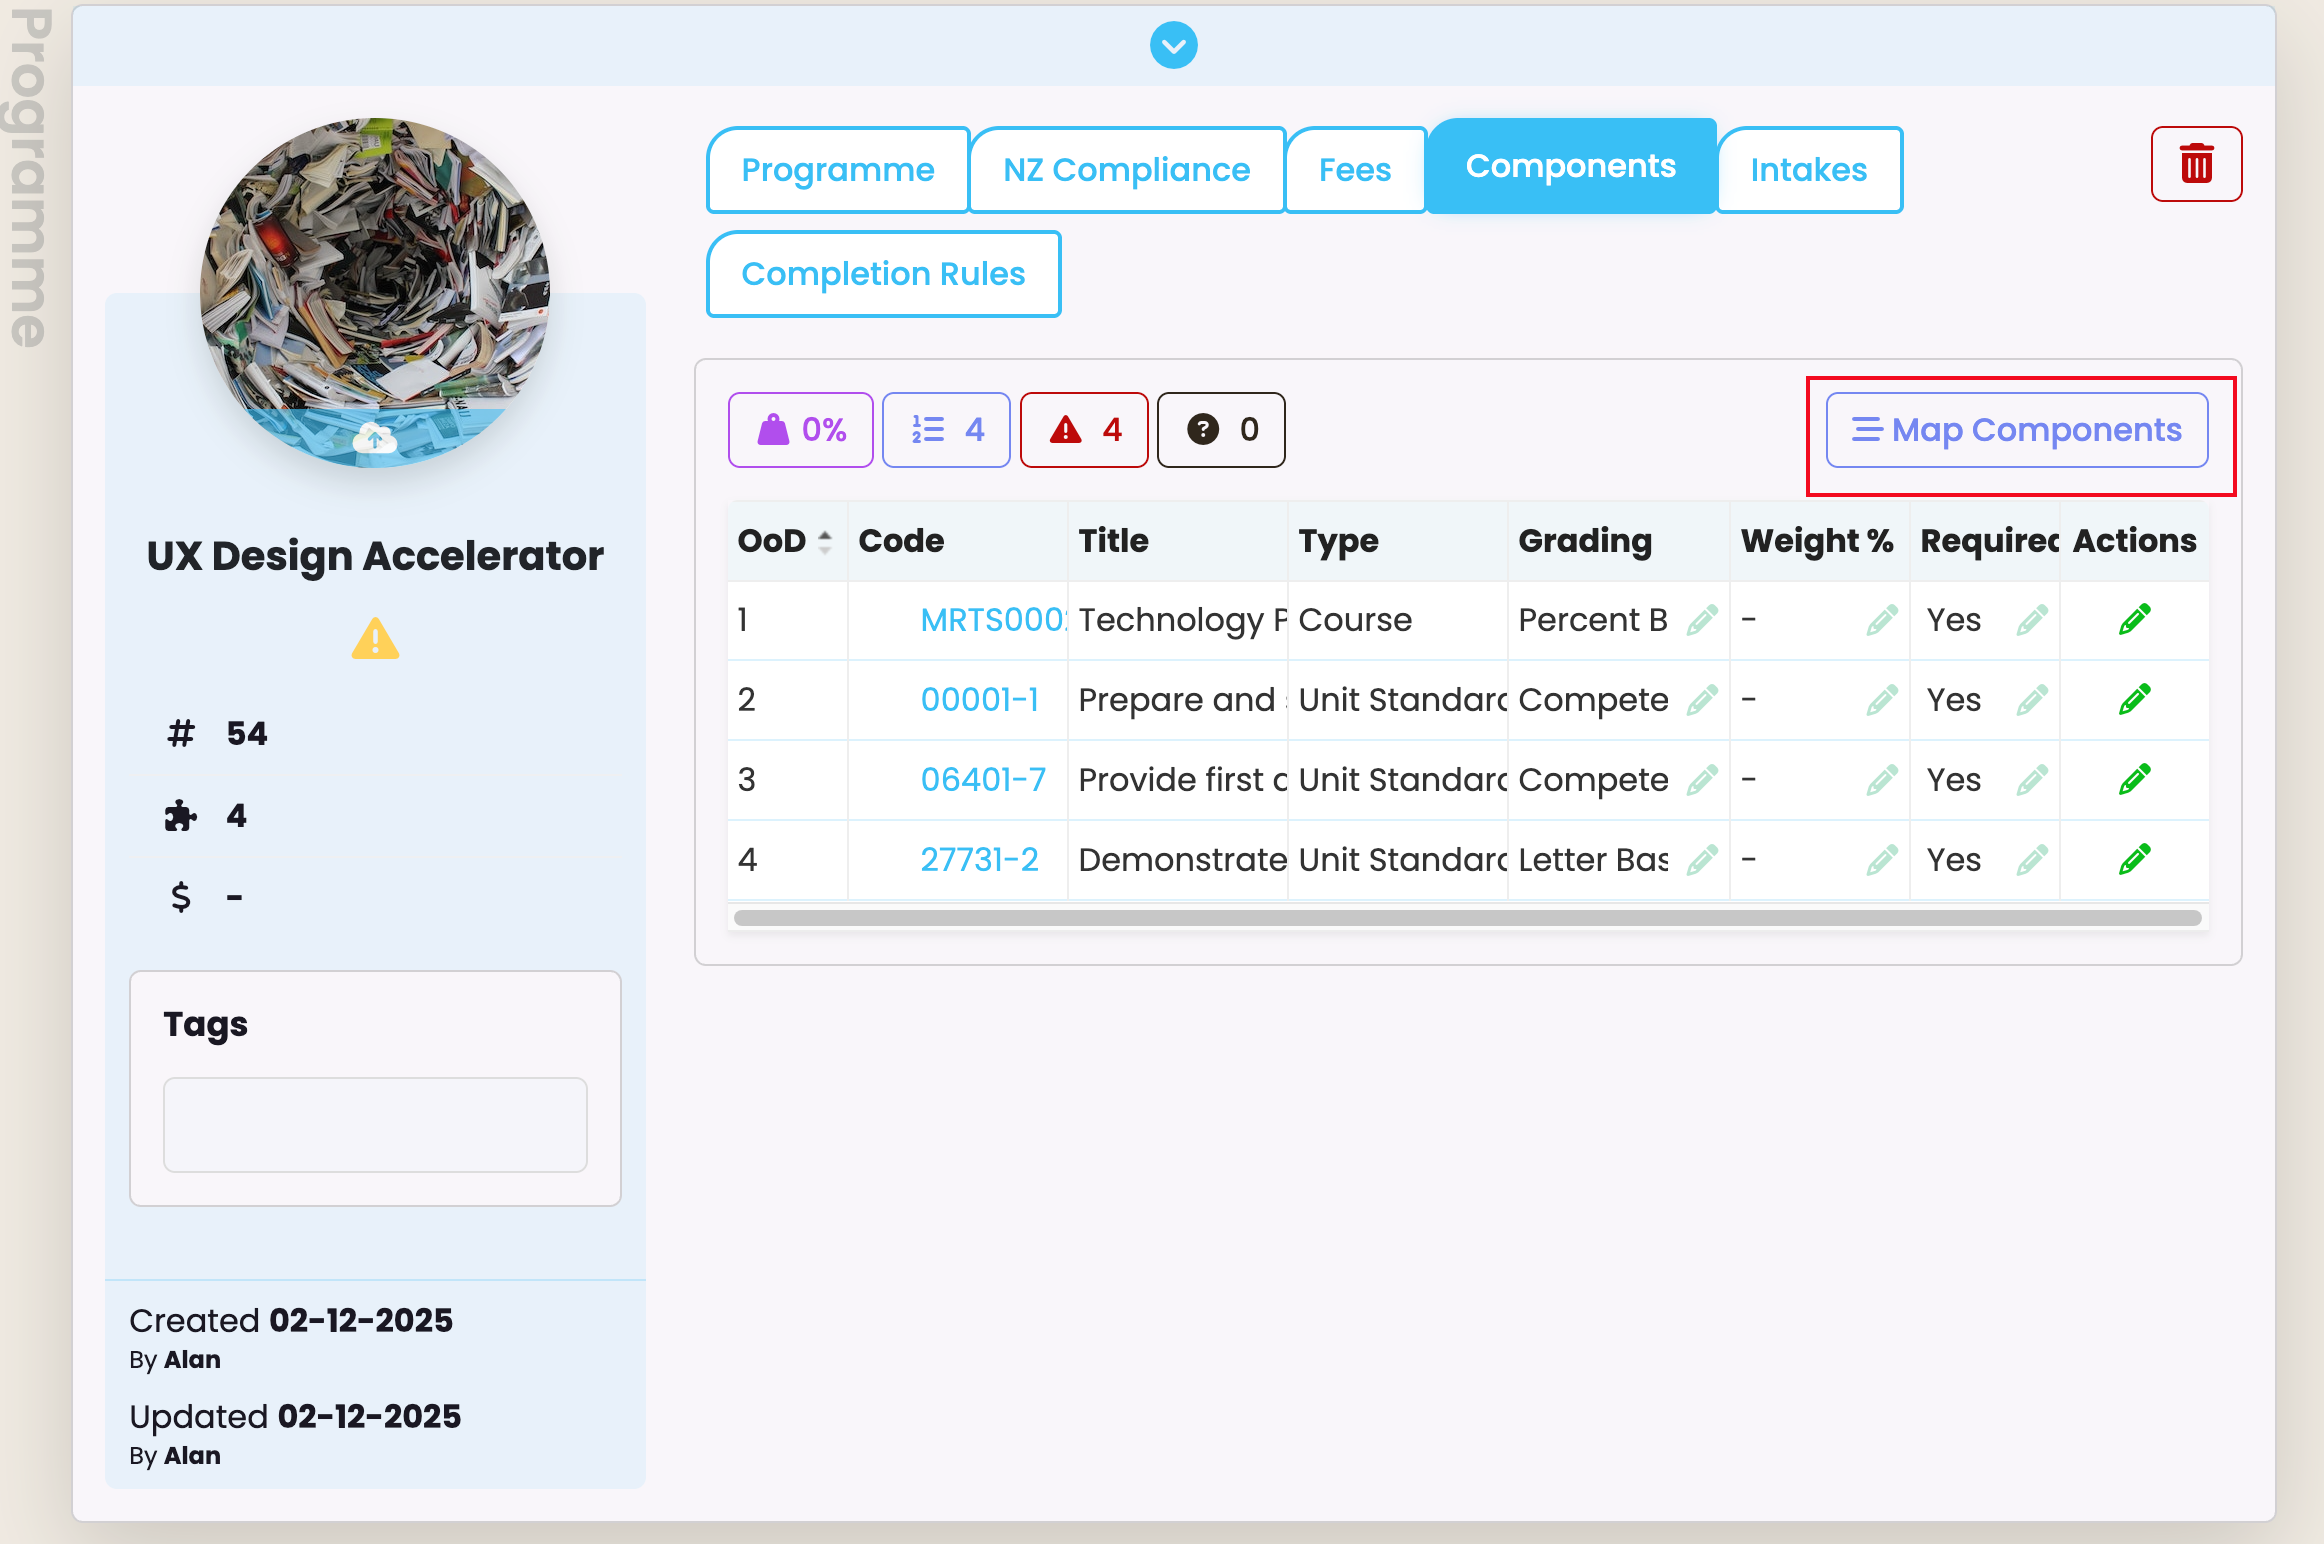
Map Components
Navigate to the “Map Components” button and click it to open a pop-up selection (Figure 8.).
Figure 8. The “Map Components” button (red) is used to add or remove components.
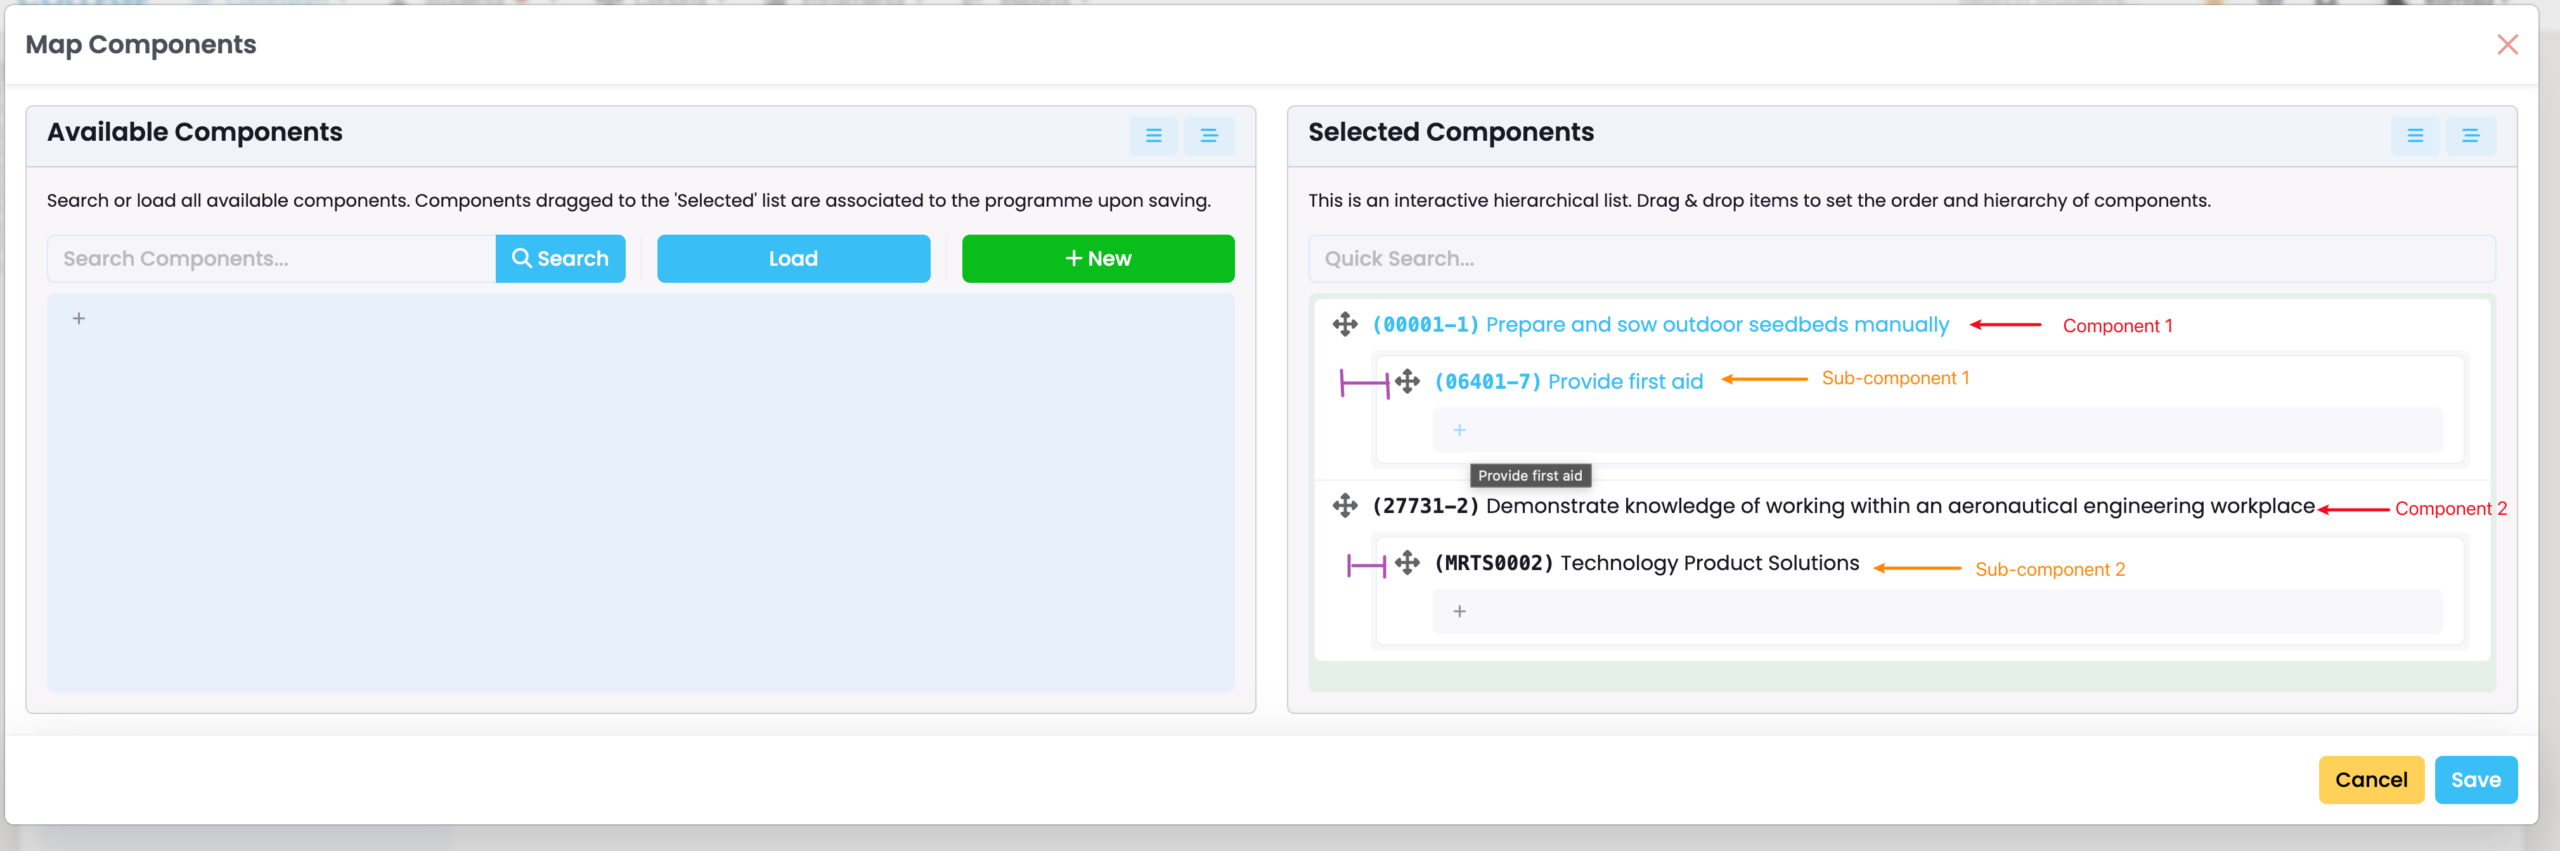
Search for “Available Components” in the left column, and drag and drop them into “Selected Components” on the right, to add components to the Programme (Figure 9i.).
You can reorder selected components from top to bottom according to the order of delivery of your course components.
If you would like to remove components from the Programme or reverse your additions, simply drag the components from the “Selected Components” column back to the left column (Figure 9i.).
Notes:
- Dragging a component over another (X) transforms it into a subcomponent of X, which is indicated by indentation on the list (Figure 9ii.).
- Removing components will only affect the Programme and future Intakes and Enrolments. It will not apply to previously created intakes and enrolments associated with the programme.
Figure 9i. The Map Components function enables the addition (red) and removal (blue) of components between two columns.
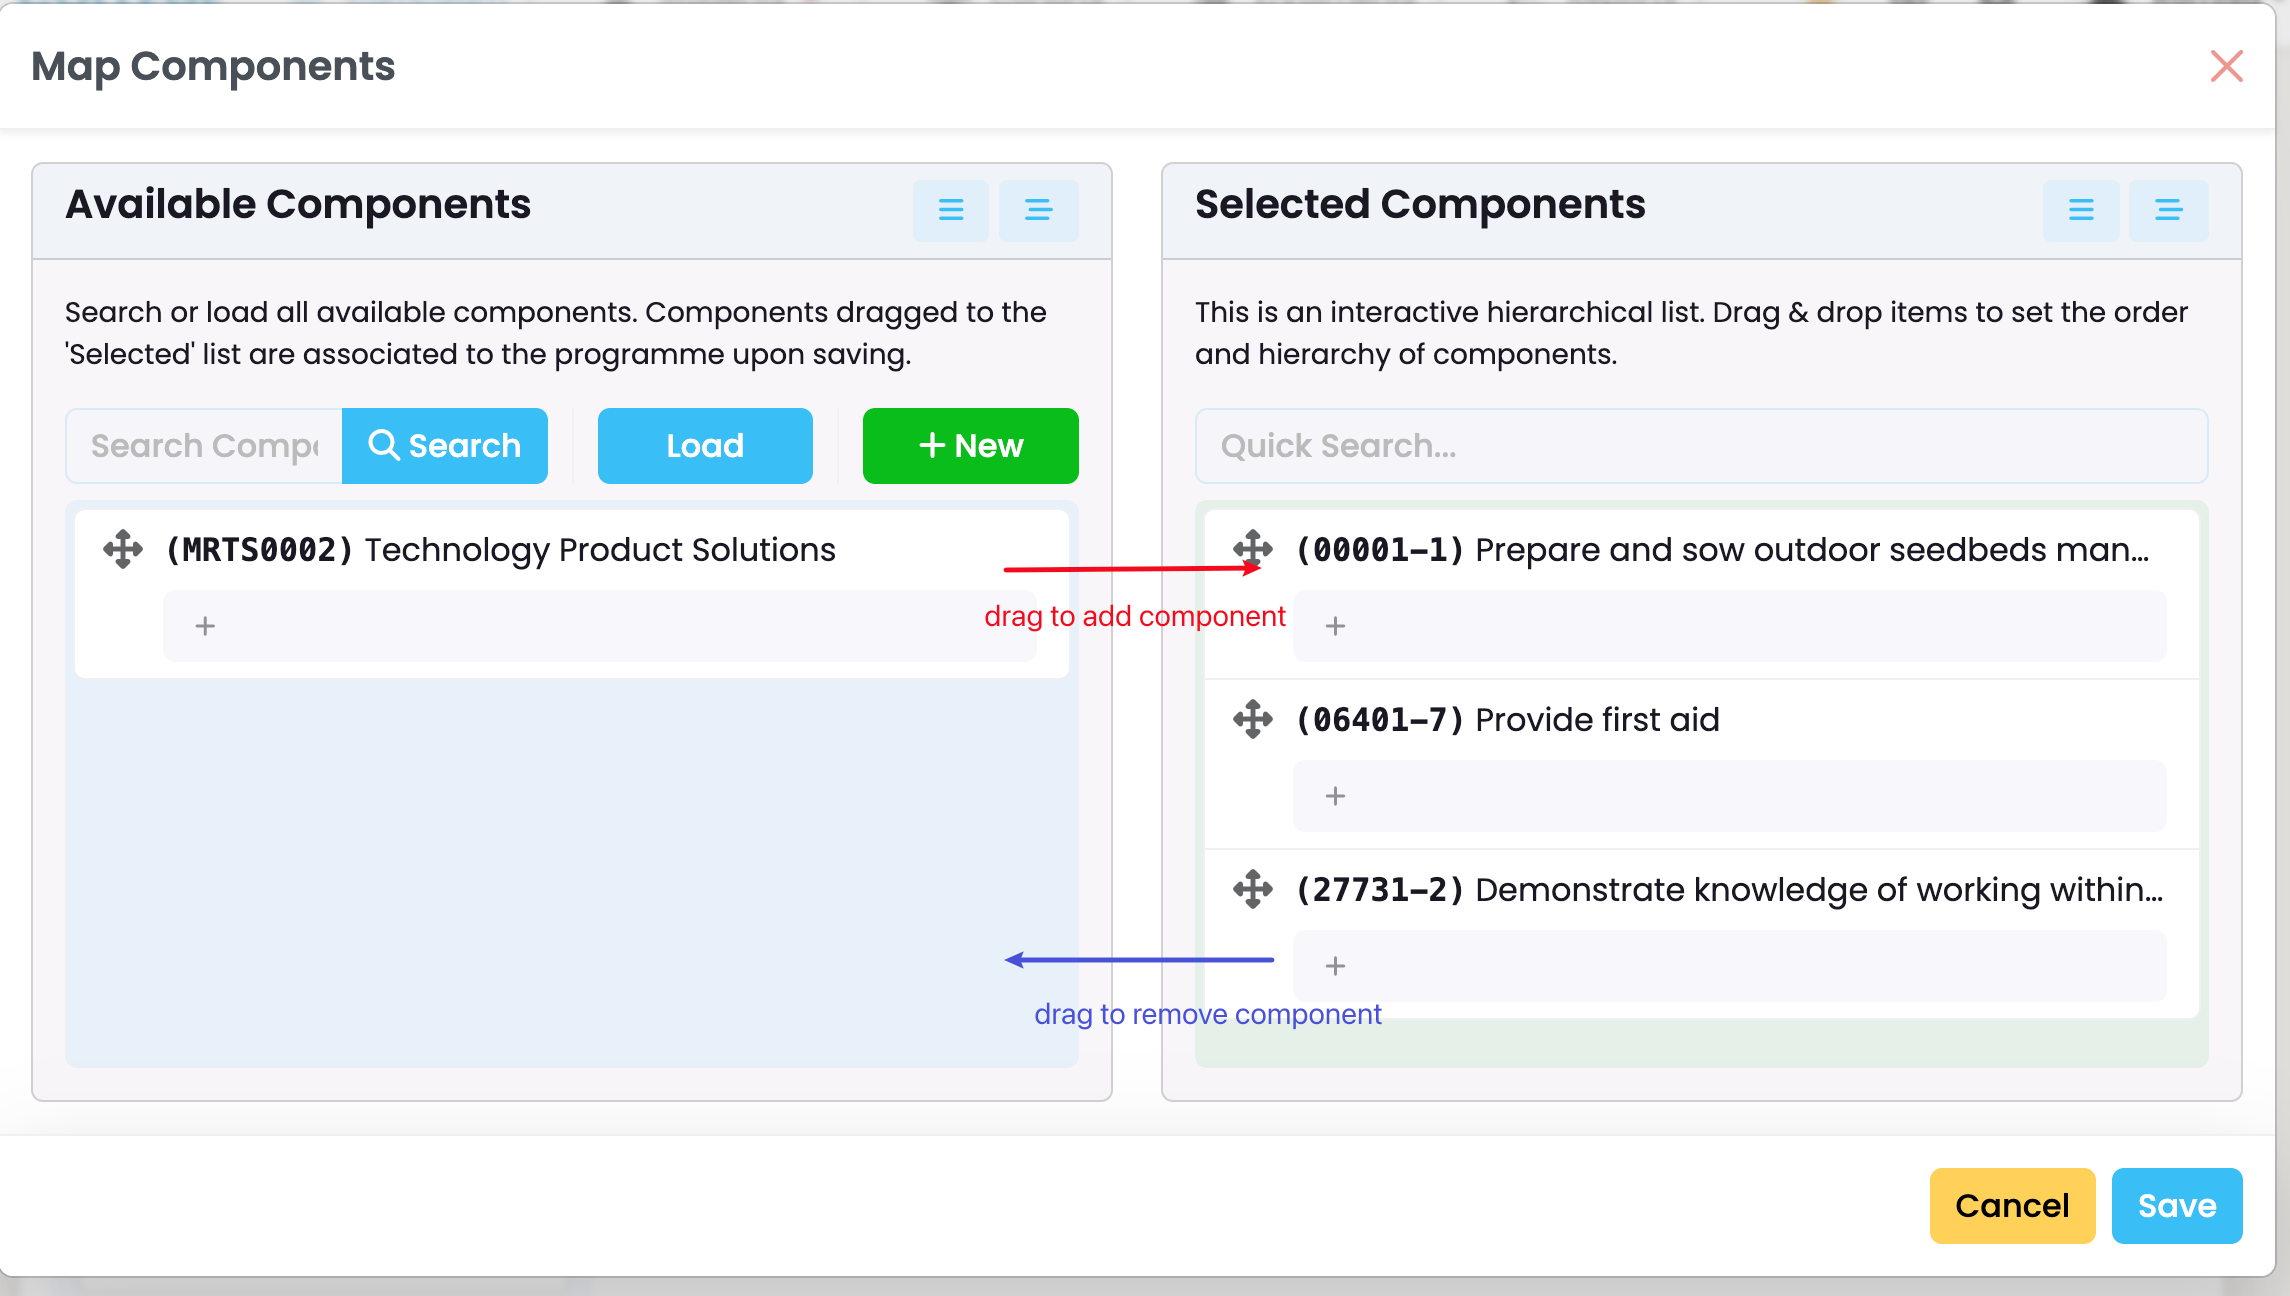
Figure 9ii. Dragging a component (red) into another creates subcomponents (orange). The subcomponent is distinguishable from the main component by an indent (purple).
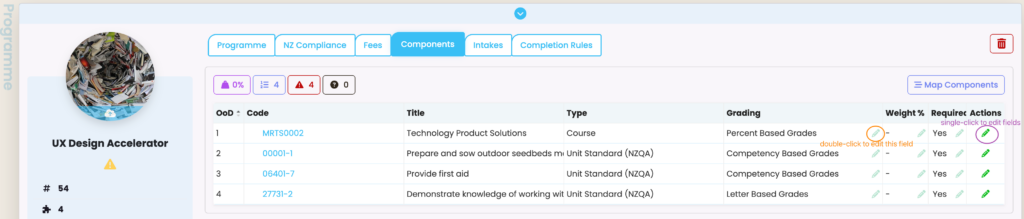
Once your components have been saved to your programme, you will see a component grid table where “Grading”, “Weight %” and “Required” can be edited (Figure 10.).
Figure 10. A grid-table display of components where specific fields with greyed-out pencil icons (orange) can be edited with a double-click. Alternatively, single-click the green pencil icon under “Actions” to edit all fields for a single component (purple circle).
Note: Please avoid deleting items such as programmes, components, students, enrolments or intakes. Update to inactive status when possible.
Programme | Intakes Tab
View and Assign Intakes
To create and assign a new intake to your programme, click on the Intakes tab and select “+Add”. Then fill out the required fields and click “Create”. (Figure 11.).
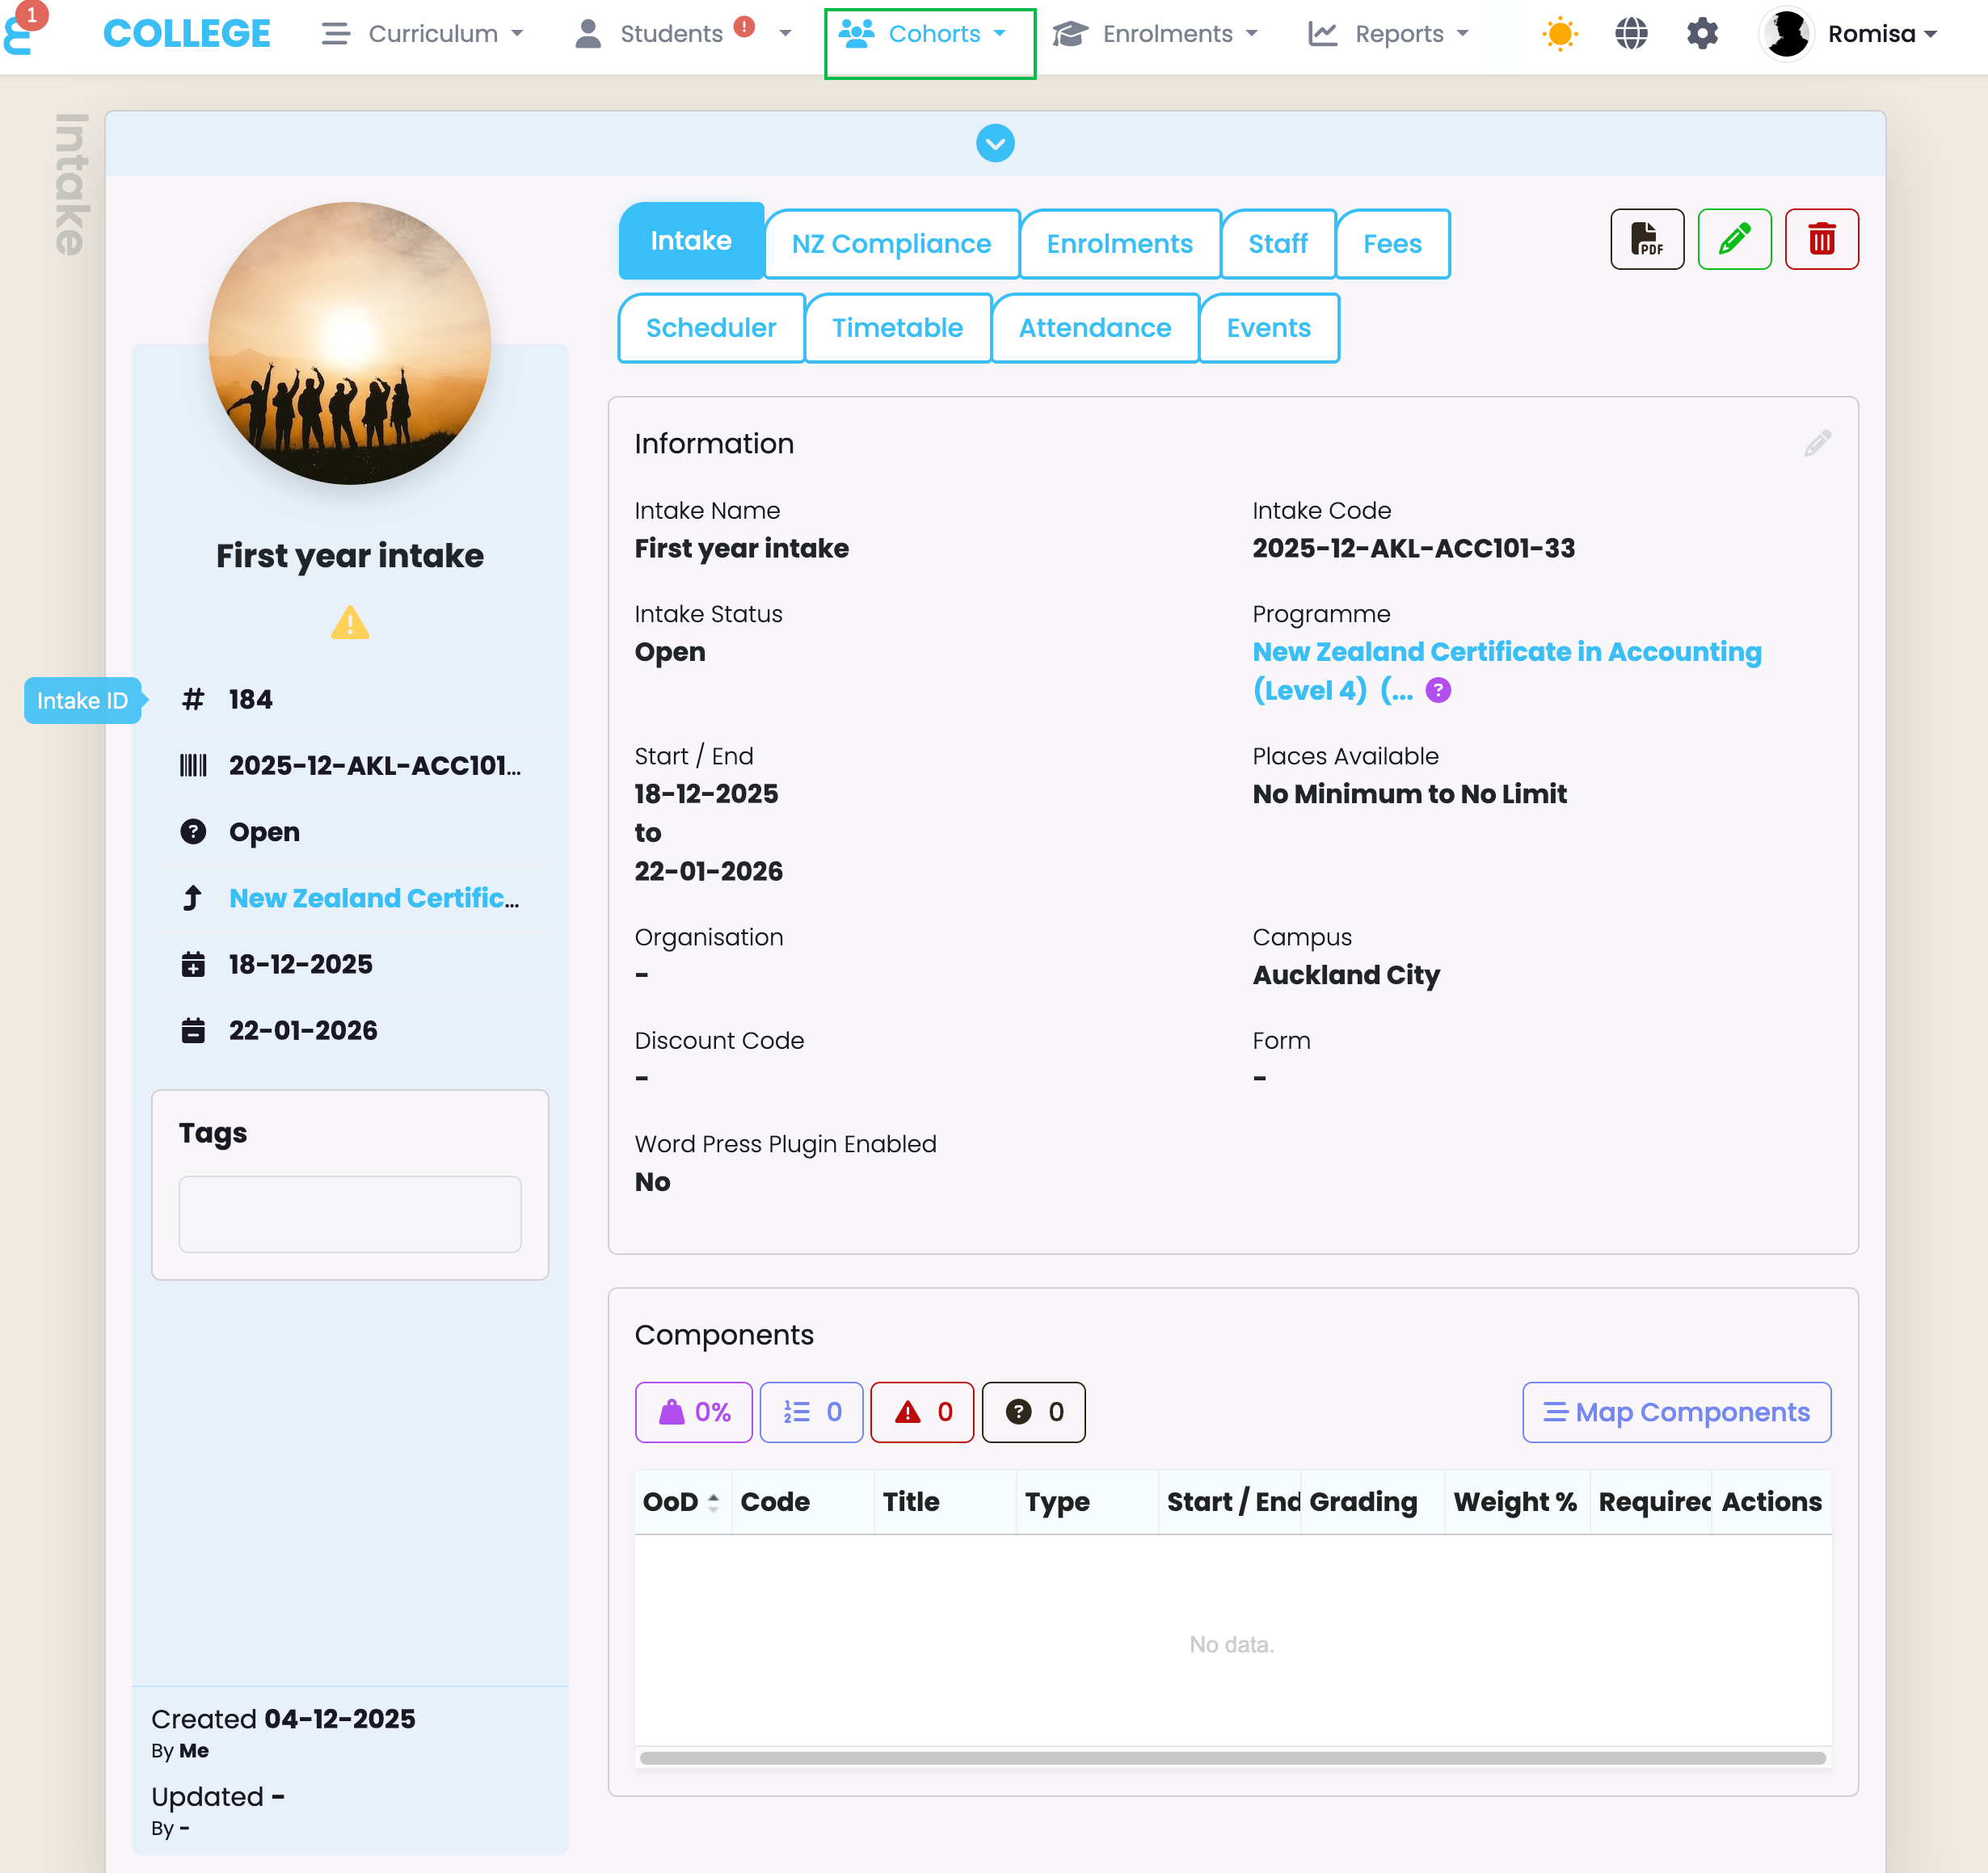
The Intake profile that appears with its saved information now belongs to the Cohorts object, seen in the top navigation bar (Figure 12.).
Notes:
- Intakes can also be allocated via Cohorts.
- The “end date” is calculated automatically based on the start date you provide and the length of the programme.
Figure 11. The Intakes tab (top blue circle) and the button to add an intake (bottom blue circle)

Figure 12. A newly created intake from Programmes displays as a page under Cohorts, as it is saved there, too.