The Form Manager allows you to create your own Enrolment or Enquiry Forms within SELMA, if you have it included in your subscription plan.
- Note: Please contact SELMA Support to subscribe to the Form Manager, if you haven’t already. Then, read the Wiki articles in this section, to guide you on form creation.
The following article guides you to create an Enrolment form, which creates a Student within SELMA, along with their submitted information.
In this Section:
- Enrolment Form Pre-Requisites
- Enrolment Form: Submission Outcomes
- Enquiry Form Pre-Requisites
- Enquiry Form: Submission Outcomes
- Create a Digital Form
- Stripe Integration
- Form Configuration
- Saving and Publishing
- Returning Students
Enrolment Form Pre-Requisites
There are essential form fields that should be included in your Enrolment form, to ensure basic Student identification is recorded. SELMA will not allow you to publish the form if it does not include the following required fields, under the Student Form Field:
- First Name
- Primary Email
- Interested in Intake
Enrolment Form: Submission Outcomes
Enrolment Form Submissions generally save new data into SELMA. However, the way in which this is done depends on whether the applicant is new or returning:
- Submissions from new applicants
- A unique Student record is created with Status “Enrolled”
- An Enrolment is created on the Intake that the applicant selected on the form.
- Submissions from returning students
- The existing Student record is updated
- An Enrolment is created on the Intake that the applicant selected on the form.
Enquiry Form Pre-Requisites
There are essential form fields that should be included in your Enquiry form, to ensure basic Student identification is recorded. SELMA will not allow you to publish the form if it does not include the following required fields, under the Student Form Field:
- First Name
- Primary Email
.Enquiry Form: Submission Outcomes
Enquiry Form Submissions generally save new data into SELMA. However, the way in which this is done depends on whether the applicant is new or returning:
- Submissions from new applicants
- A unique Student record is created with Status “Enquiry”
- Submissions from returning students
- The existing Student record is updated
Create a Digital Form
Figure 1. Navigate to Settings > Form Manager
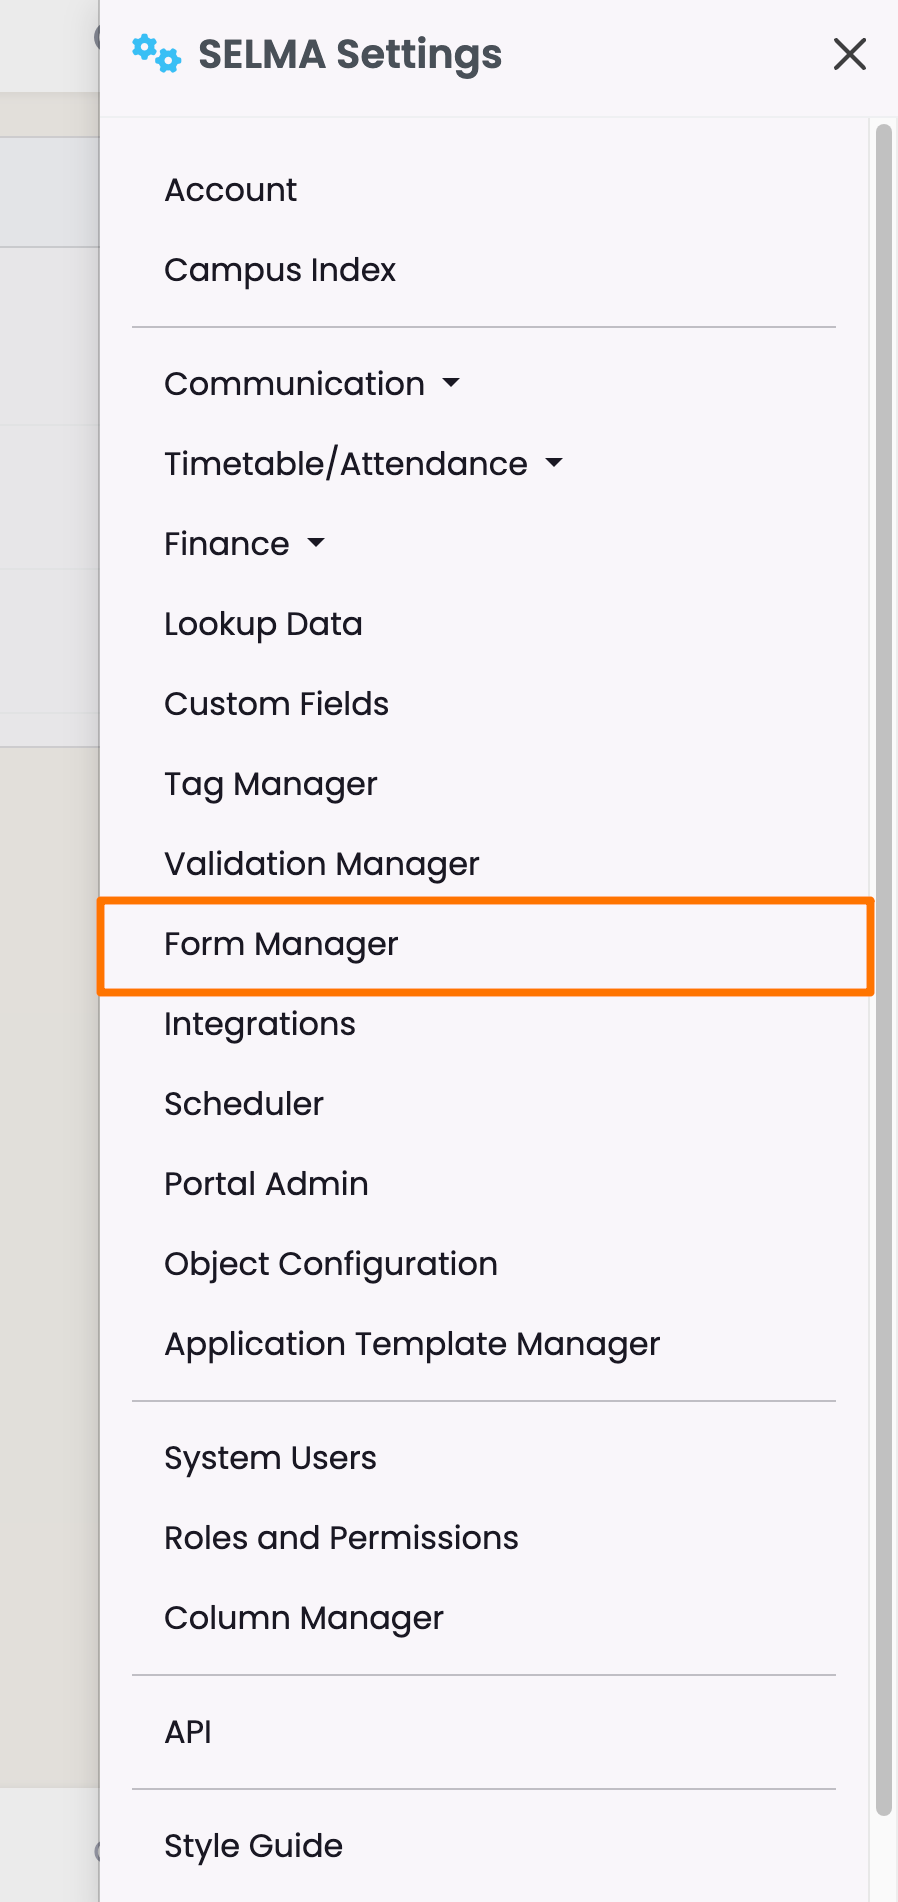
Figure 2. Create New Form
Click the “+” button (green) to create a new form.
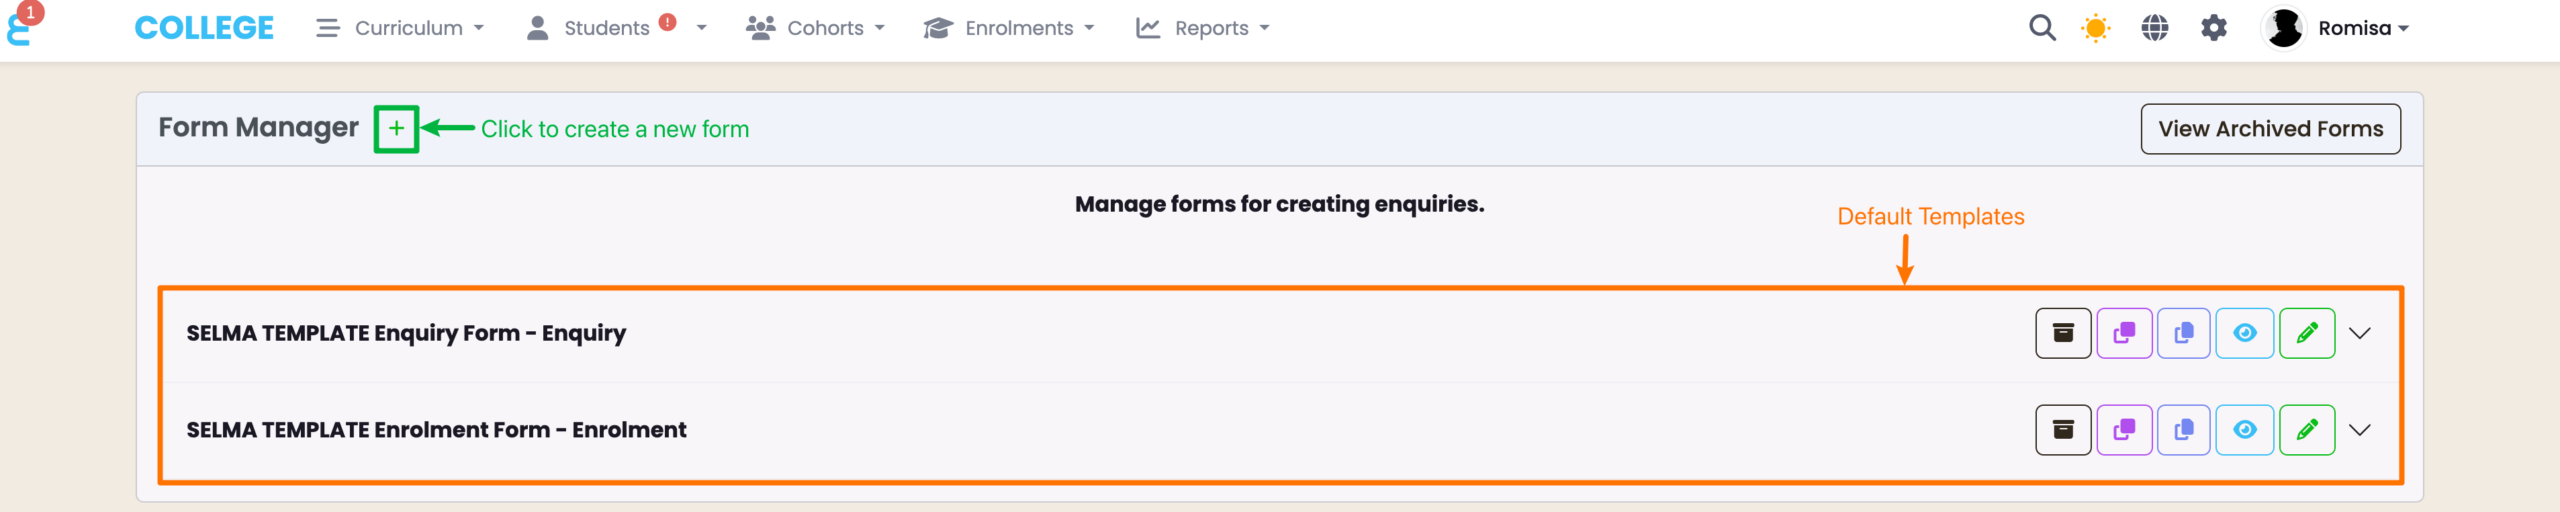
Figure 3. Add Required Details and Specify Form Type
Provide the required details, as indicated by red asterisks.
NOTE: You must ensure the Form type is correctly set to “Enrolment” or “Enquiry” based on the desired outcome. Once created, form type cannot be changed. If the wrong type is selected, you must create a new form.
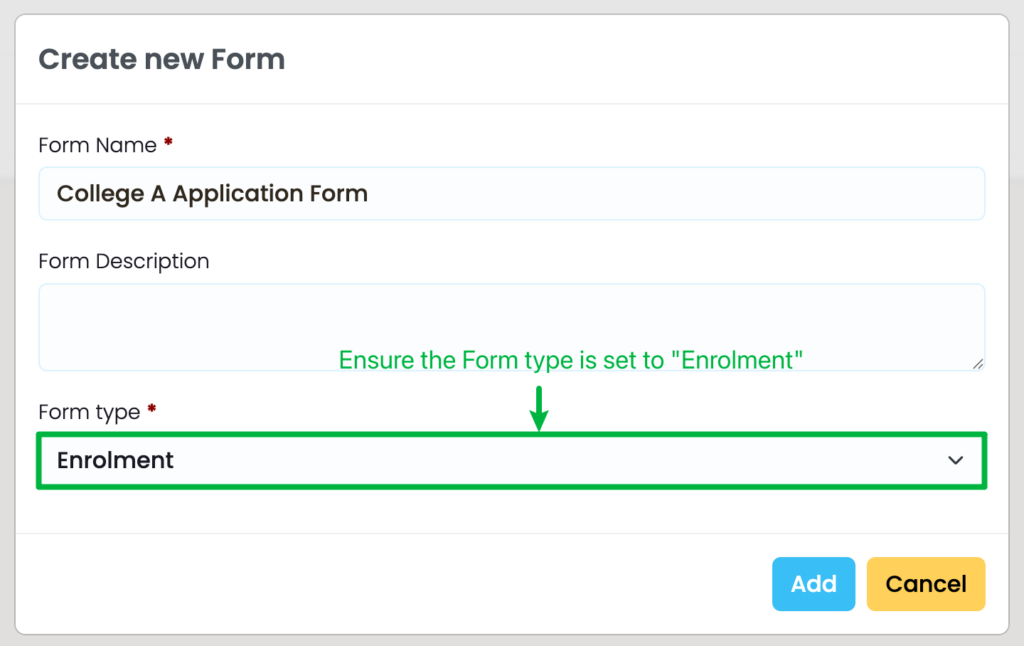
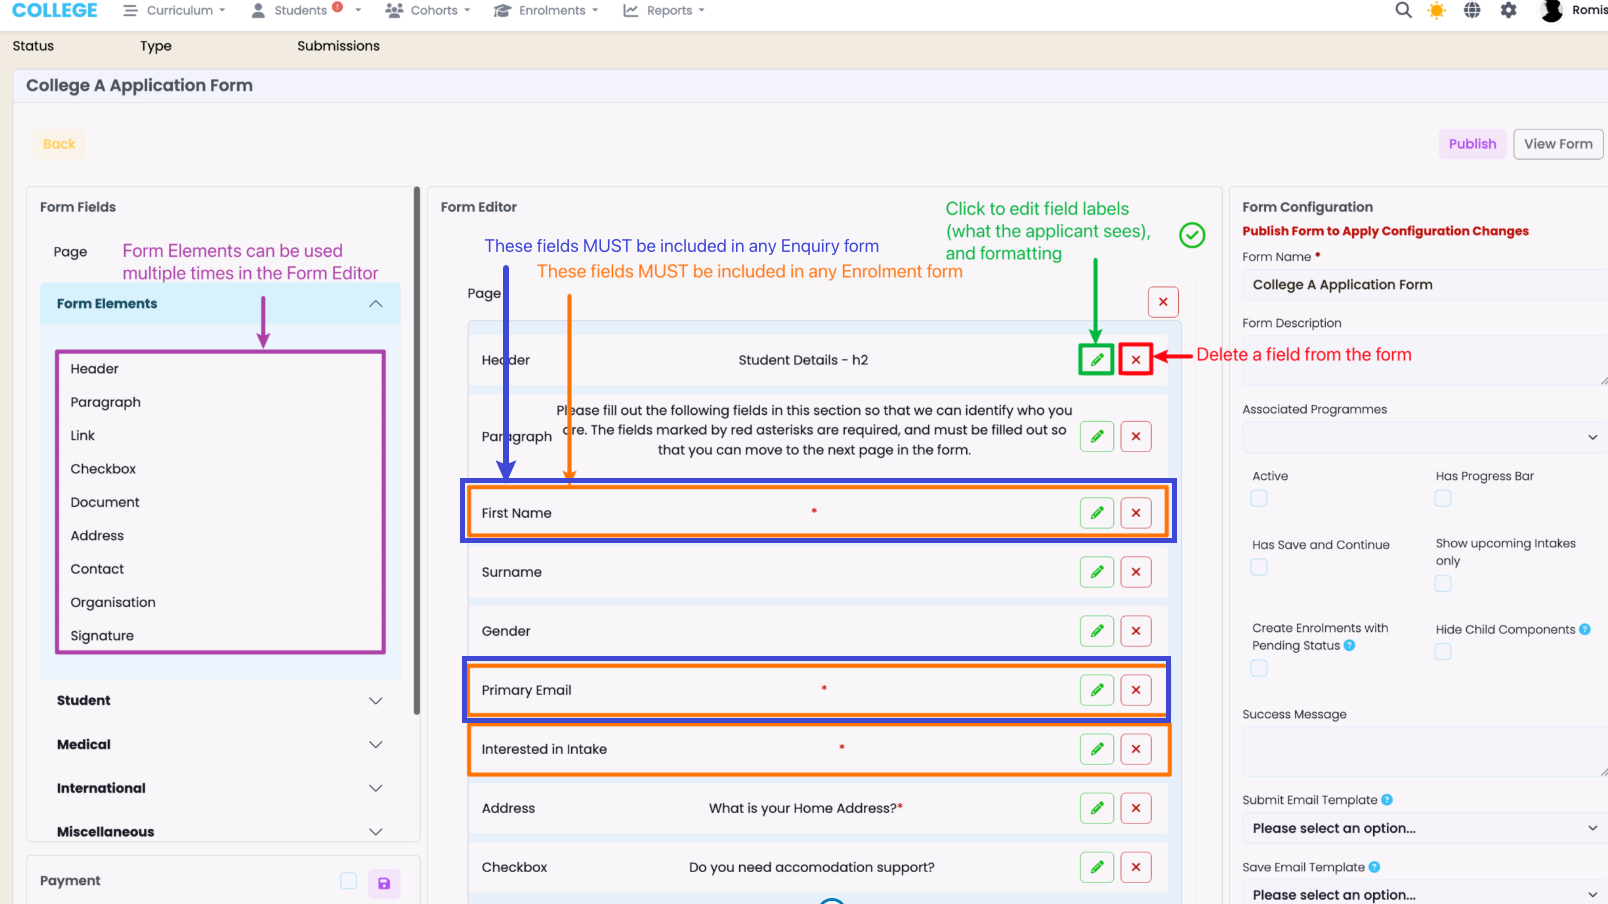
Figure 4i. Add Pages and Form Fields to the Form Editor
From the left panel titled “Form Fields”, drag and drop “Pages” to the Form Editor. Then, add “Form Elements“.
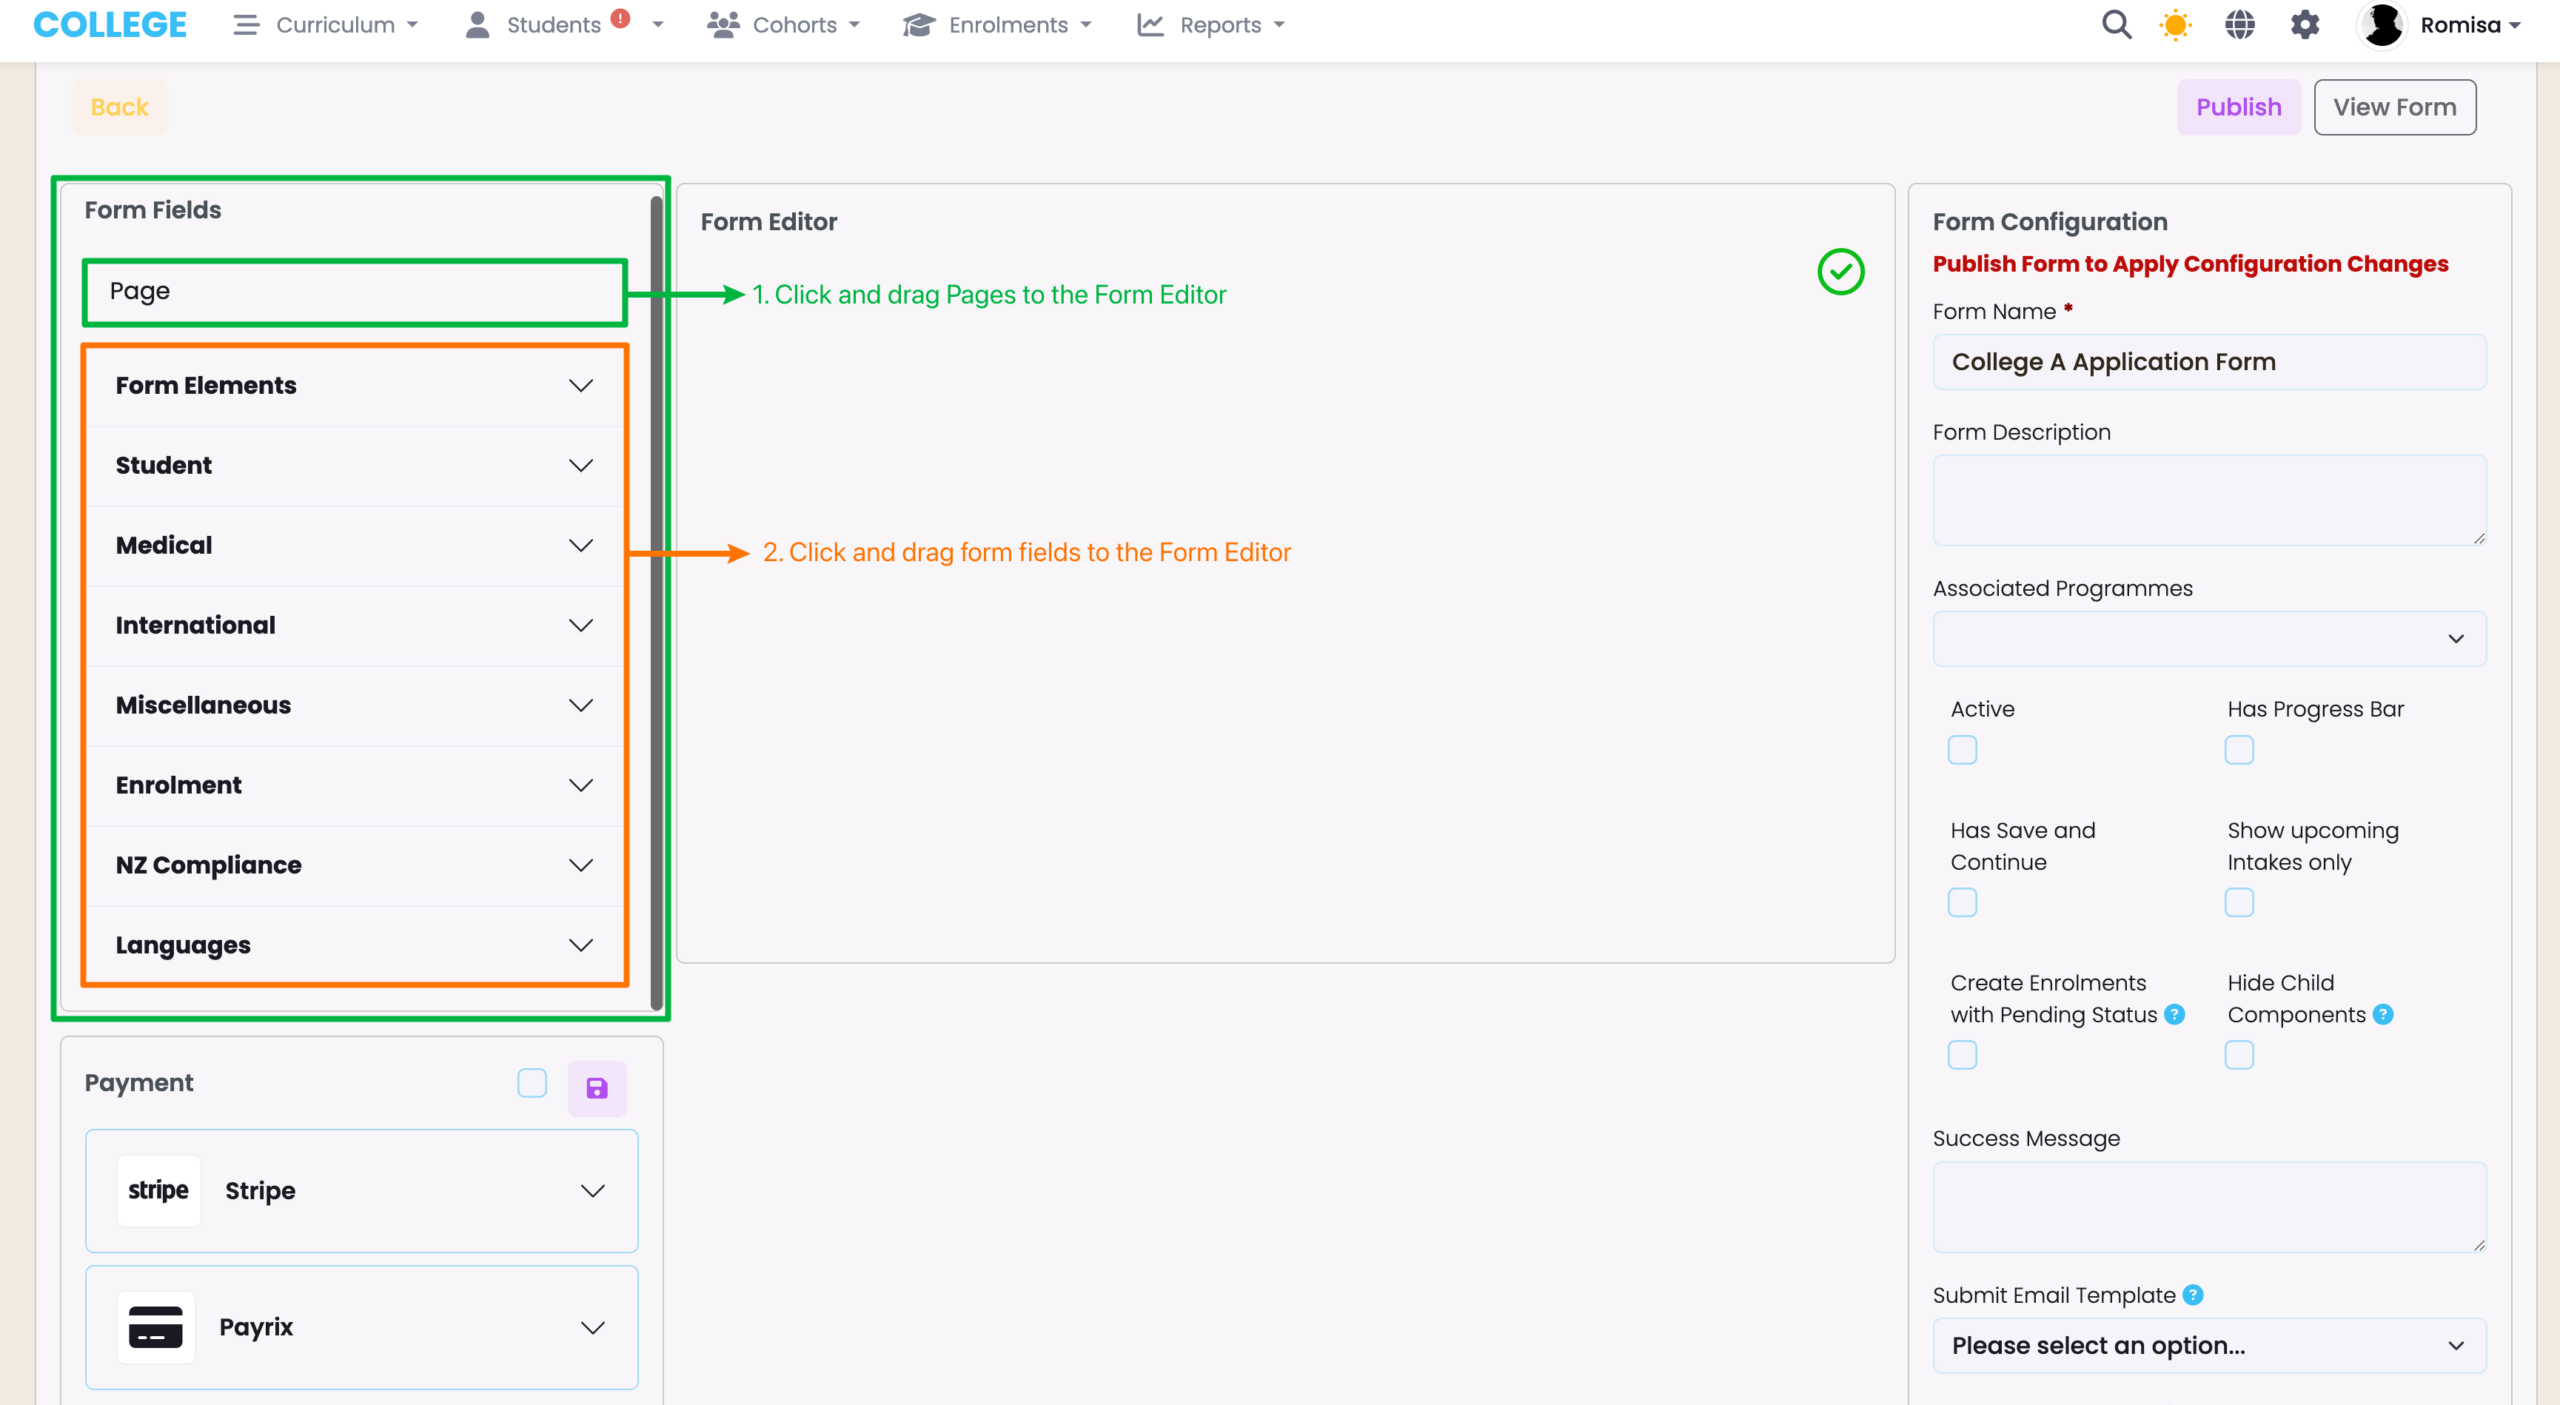
Figure 4ii. Form Elements and Other Form Fields
Form Elements can be used repeatedly within the form (purple), while all other form fields (including Custom Fields) can be added once. Please make sure you include the pre-requisite Student fields for the form to be published (orange).
- Please refer to System Settings – Custom Fields to use Custom Fields in the form. You must create the Custom Fields under “Student”, after which you will see a dedicated dropdown section appear at the bottom of the Form Fields panel.
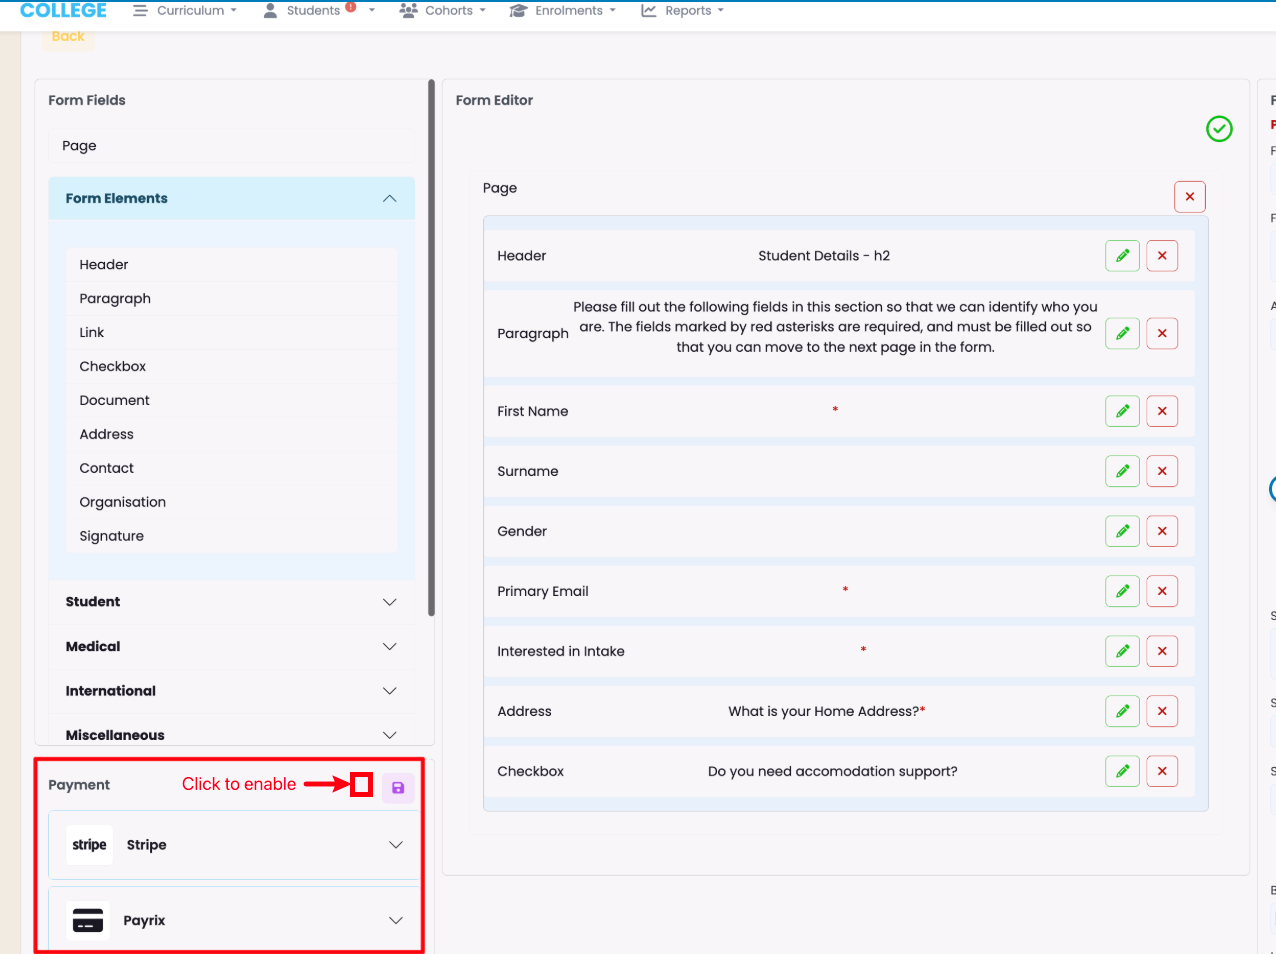
Stripe Integration
SELMA Forms of type Enrolment can integrate your Stripe account, so that an applicant can make a payment (not available on forms of type Enquiry).
The Stripe Integration is an additional paid feature to the Form Manager. It also requires intake fees to be previously configured.
- Please refer to Integrations – Stripe and Discount Codes for more information.
Figure 5. Payment Integration
Form Configuration
Figure 6. Configure: Activate and Link Programmes
Make sure to select the “Active” checkbox (orange), and include Associated Programmes (red) which the fields “Interested in Intake” and “Interested in Programmes” will fetch data from in SELMA.

Figure 7i. Configure: Progress Bar, Saving and Success
Add a “Save and Continue” button on the form (orange), and a “Progress Bar” (red). You can also customise the “Success Message” the applicant sees on submission.
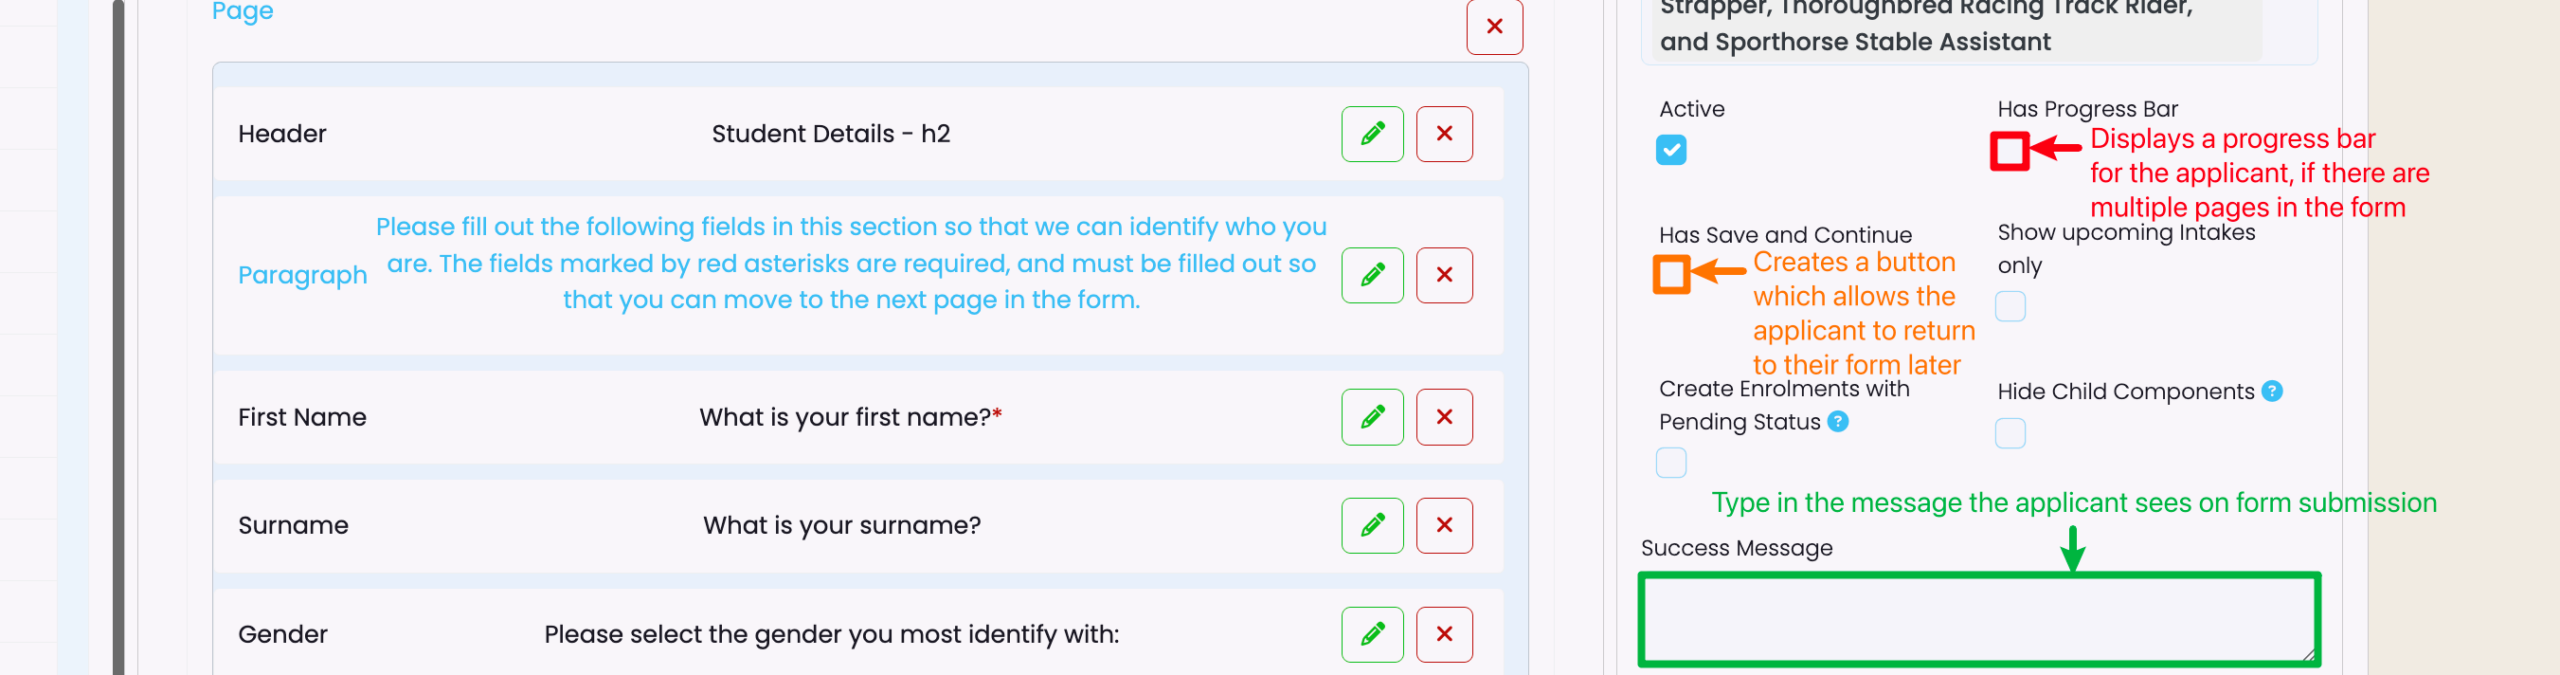
Figure 7ii. Default Success Message
If the “Success Message” text area is left blank, the applicant will see the following screen on form submission.
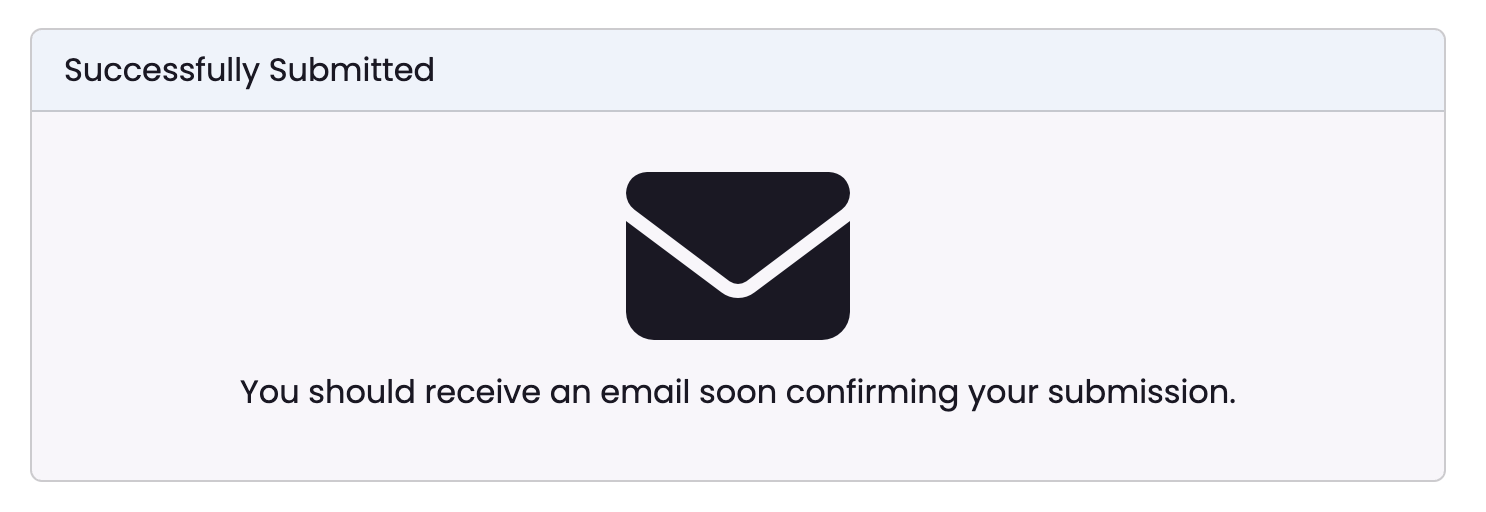
Figure 8. Customise Emails and Form Appearance
Please refer to System Settings: Communication Templates to assist you in creating Email Templates, which can be used here (green). You can also customise the background colour and CSS of the form (advanced).
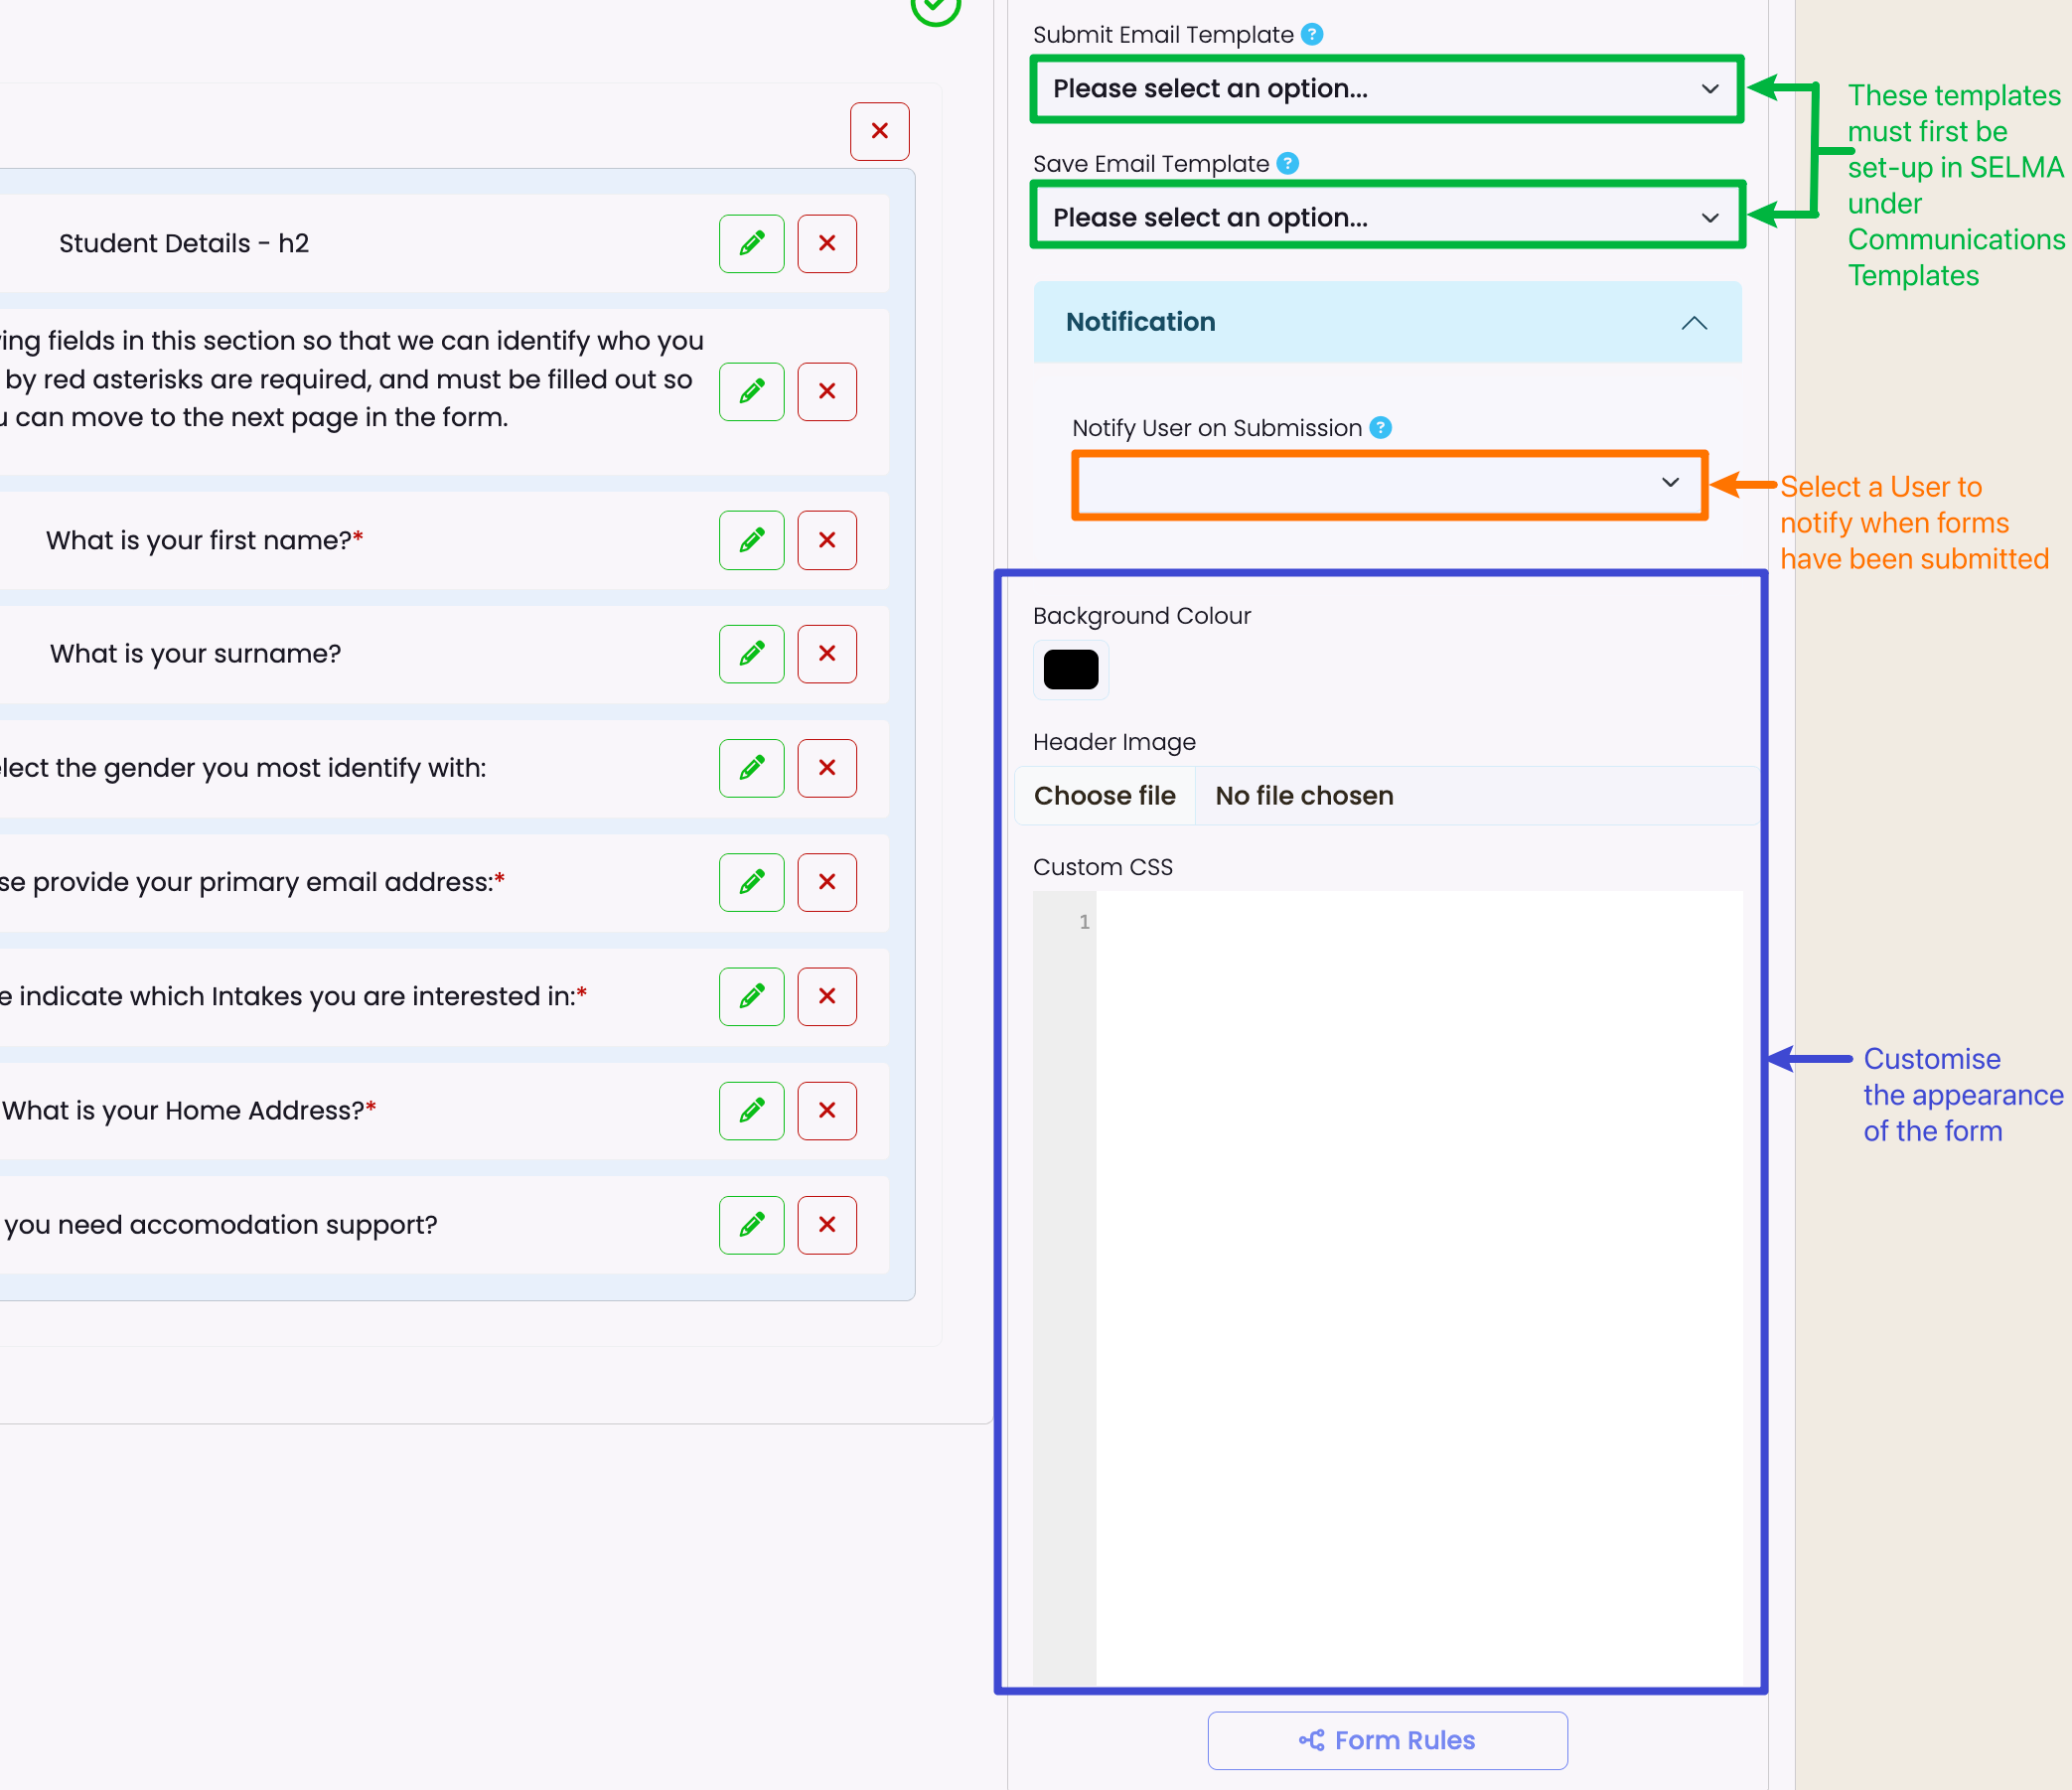
Attaching Automated Form Emails
Submit Email Template
A default email is always sent to applicants upon submission, if the “Submit Email Template” is left blank. The default text reads:
”Hi [First Name], thank you for your form submission, please find attached a PDF for your reference.”
If you wish to send a customised email, you will need to set-up a Communication Template, then select it, here.
- Please refer to Outbound Mails – Communication Templates for more.
Figure a. Select an Email Template
Choose a “Submit Email Template” which you have set-up under Communication Templates, previously. Doing so will ensure that the applicant receives an email of your choice, upon form submission.
Note: Applicants will always receive a PDF copy of their form submission, whether they choose to use an email template or not.

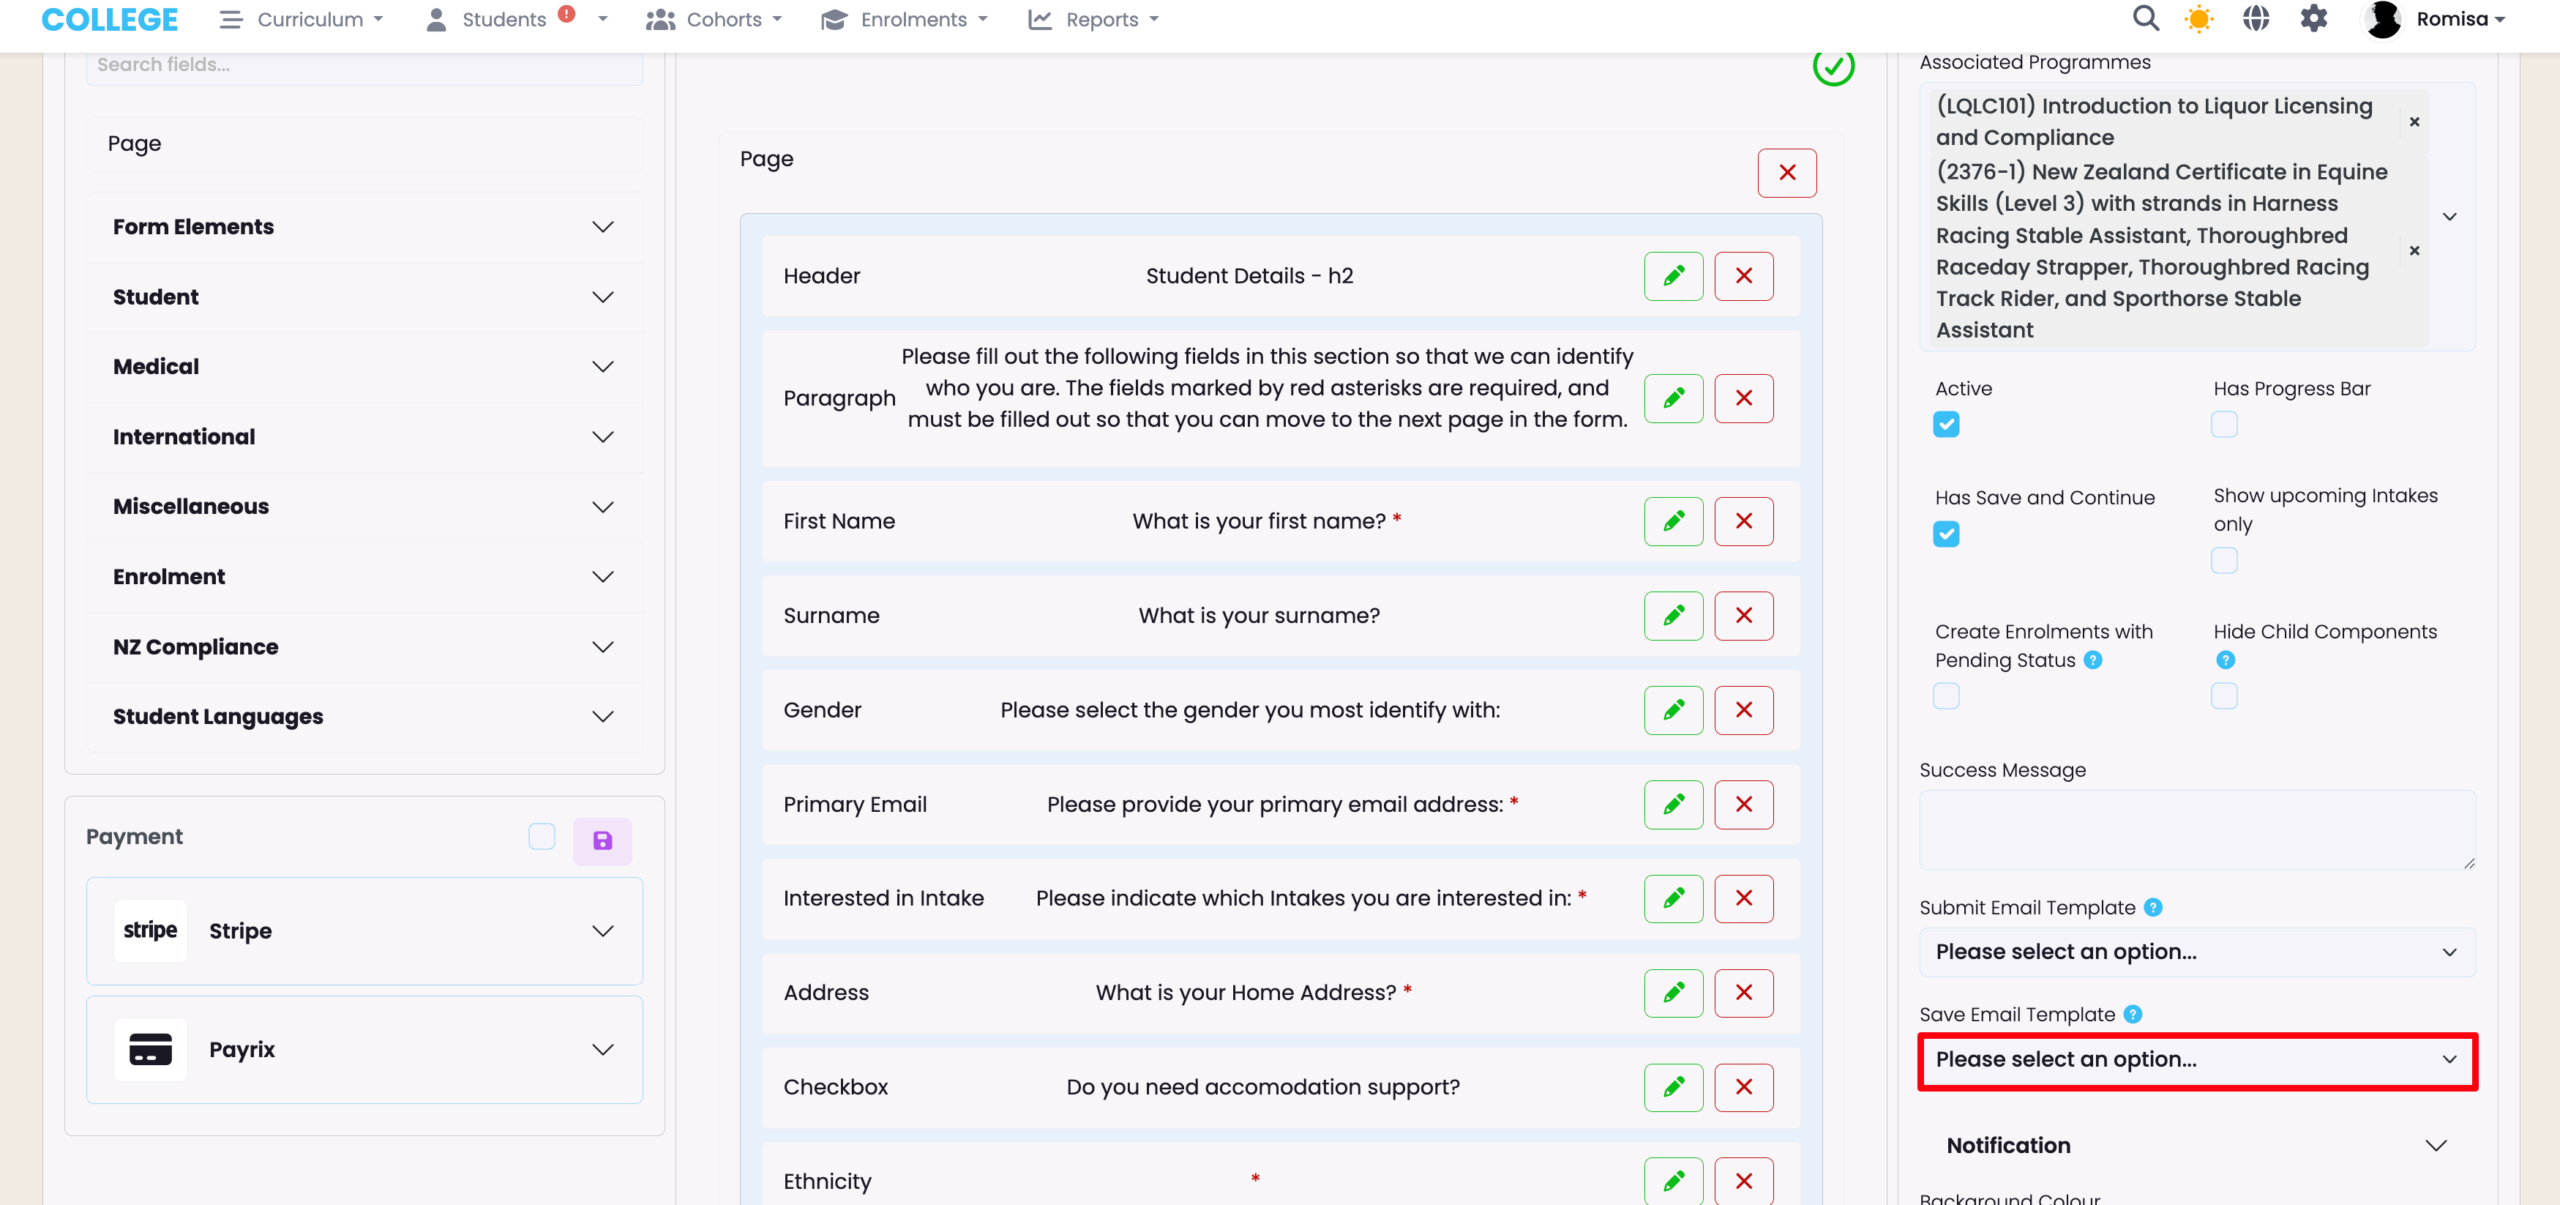
Save Email Template
Activates only if the setting “Has Save and Continue” is applied to the form.
A default email is always sent to applicants upon saving the form to complete later, if the “Save Email Template” is left blank. The default text reads:
“Hi [First Name], You can continue your submission anytime from [link]. Thanks, [School name].”
If you wish to send a customised email, you will need to set-up a Communication Template, then select it, here.
- Please refer to Outbound Mails – Communication Templates for more.
Figure b. Select an Email Template
Choose a “Save Email Template” which you have set-up under Communication Templates, previously. Doing so will ensure that the applicant receives an email of your choice, upon leaving the form to complete, later.
Save and Continue: Applicant Side
If you select the “Has Save and Continue” checkbox on a multi-page form, an additional button “Save and Continue Later” is displayed on the right bottom corner of the form, once the applicant has entered their primary email address.
This option allows the applicant to save a partial submission. A form submission with status “Pending” is created in SELMA.
Figure 9. Applicant may be required to Create a Login
By clicking on “Save and Continue Later” the new applicant will be prompted to set-up a login, if they don’t have one already.
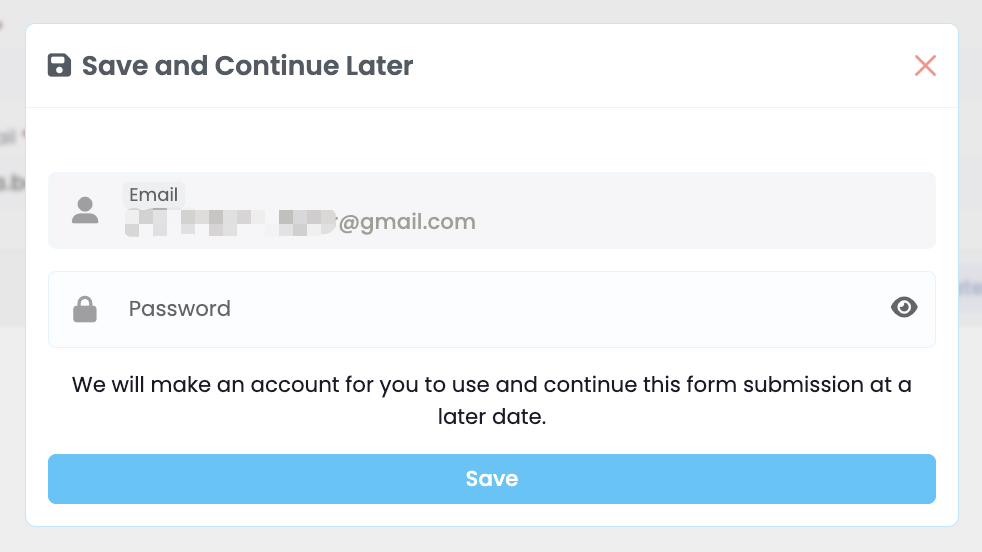
Figure 10. Applicant Must Click “Save”
The applicant must then proceed to click the “Save” button.
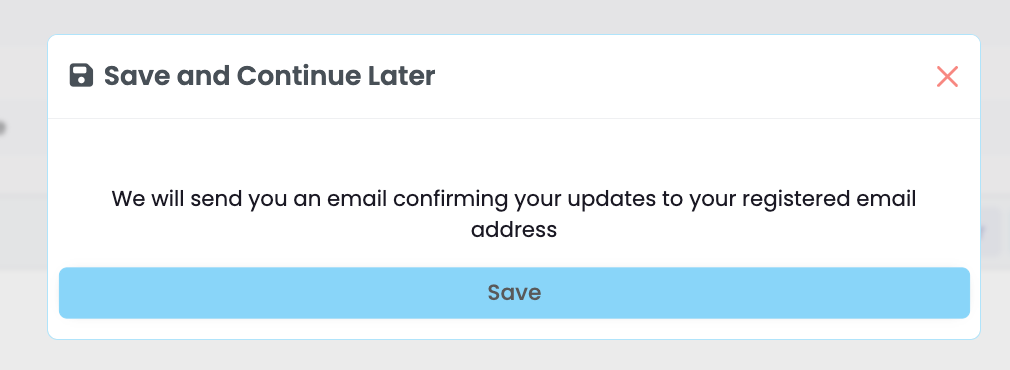
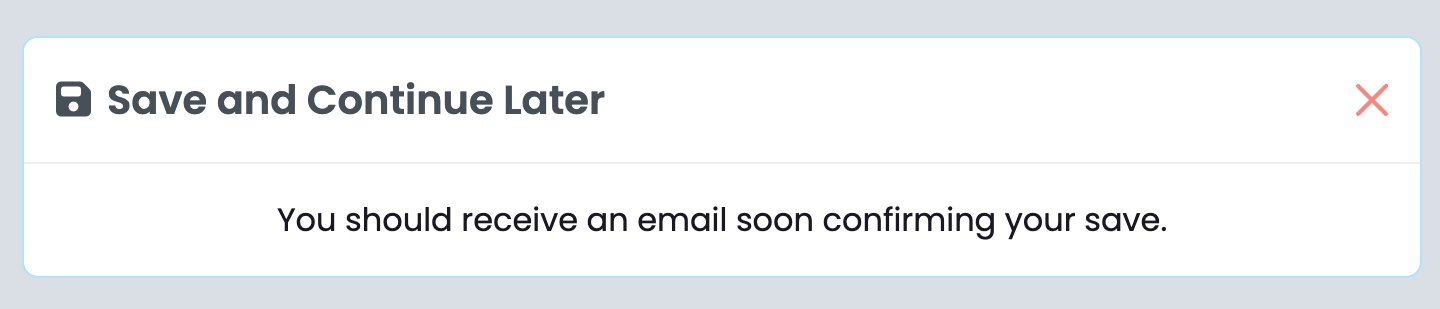
Figure 11. Confirmation Message
The final screen that the applicant sees.
Form Rules
On the Form editor, you can create rules or relationships between form fields, which perform an action or outcome.
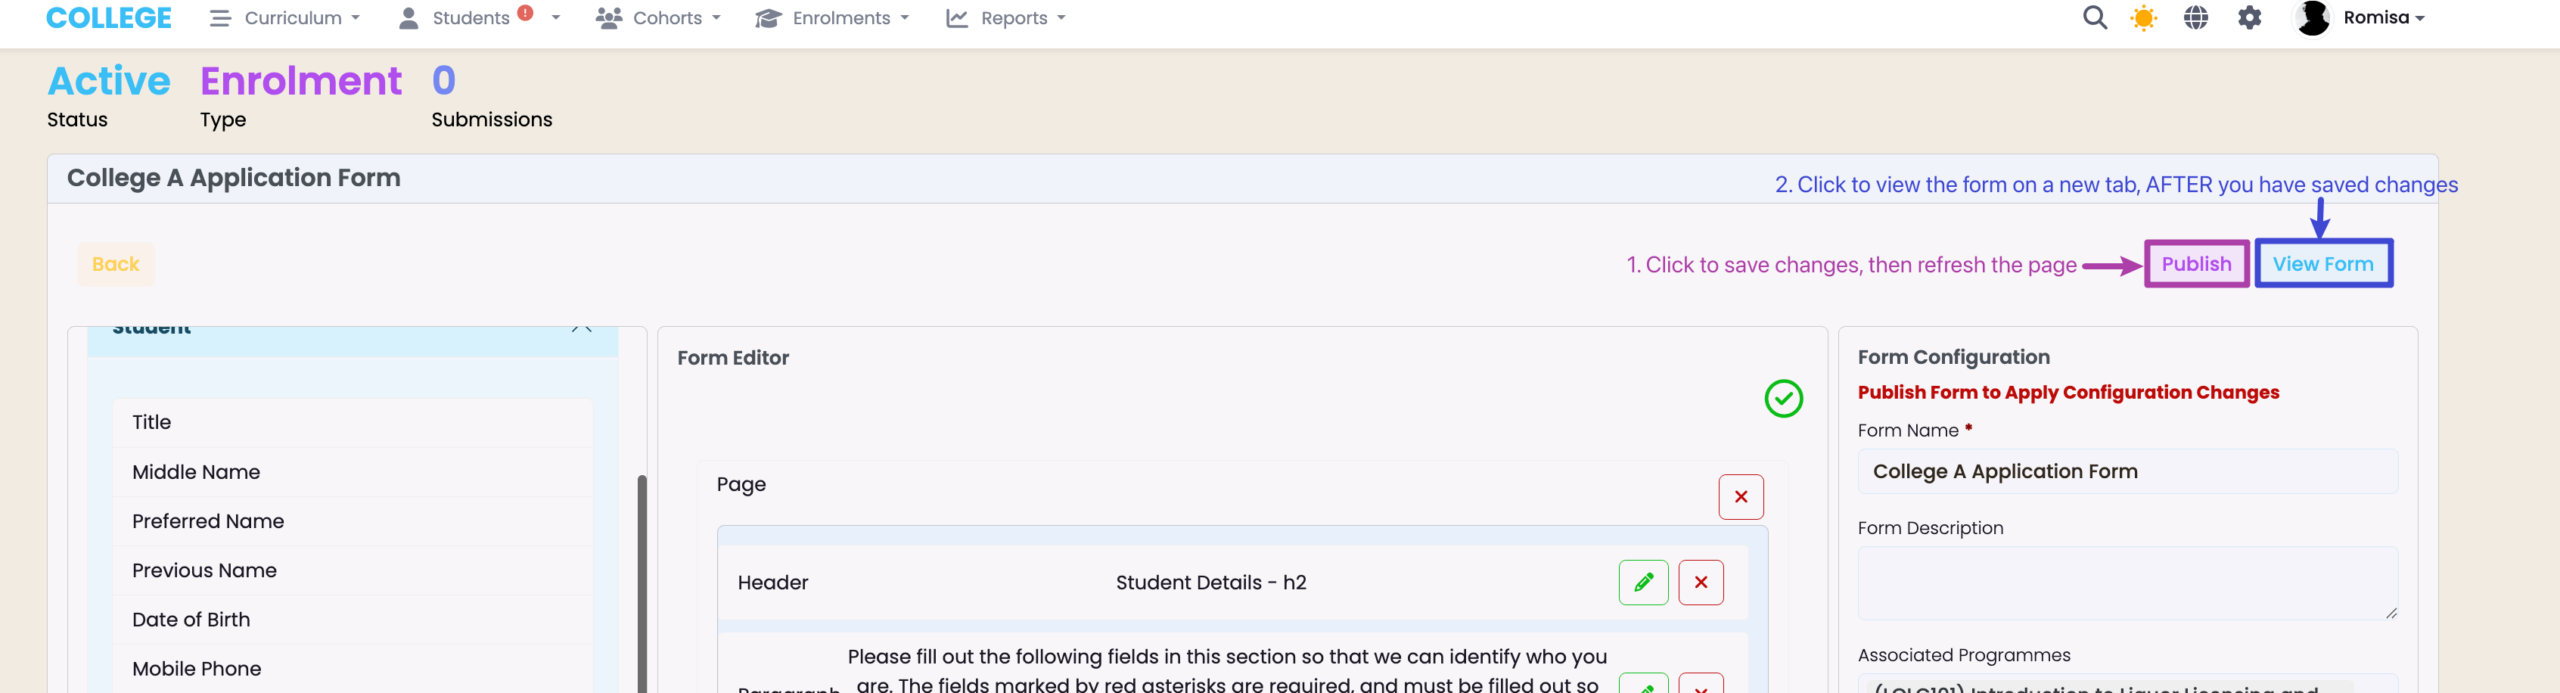
You can then test the form rules by opening an incognito window of the form, (click “View Form” at the top right of the form builder), and filling in the details as an applicant.
- Note: Please remember to save your changes by clicking “Publish” before you test the form.
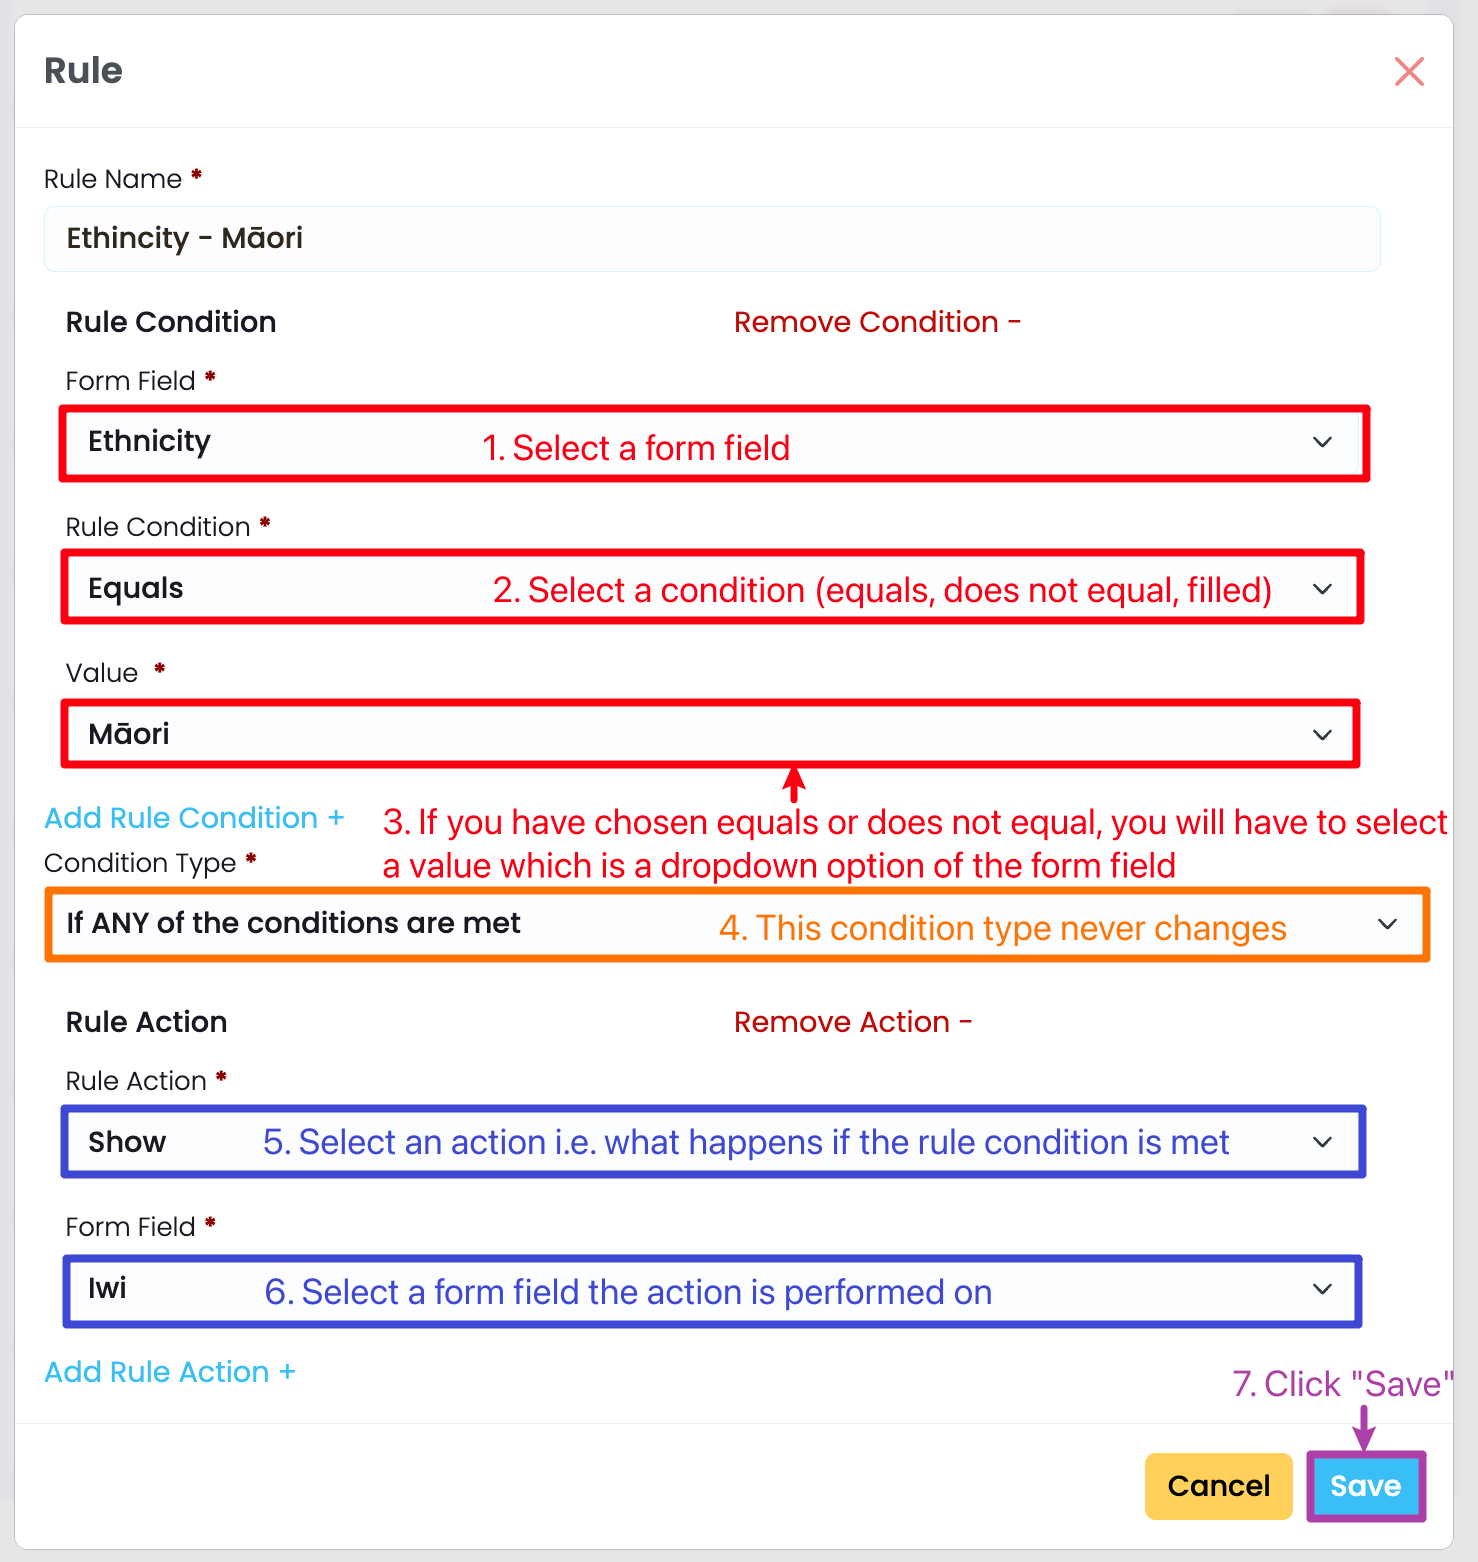
Figure 15. Form Configuration
At the bottom of the Form Configuration panel, to the right of the form builder, click “Form Rules”.
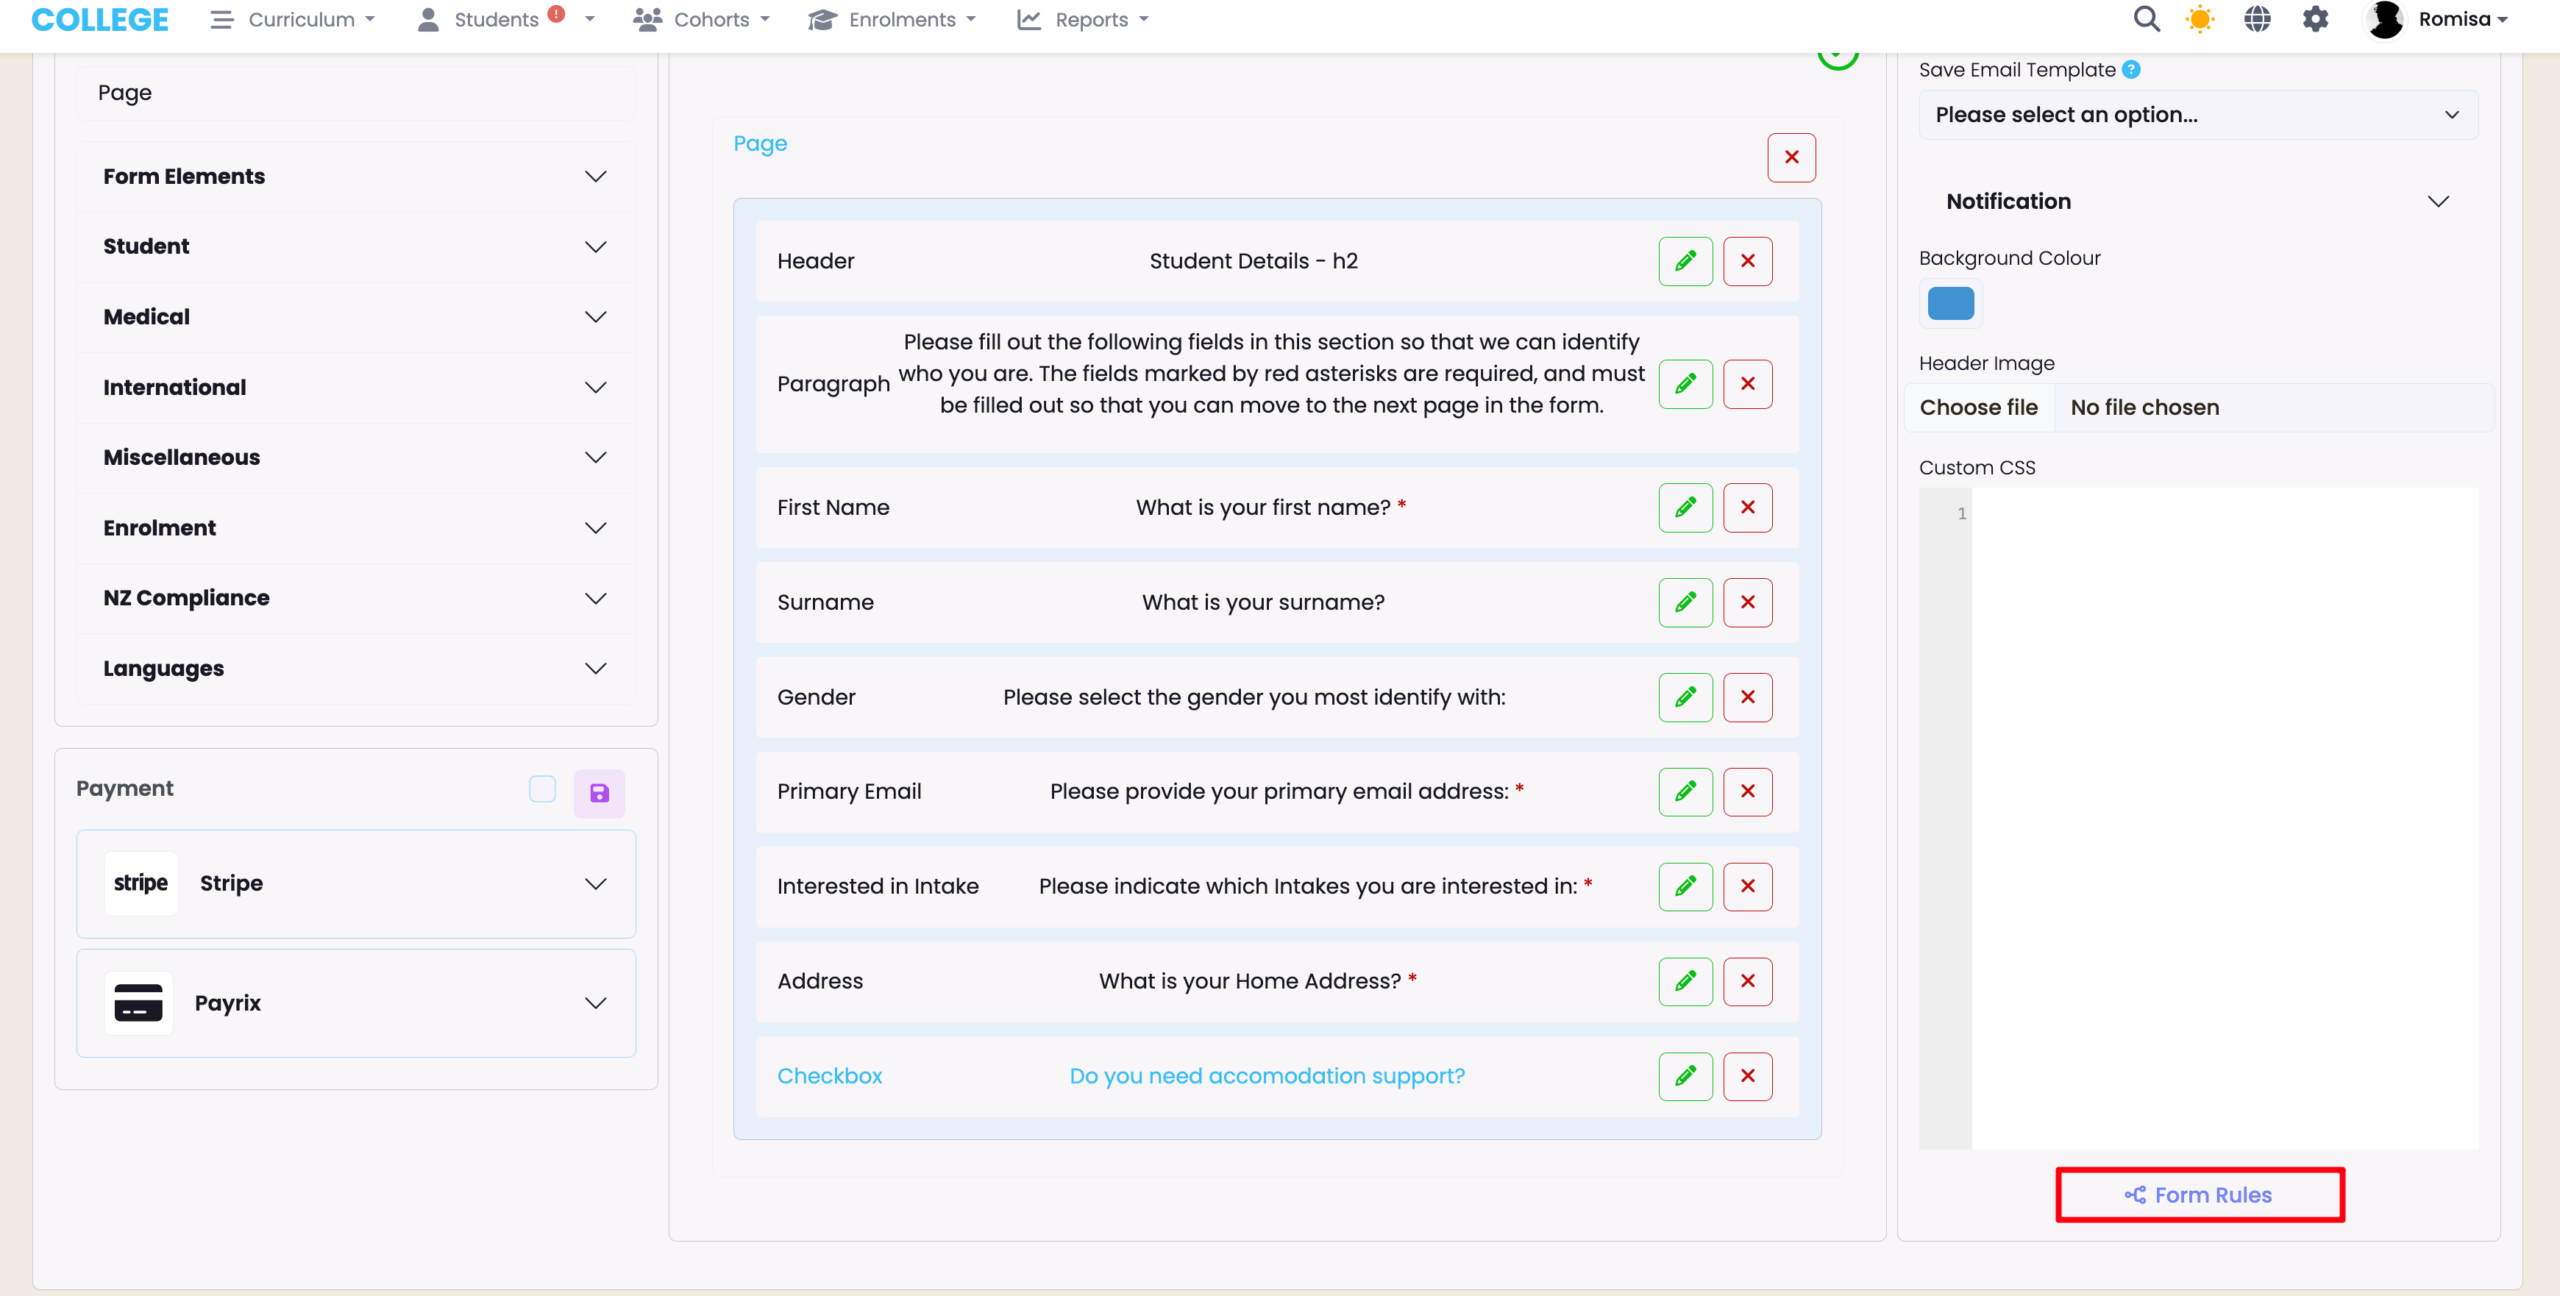
Figure 16. Add a Rule
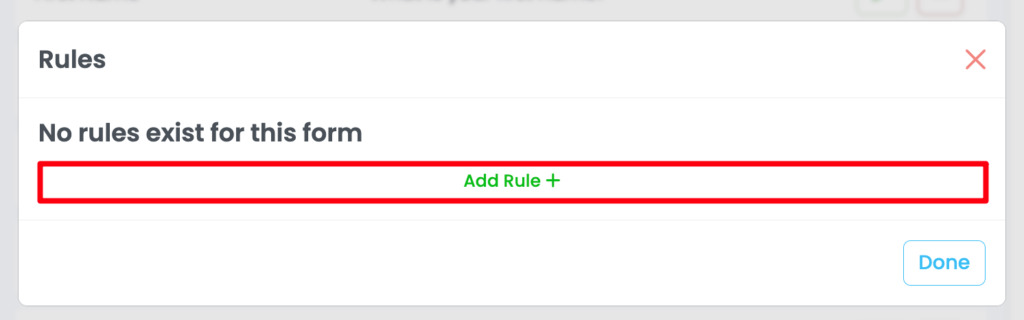
Figure 17. Create a Rule Name and Expand Details

Figure 18. Apply Rule Conditions and Outcomes
Follow the steps below to create a form rule.
Note: If you are choosing a value to complete a rule condition (step 3), make sure that you select a value from the dropdown list. If you are forced to free-type a value, the condition will not be processed, and neither will the form rule, overrall.
Saving and Publishing
Save any changes made to the form by clicking the “Publish” button, and refreshing the page.
If you would like to “Publish” the form for applicant use or testing, you should ensure that the following applies to the form:
- The Form Configuration “Active” button is selected
- The Pre-Requisite Form Fields are included on the form
Custom Fields and Testing
Click “Publish” to save changes, then refresh the page to load custom fields.
- Note: You should have custom fields set-up before loading them in the form editor. Please refer to System Settings – Custom Fields for a guide to help you create custom fields.
Follow the same steps, as below, if you wish to test your form.
- Remember to open the test in an incognito window so that you may imitate an applicant, without being logged into SELMA.
Figure 12. Publish and View Form
Copy Link to Form
There are three ways to fetch the link to the form:
Figure 13i. Navigate to Form Editor > View Form
When you click to “View Form” from the Form Editor, you will see the URL link at the top of the screen, indicated in red, below.
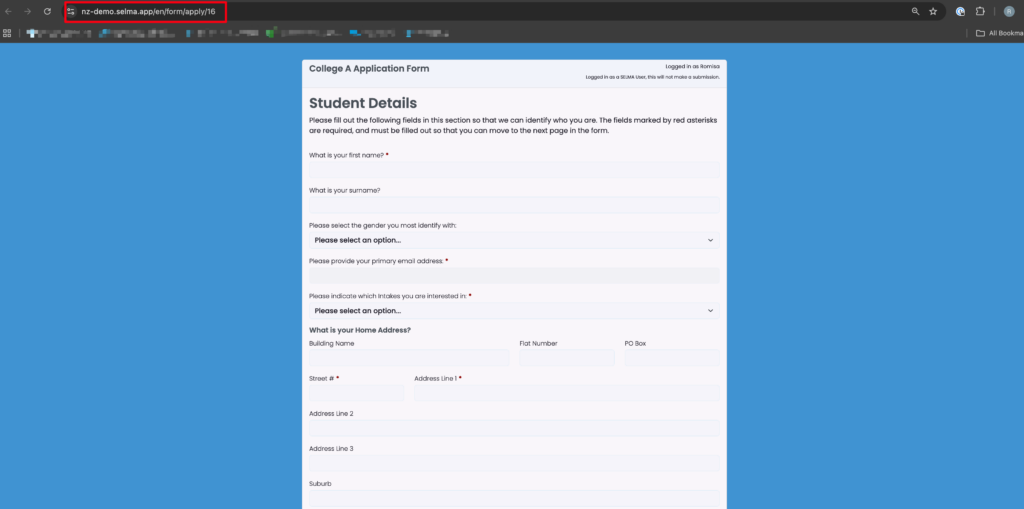
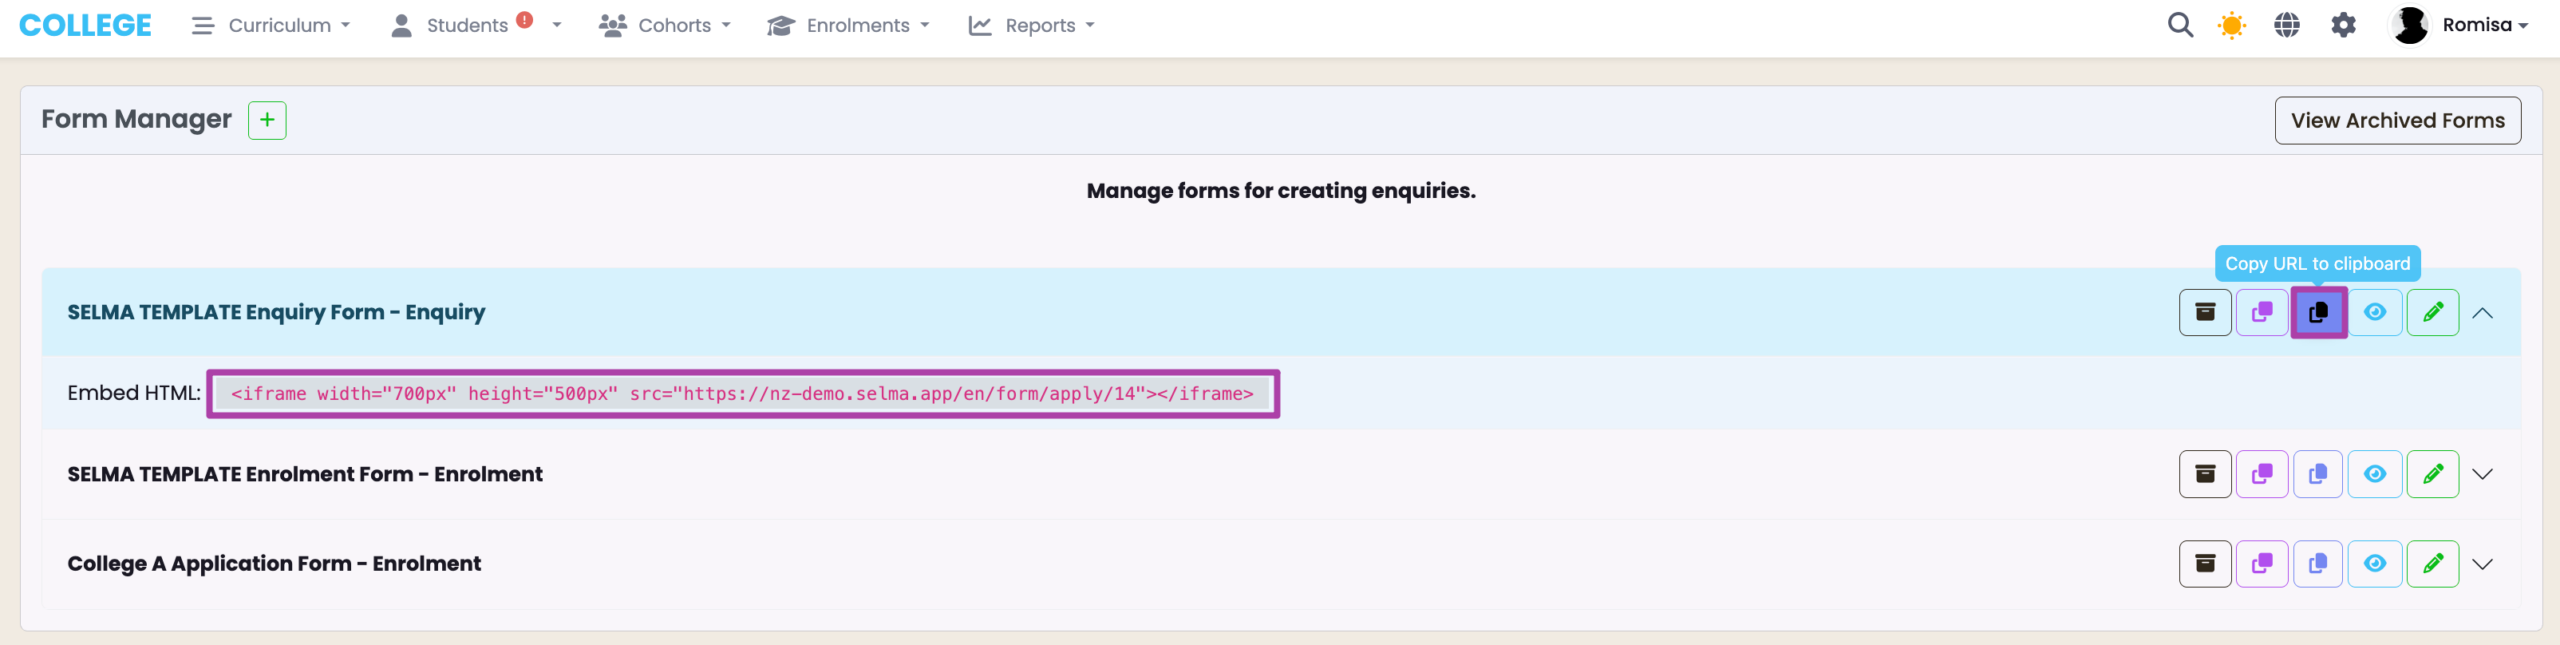
Figure 13ii. Form Manager
Click the clipboard icon to copy the URL link to your clipboard.
Note: Right-click and copy the Embed HTML link under a form. You can then paste it into your website builder to embed the form on your website.
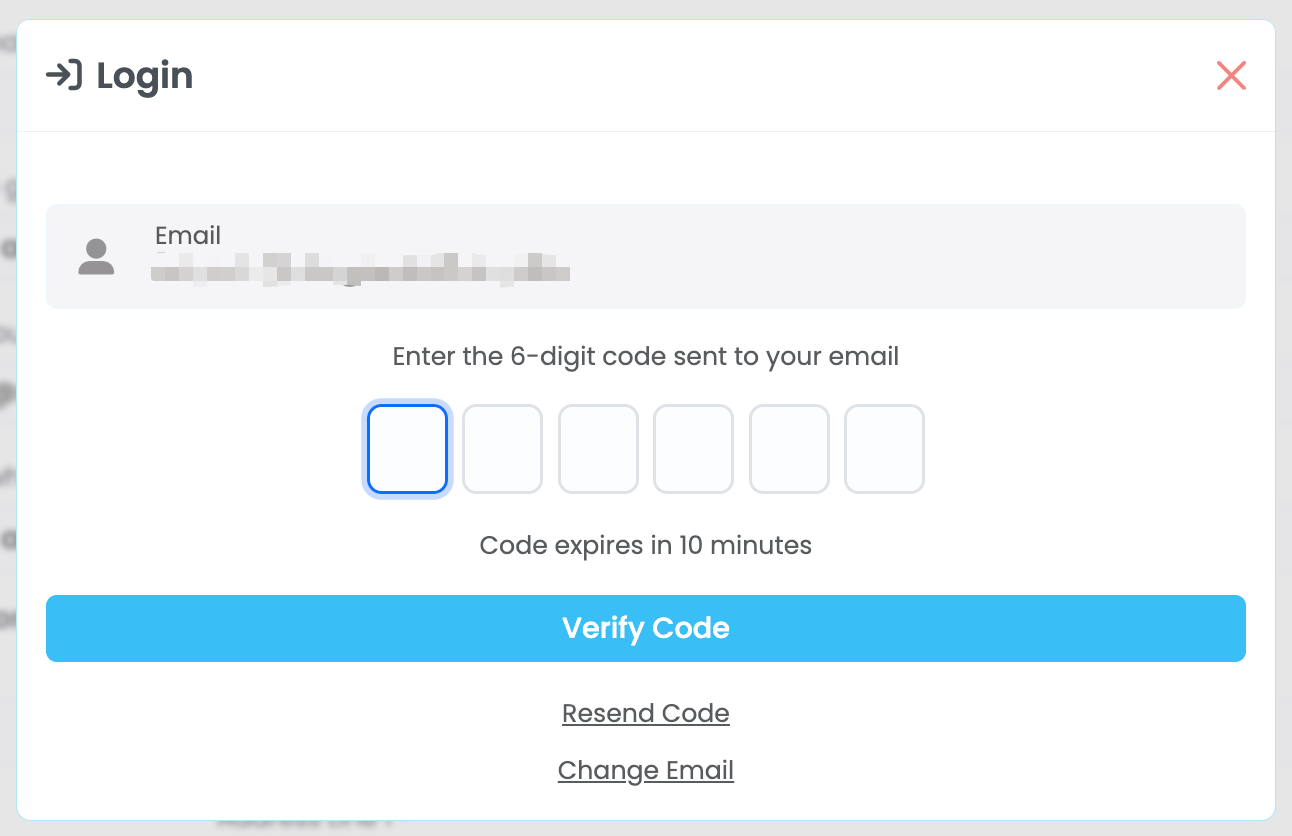
Returning Students
If the primary email address of the Student has been recorded in SELMA before, they will be prompted to log-in upon entering their email. This will auto-populate the form fields with the information that has been previously saved in the database.
Figure 14. Returning Student
If a Student record has been previously created in SELMA, with the same primary email address , the applicant will be prompted to verify their identity via 2FA email. Once verification is complete, the system auto-populates the form fields with information in the database.