
Overview
Completion Rules are automated rules which perform tasks for you at the Enrolment level, when students complete components. They have conditions (criteria) that must be met to run actions (effects), both of which you can customise.
Note:
- Completion rules are created at the Programme level, by users assigned as Registrar in the Curriculum.
- Multiple Rules can run at the same time.
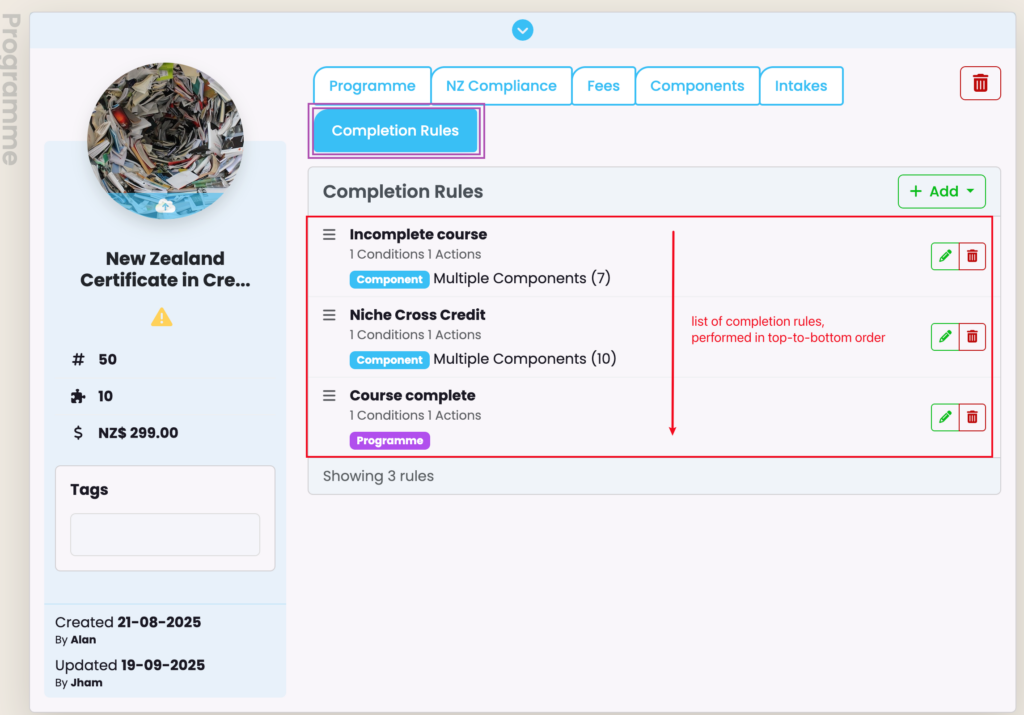
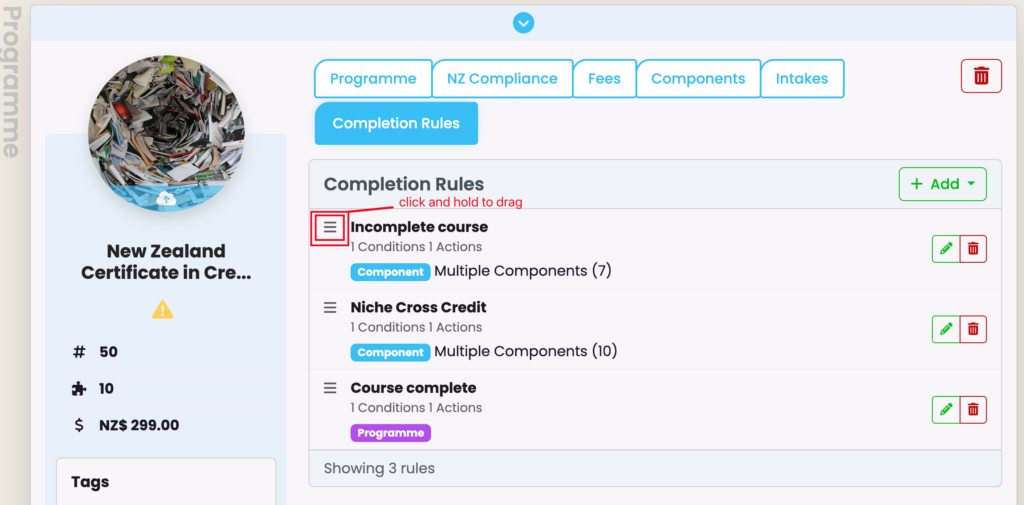
When you navigate to the Curriculum Index you can choose a Programme to view. Click on the “Completion Rules” tab, to add or edit Completion Rules (Figure 1.).
Figure 1. The Completion Rules tab (purple), shows 3 Condition Rules already set (red) at the Programme level.
Adding a Rule
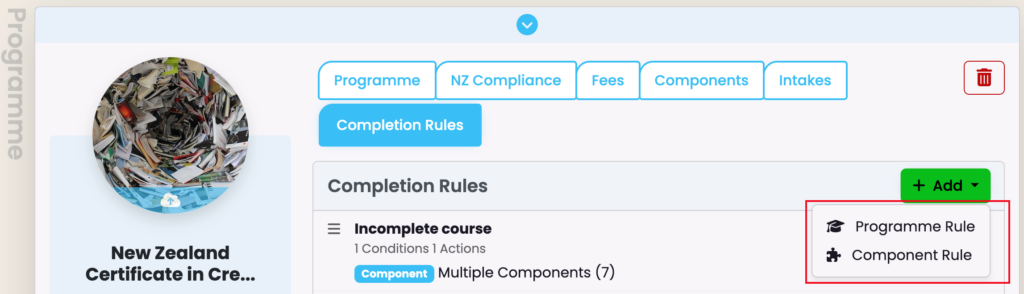
Clicking on the green “+Add” button displays the options “Programme Rule” or “Component Rule“, which add rules affecting the completion status of all or specific components at the Enrolment level, respectively (Figure 2.).
Rule Types:
- Programme Rules: Influence the completion status of all components within a programme.
- Component Rules: Influence the completion status of specific components within a programme.
Figure 2. To add a Completion Rule, click the “+Add button and choose between a “Programme Rule” or “Component rule” (red).
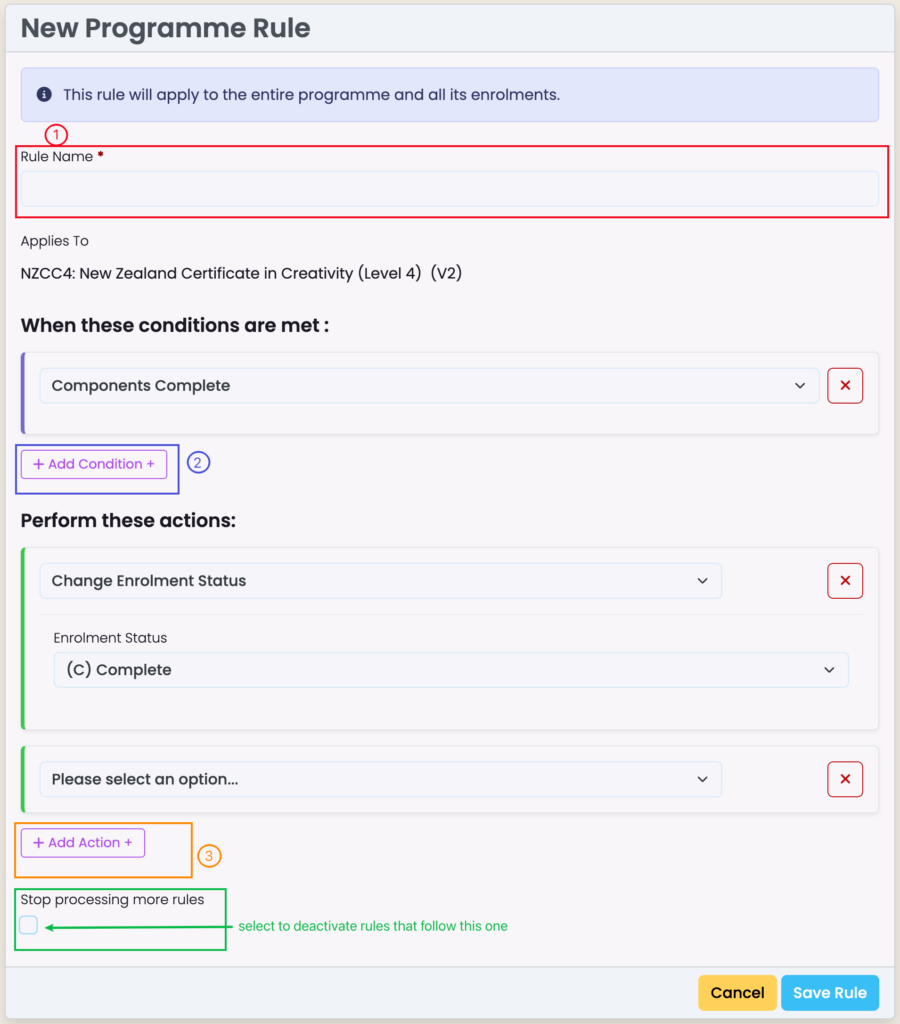
The following screen prompts you to create a name for your Rule, and to set a condition and associated action/s i.e. When condition [blank] occurs, action/s [blank] is performed at the Enrolment level (Figure 3.).
Note: Rules are processed in a specific order, with the option to stop processing after certain rules.
Figure 3. For both Programme or Component Rules create a Rule name (1), then add a condition (2) and linked action/s (3). To stop any rules following this one, check the button at the bottom of the screen (green arrow).
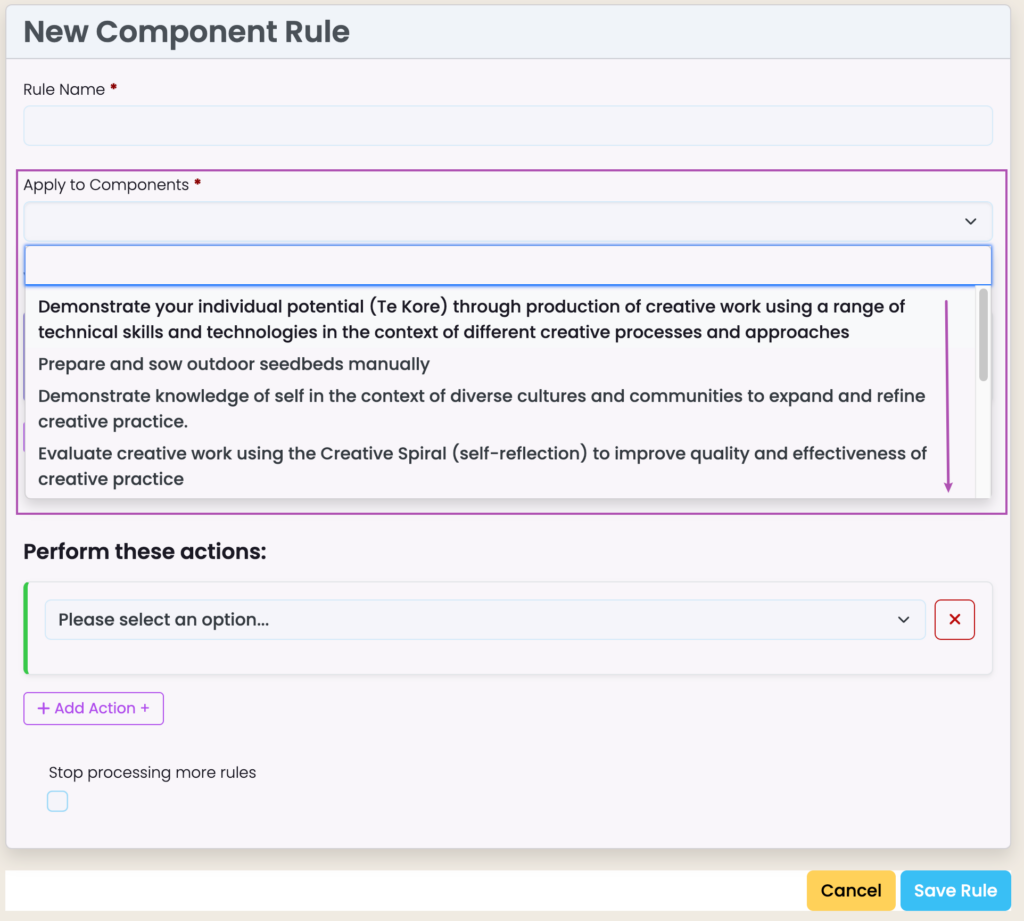
When creating Component Rules, you will see a required field following “Rule Name” which allows you to select which specific components to apply the new rule to (Figure 4.).
This field doesn’t feature on the screen when creating a Programme Rule, as Programme rules apply to all components at the Enrolment level.
Figure 4. Select specific components to apply the new Component Rule (purple).
Ordering Rules
When you have clicked the “Save Rule” button in the bottom right of the screen, your Completion Rule will be saved on the main screen and an Event log will be created (See Event Log in this Resource for more).
If you have multiple Completion Rules saved, you can rearrange them by a top-to-bottom chronological order. However, keep in mind those where you had selected “Stop processing more rules” on creation, as this affects whether or not following Rules are performed (Figure 5.).
Figure 5. Use the menu list icon (red) beside a Programme or Component Rule to rearrange the execution order.
Running Completion Rules
Automated Execution
The system can automatically process completion rules through scheduled tasks once:
- Component statuses have been updated at the Curriculum level
- Components have been updated at the Enrolment level
Manual Execution
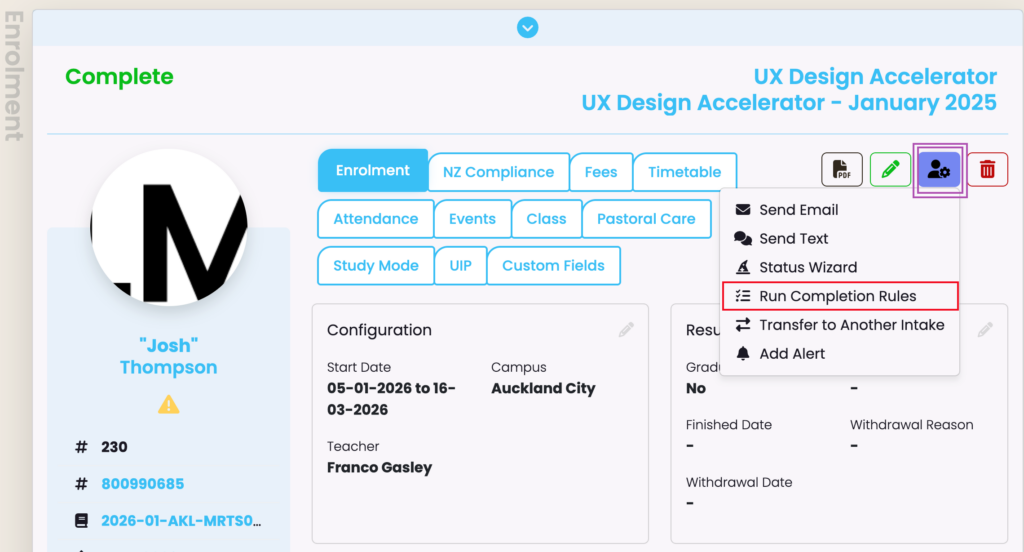
Navigate to a student’s enrolment record and click the “Run Completion Rules” button (Figure 6.).
Figure 6. At a select Enrolment profile, click the figure with a cog icon (purple) to access the “Run Completion Rules” button (red).
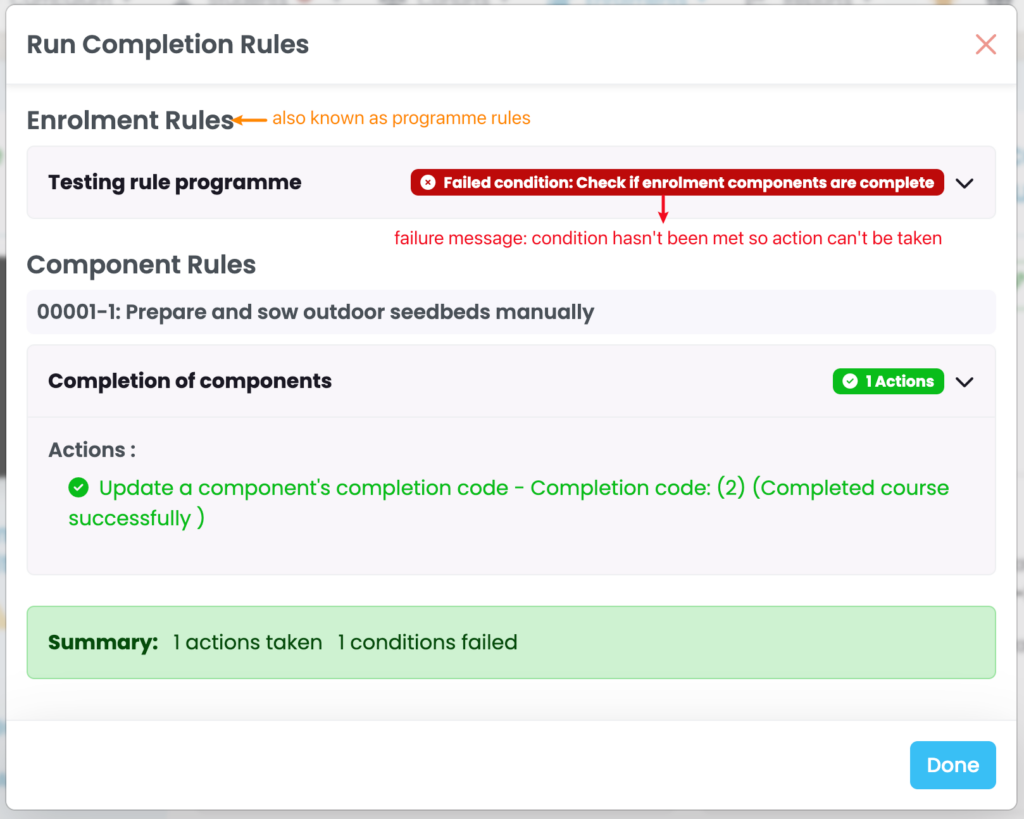
The results are summarised, and coloured messages indicate executions which are successful, failed and/or already executed (Figure 7.).
Figure 7. One Enrolment Rule has failed to execute (red), while another Component Rule has successfully executed (green text).
Managing Completion Rules
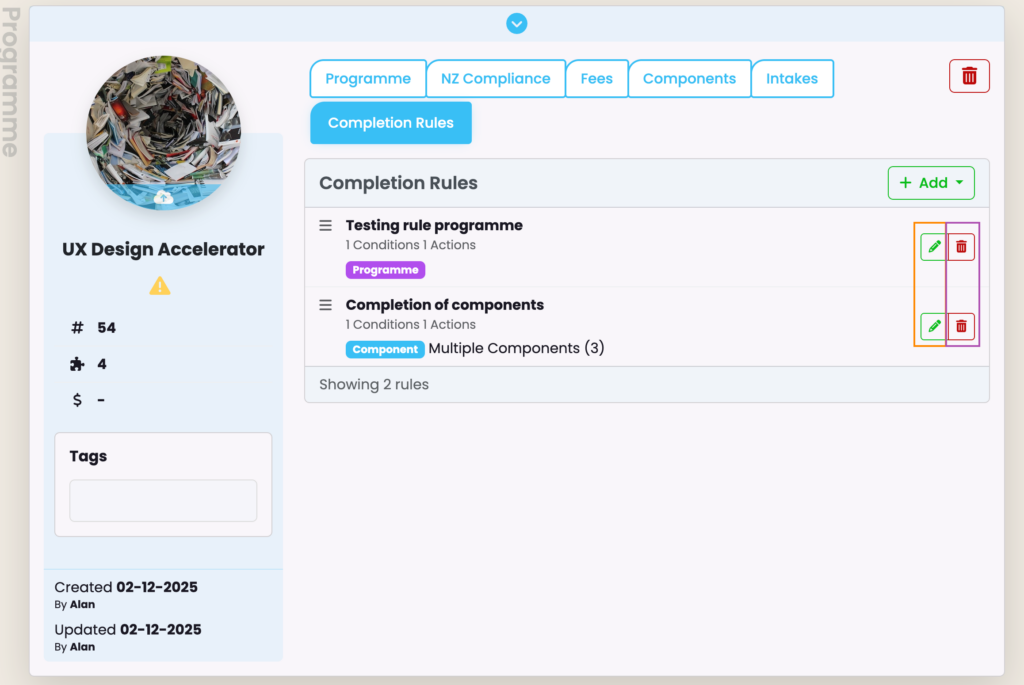
Editing and deleting Completion Rules is done at the Curriculum level, where you created the Rules (Figure 8.).
Figure 8. Click the green pencil icon to edit the associated Rule, or click the red trash bin icon to delete it.
Common Component Rule Configurations
Automatic Component Completion
Condition: Children Completion (all child components are complete)
Action: Change Completion Code (set to a completion code that counts as complete)
Grade Calculation
Condition: Weight (e.g., 70% of weighted components are complete)
Action: Grade from Children (calculates a weighted average grade)
Common Programme Rule Configuration
Notification on Completion
Condition: Completion Status (component is complete) Action: Event (creates a notification for staff)
Troubleshooting
Rule Not Executing
- Check if all conditions are met
- Verify that the rule hasn’t already been executed (check Event logs)
- Ensure earlier rules aren’t stopping processing
Rule Already Executed
If you need to re-run a rule that has already been executed:
- Run the completion rules
- Locate the rule with the “Already executed” status
- Click the “Clear” button
- Run the rules again
Rule Execution Failures
If an action fails during execution:
- Check for error messages in the results screen once you have “Run Completion rules”
- Verify that all conditions are met
- Review the system’s event logs for more detailed information