This Section discusses how to use each of the tabs in an Intake Profile, as seen in order.
In this Section:
- Intake Profile Tabs
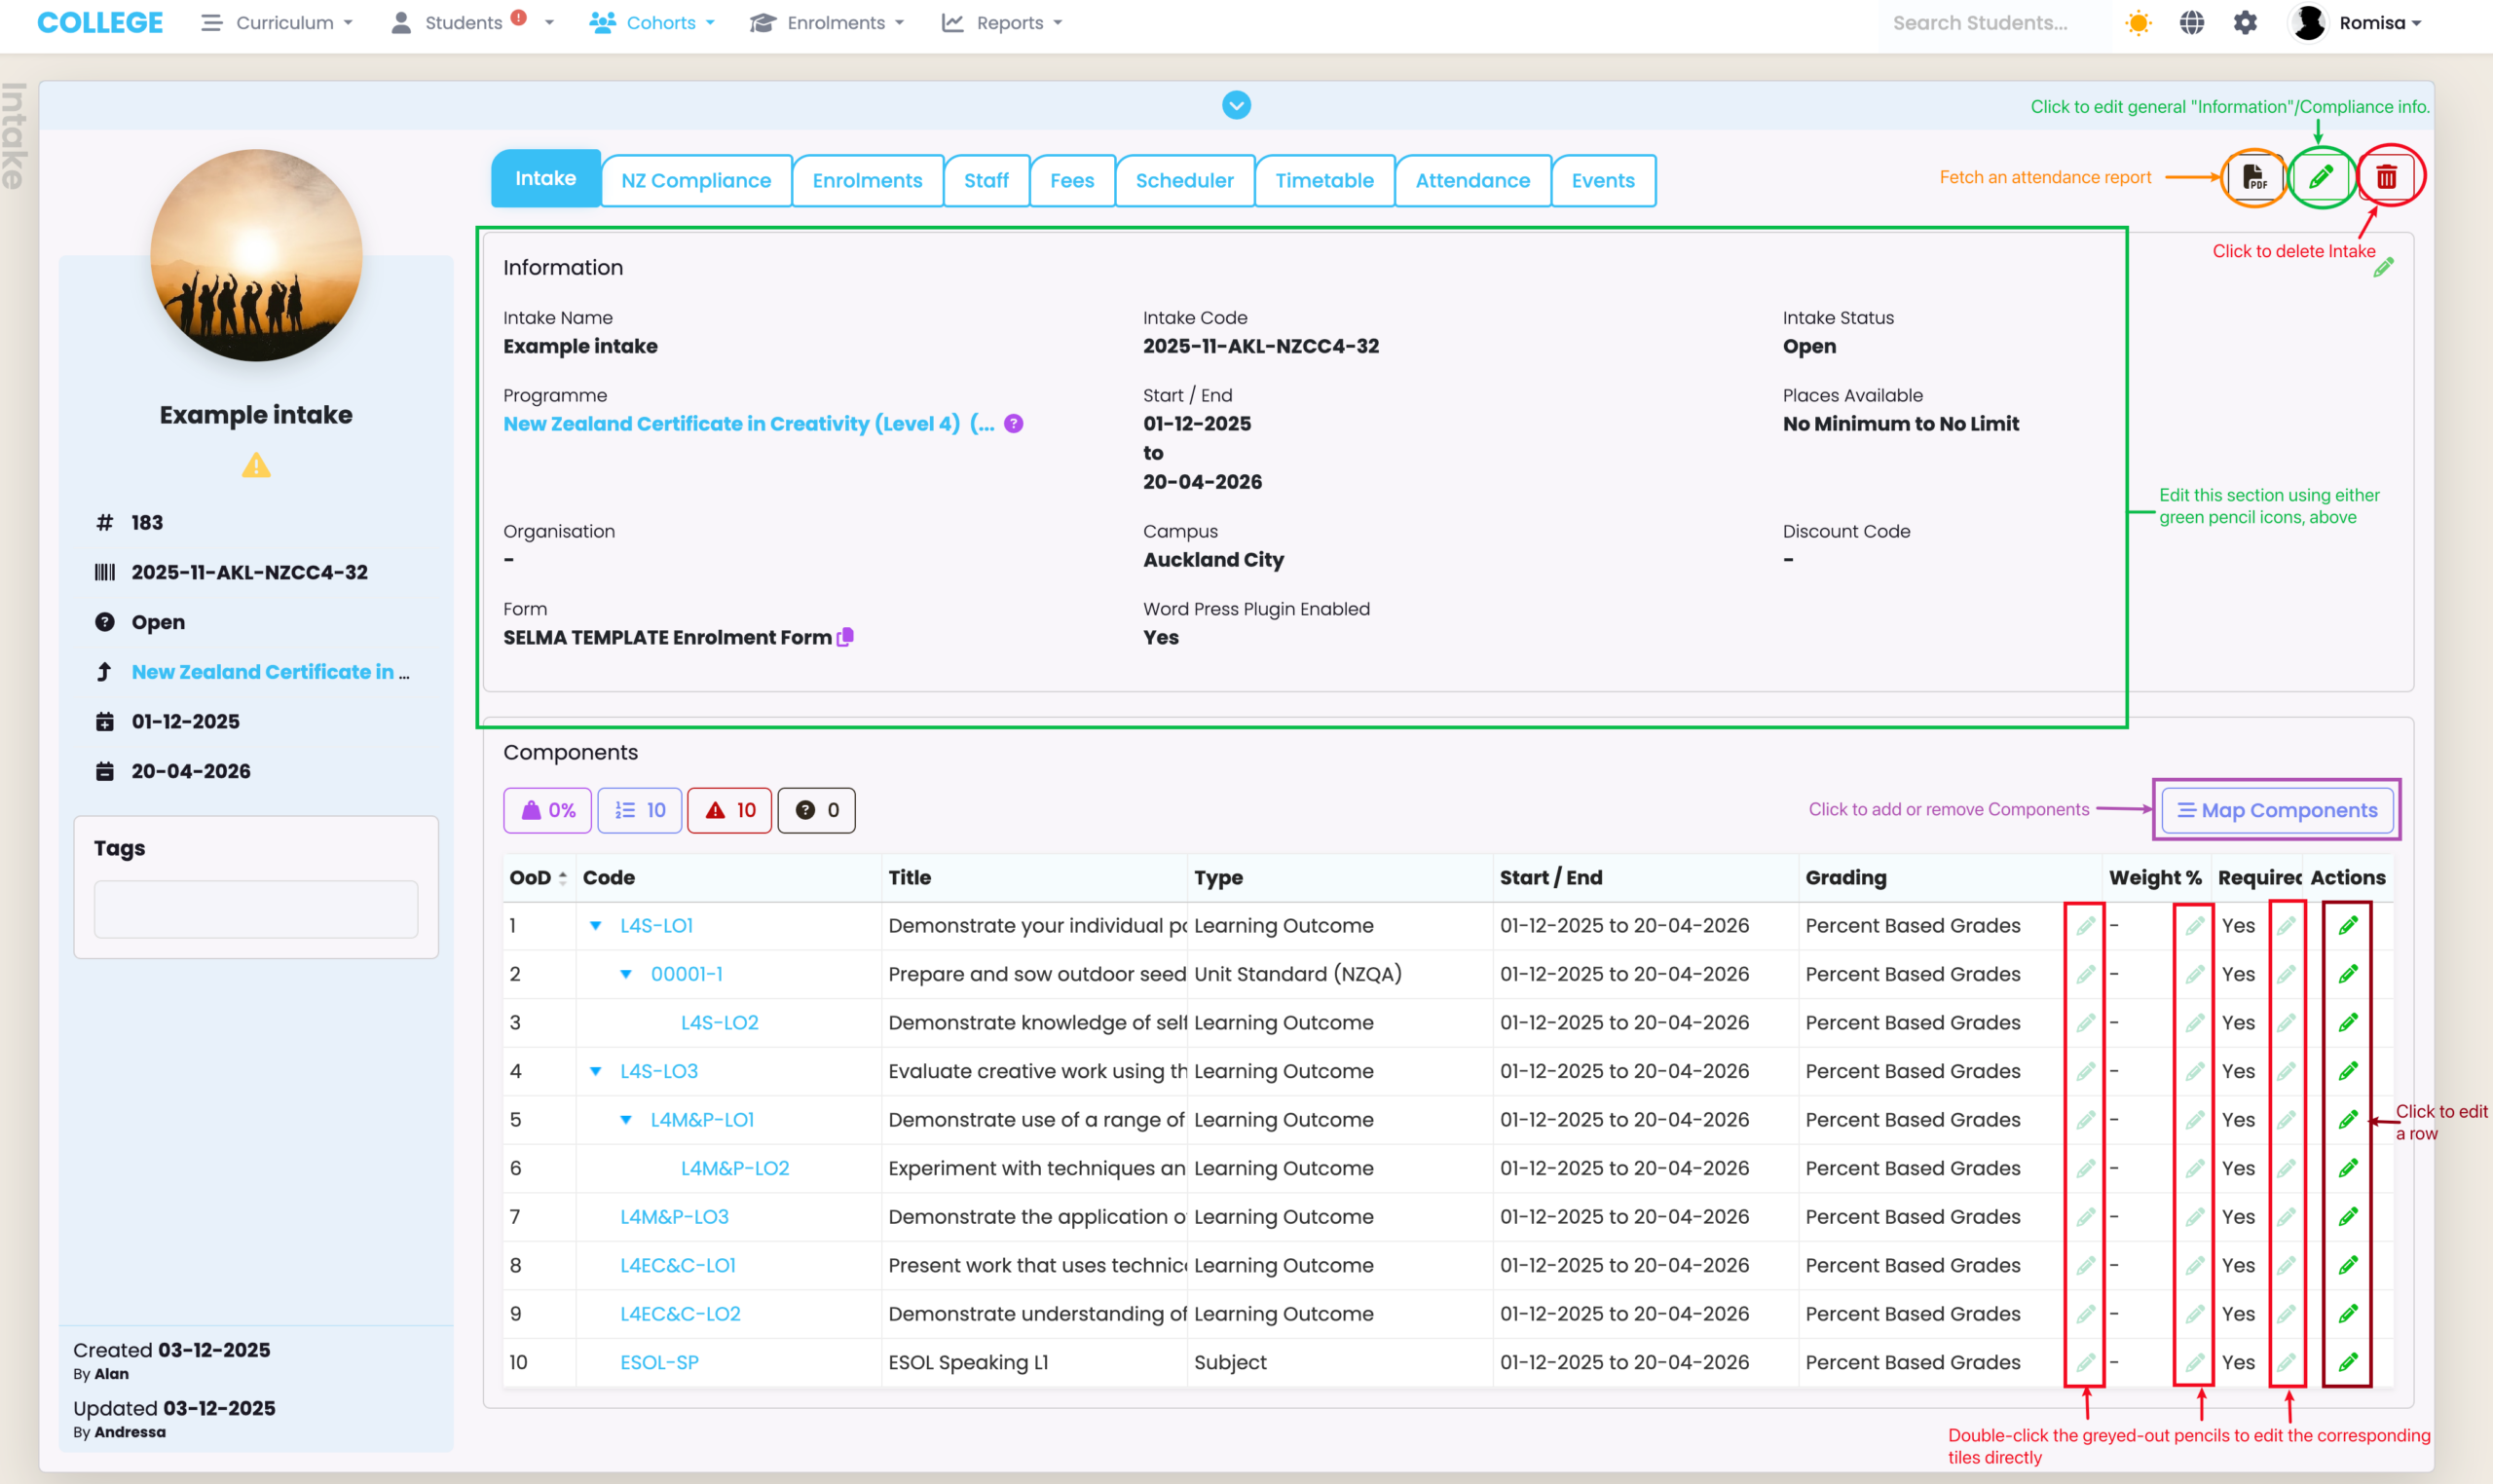
Intake Tab
The Intake Tab is an overview page showing key Intake information and inherited Components from its corresponding Programme.
See Figure 1. for annotated descriptions of key features within this Tab.
Figure 1. The top three circled buttons feature across all tabs within the Intake profile: The PDF icon (orange) enables Attendance Report downloads, while the pencil icon (green) enables editing of all types of information, including Compliance information. Add or remove Components using the “Map Components” button (purple). To edit information you can double-click specific tiles (red) within “Components”, or single-click the pencil icon under the “Actions” column (burgundy), to edit whole rows of information.
Compliance Tabs
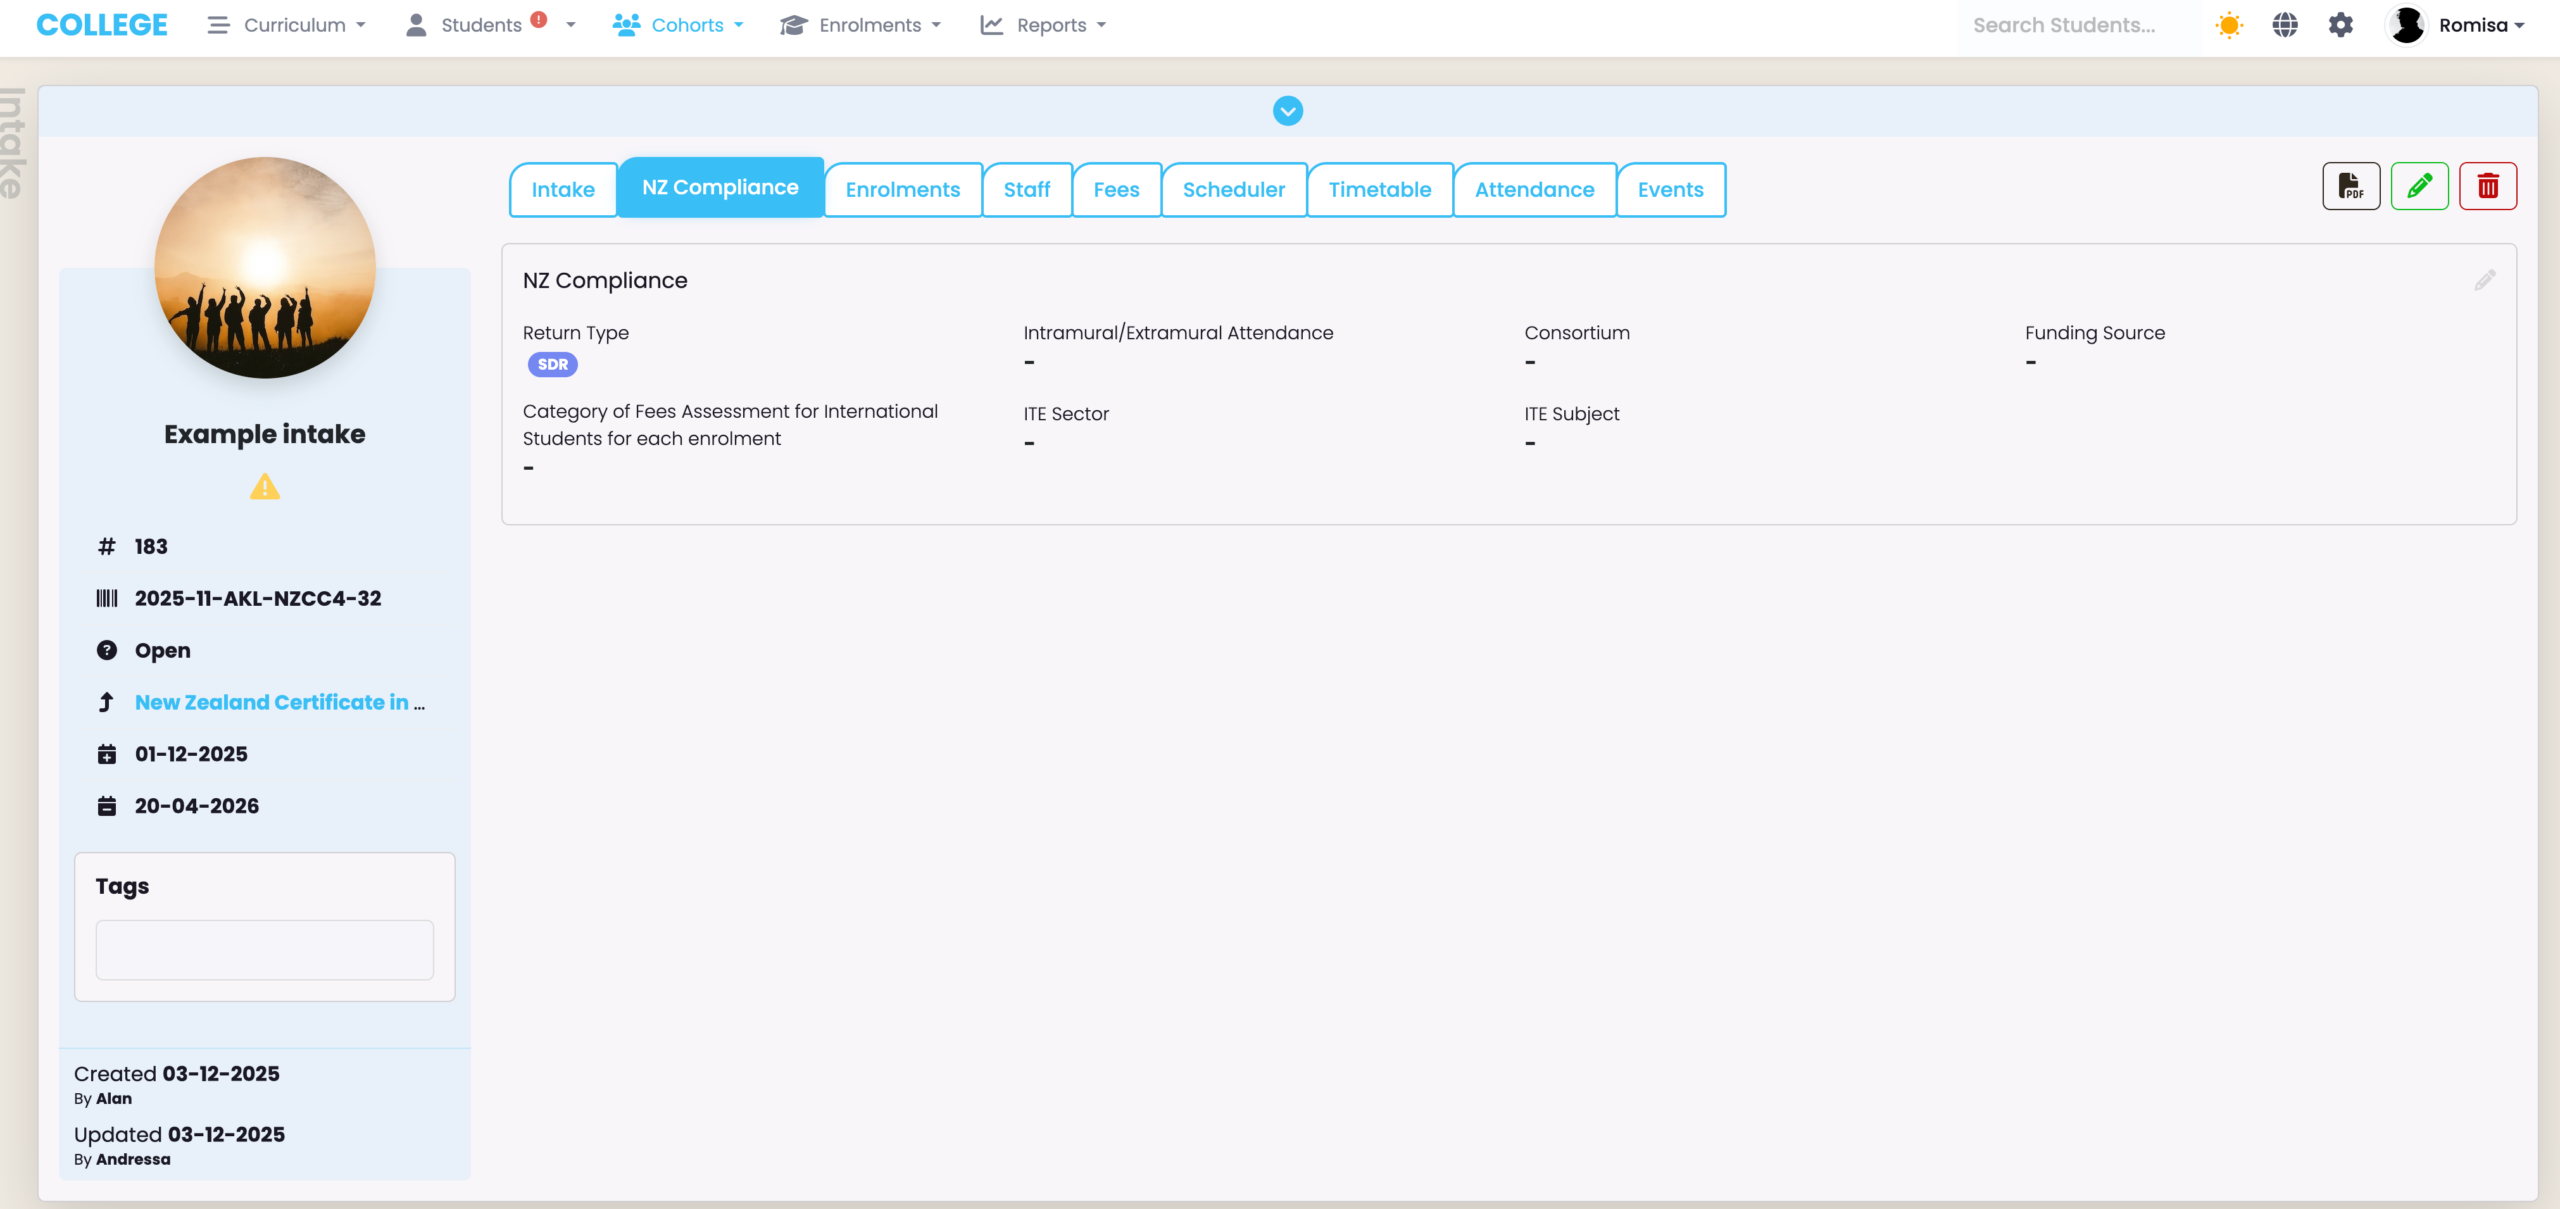
NZ Compliance
This tab will inherit the Compliance information provided for its corresponding Programme, and is visible to NZ providers only.
Figure 2. NZ Compliance Tab.
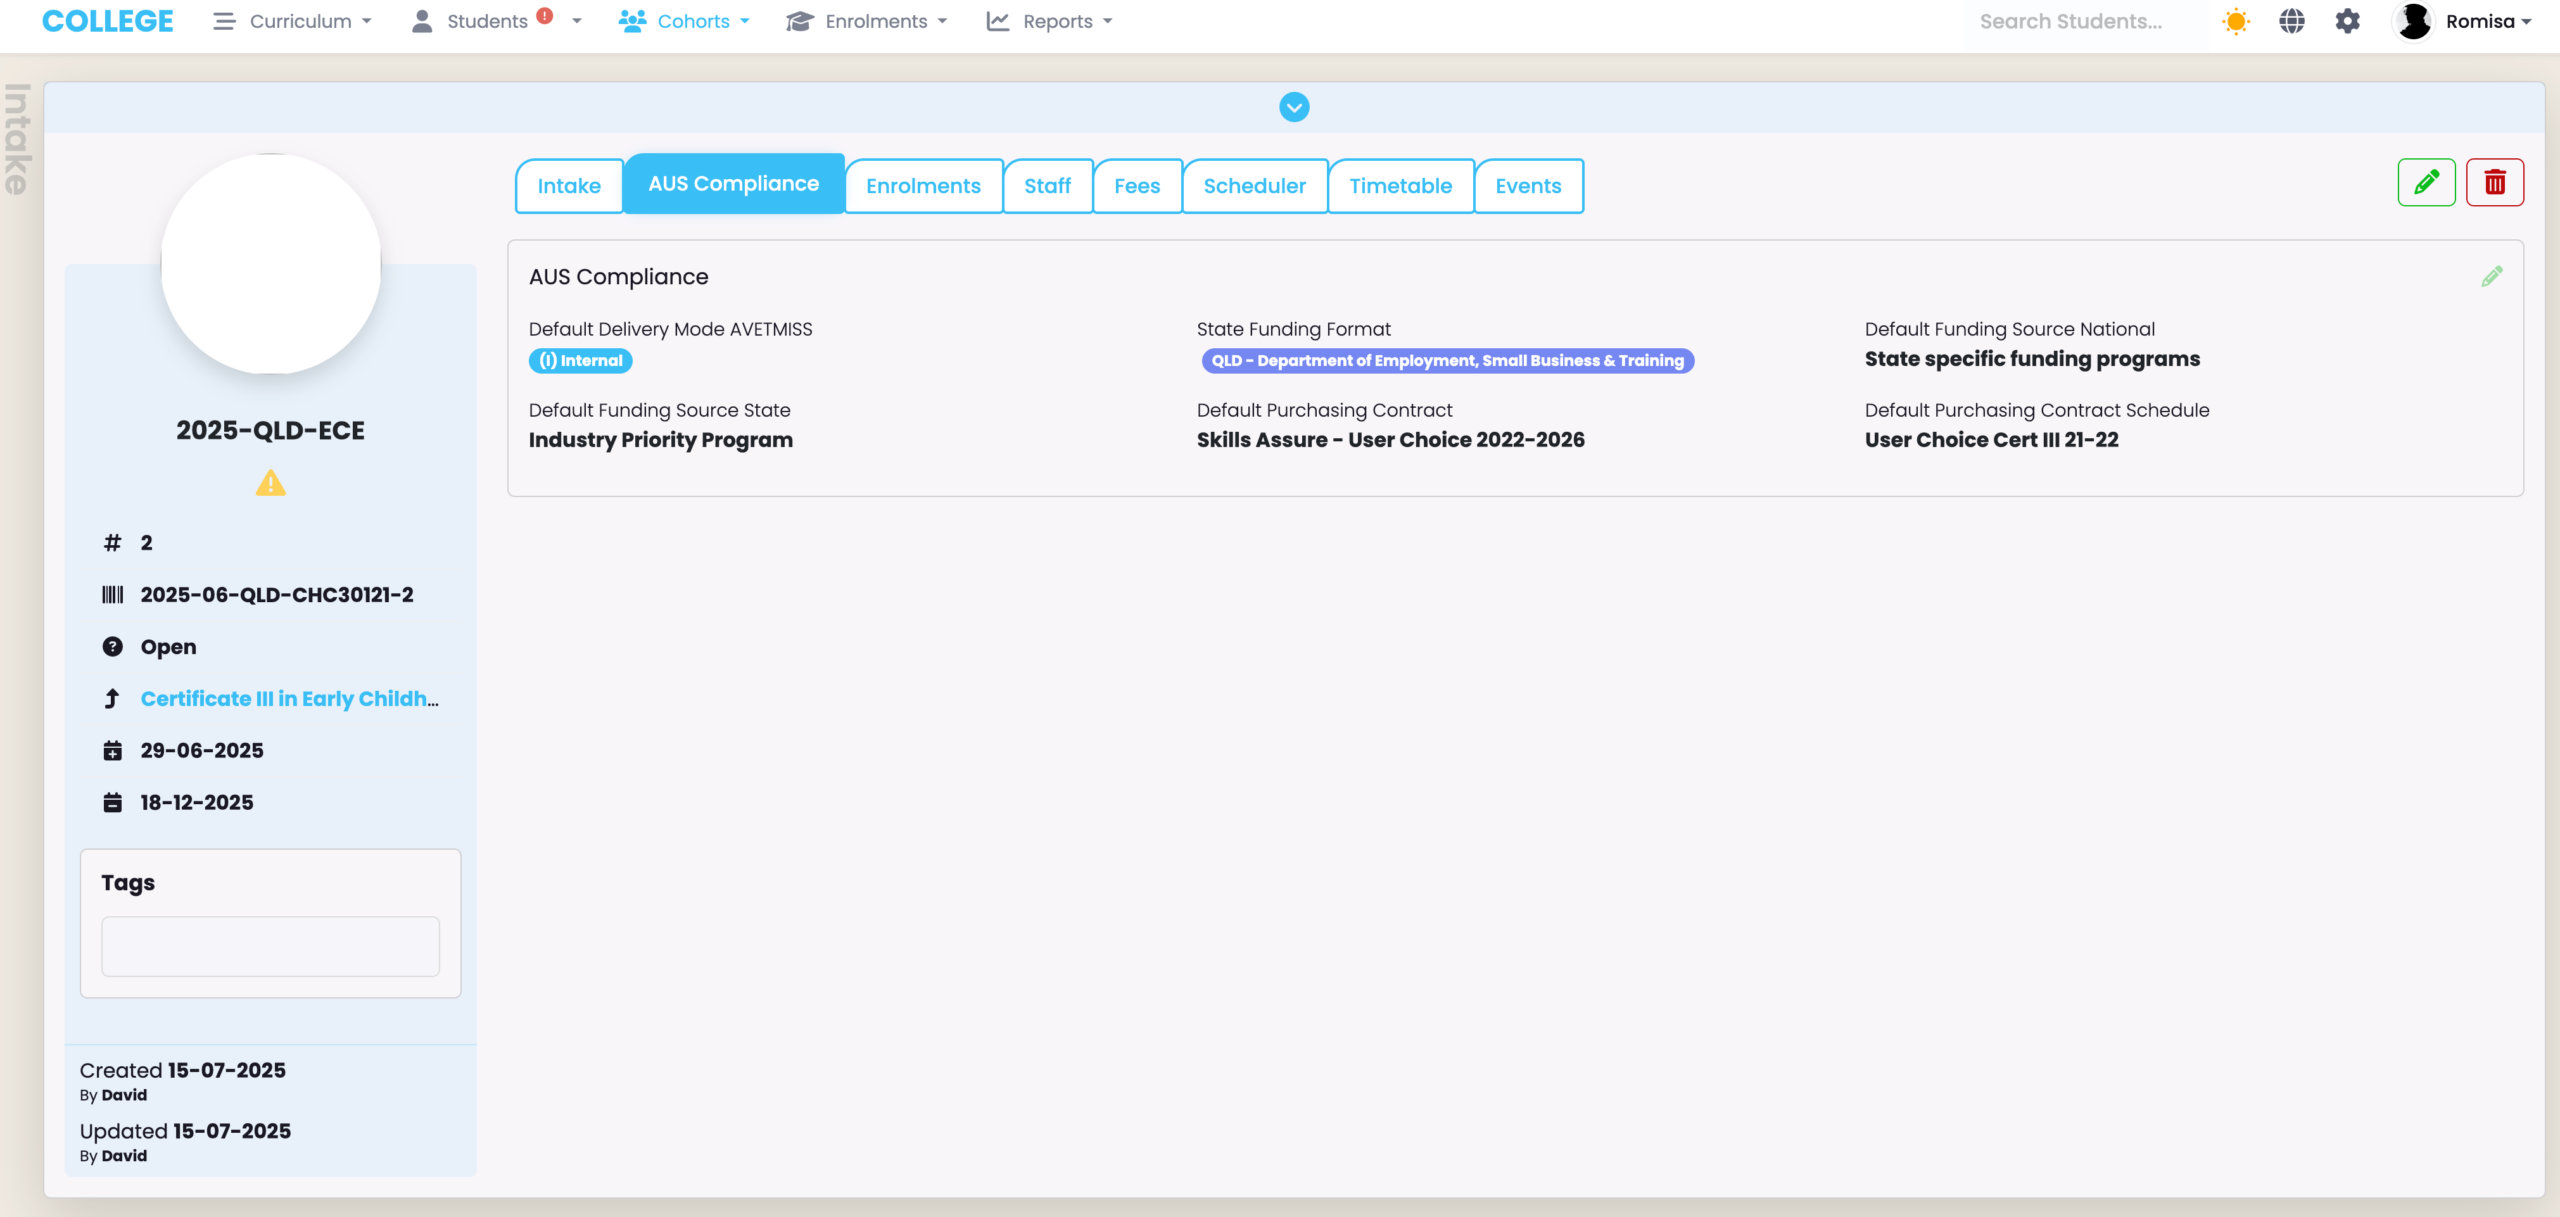
AUS Compliance
This tab will inherit the Compliance information provided for its corresponding Programme, and is visible to AUS providers only.
Figure 3. NZ Compliance Tab.
Enrolments Tab
The Enrolments tab shows existing Enrolments on an Intake, which you can select and perform actions on (Figure 1.).
List View
The List View includes a search field to filter by first name or surname, and the options to filter by status. You can also resize the columns in the table (Figure 2.).
Figure 1. The Enrolments tab shows Enrolments you can select (blue) to perform various changes to, via the action button (orange). Switch between different table displays e.g. the current list view (red) or matrix view (purple).
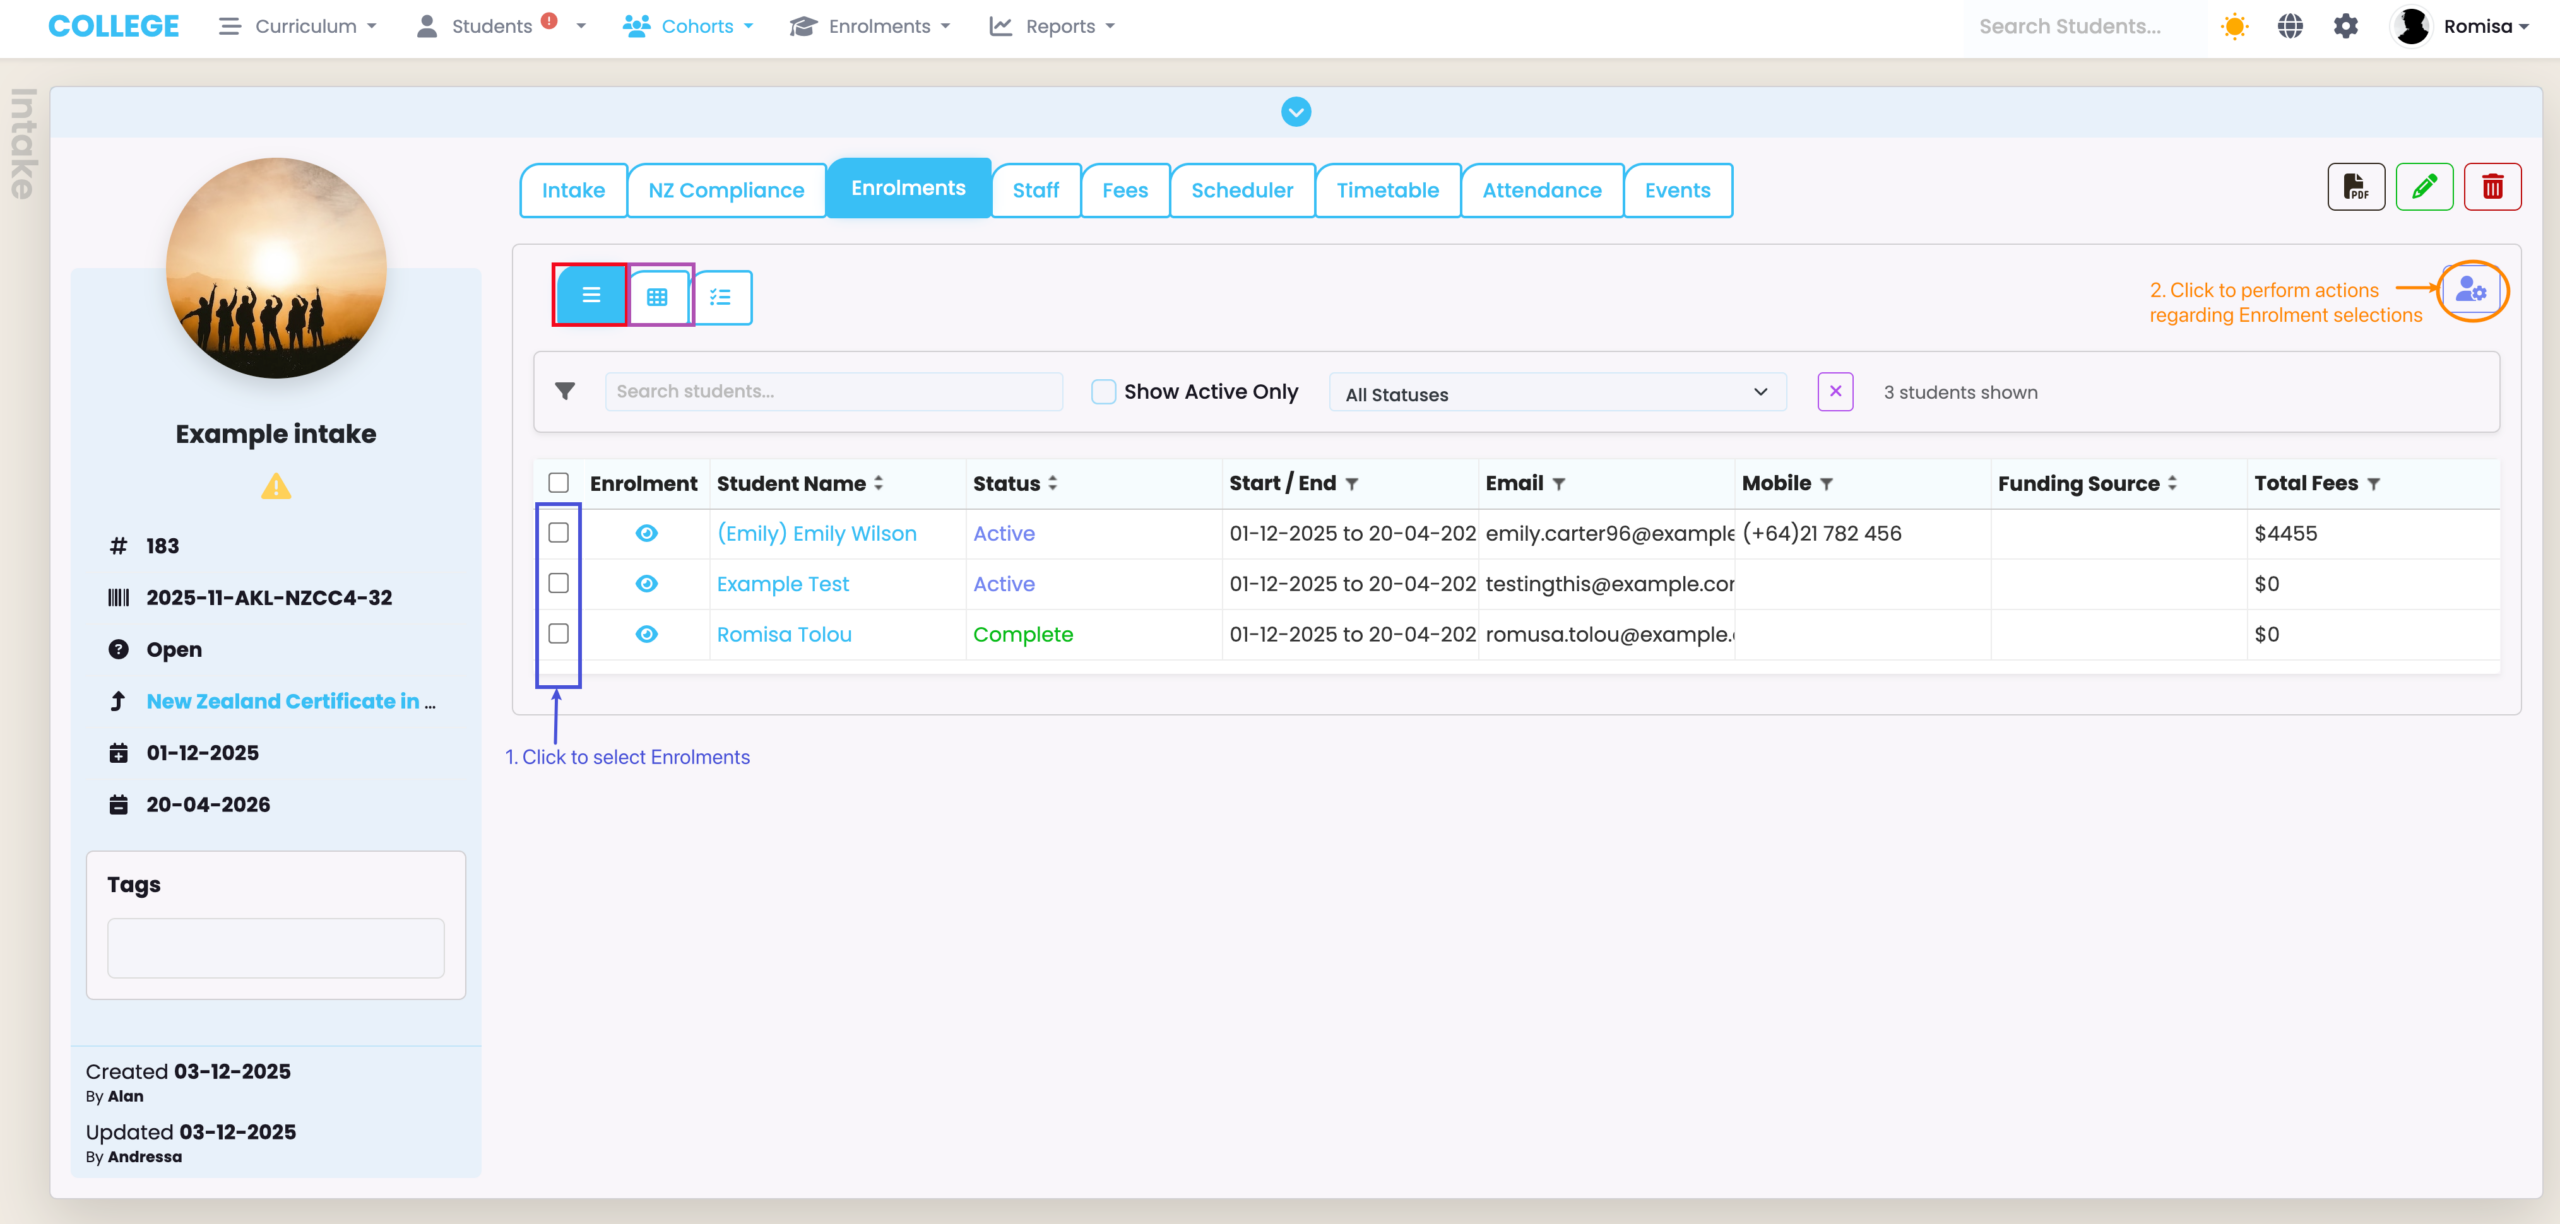
Figure 2. Filter by name (orange), click to show only “Active” enrolments (green) or filter by other Enrolment statuses (purple). Drag the column division lines in the top row (red arrows) side-to-side to resize columns.

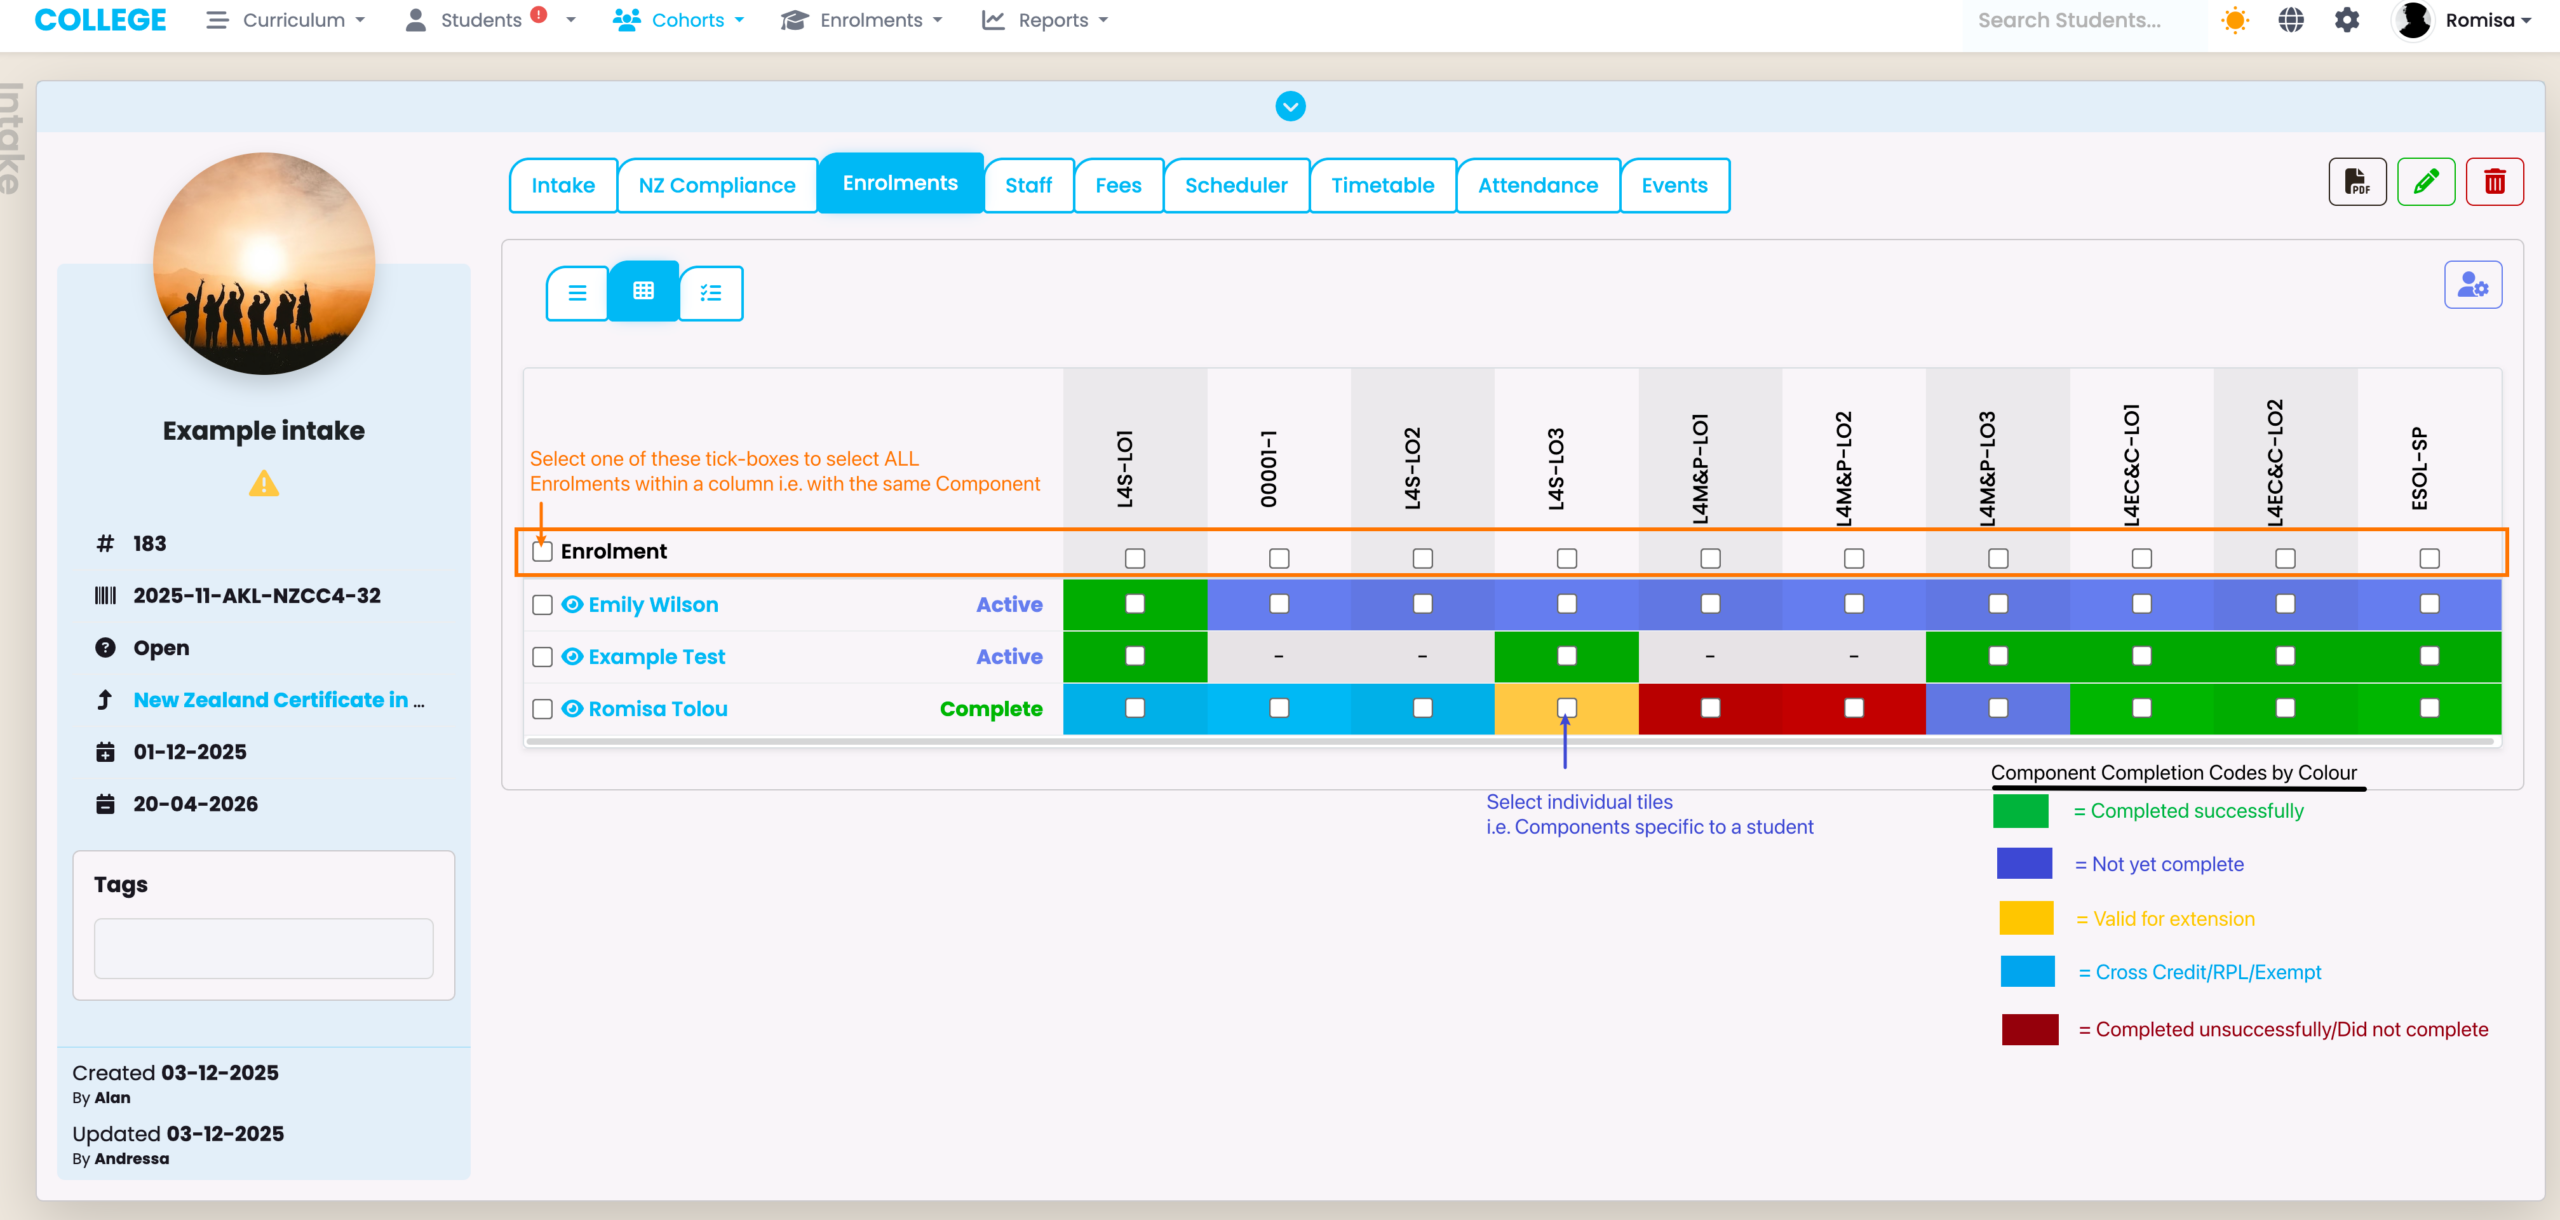
Matrix View
In this view, you can see a coloured grid-display of Enrolments and their Components which are attached to an intake (Figure 2.).
Figure 2. The Matrix view displays Enrolments i.e. Students against their Mapped Components, which are each colour-coded by Completion Code (see legend below).
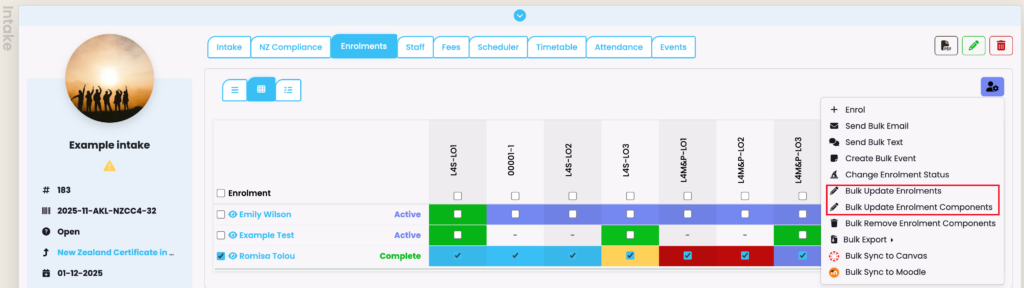
The Action Button
All of the Action buttons are enabled once you have made at least one Enrolment and/or Component selection within the matrix.
You can then access key buttons such as the “Bulk Update Enrolments” and “Bulk Update Enrolment Components”, to change details about all Enrolments and/or their Components attached to an Intake (Figure 3.).
Bulk updates save time by marking all Students at the same time.
Figure 3. The Action button allows you to make Enrolment and/or Component changes in bulk, saving you time from marking each one individually, at their level.
Staff Tab
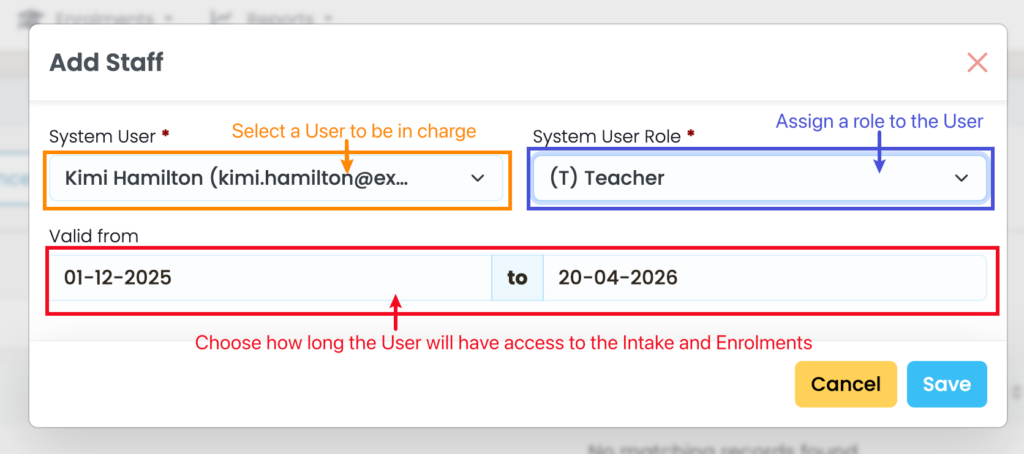
The Staff Tab allows you to assign a System User or Staff member to an Intake (Figure 4i.).
Select who the User is and their role in relation to the Intake, and select the time period for which they will have access to the System (Figure 4ii).
Notes:
- If the User is a “Teacher” they will only be able to view their assigned Intake from the Intake Index, and the corresponding Enrolments of an Intake from the Enrolment Index.
- Roles have different privileges, and they may be changed.
- See System Users – System Roles and Privileges for more information.
Figure 4i. On the “Staff” tab (orange), click the “+Add” button (green) to assign a Staff member to this intake.
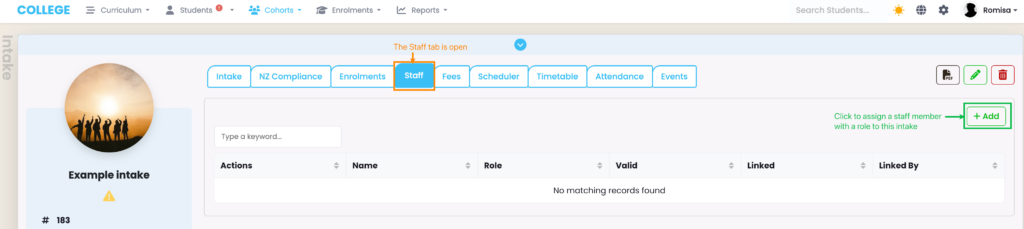
Figure 4ii. Select the Staff member i.e. the User assigned to the Intake (orange), along with their role (blue) and the duration of their System access (red).
Fees Tab
Please see Finance – Fees for a comprehensive guide on how to use this Tab.
Scheduler Tab
The Intake Scheduler serves to automate purposeful communications, which notify Students and/or Staff.
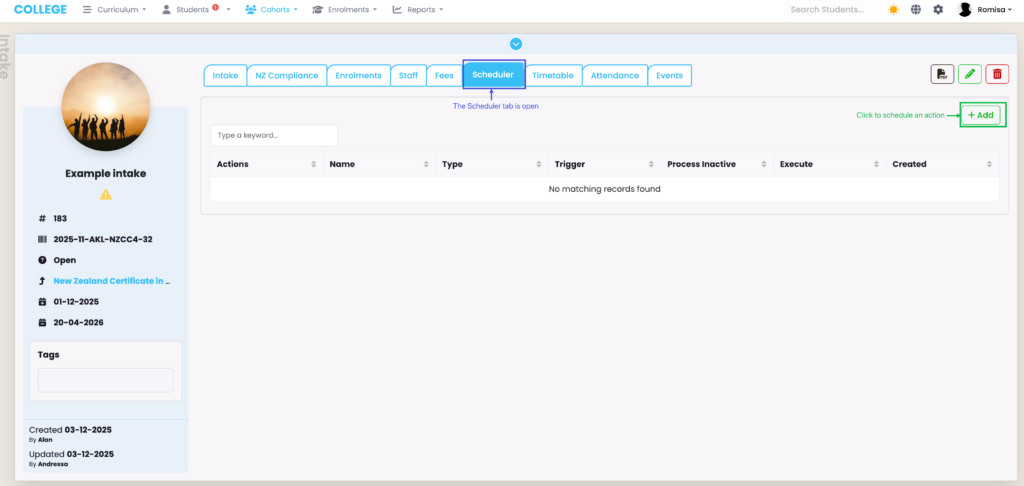
To schedule an action, go to the “Scheduler” tab and use the green “+ Add” button (Figure 5i.) :
Figure 5i. Click the “+Add” button to schedule an action (green).
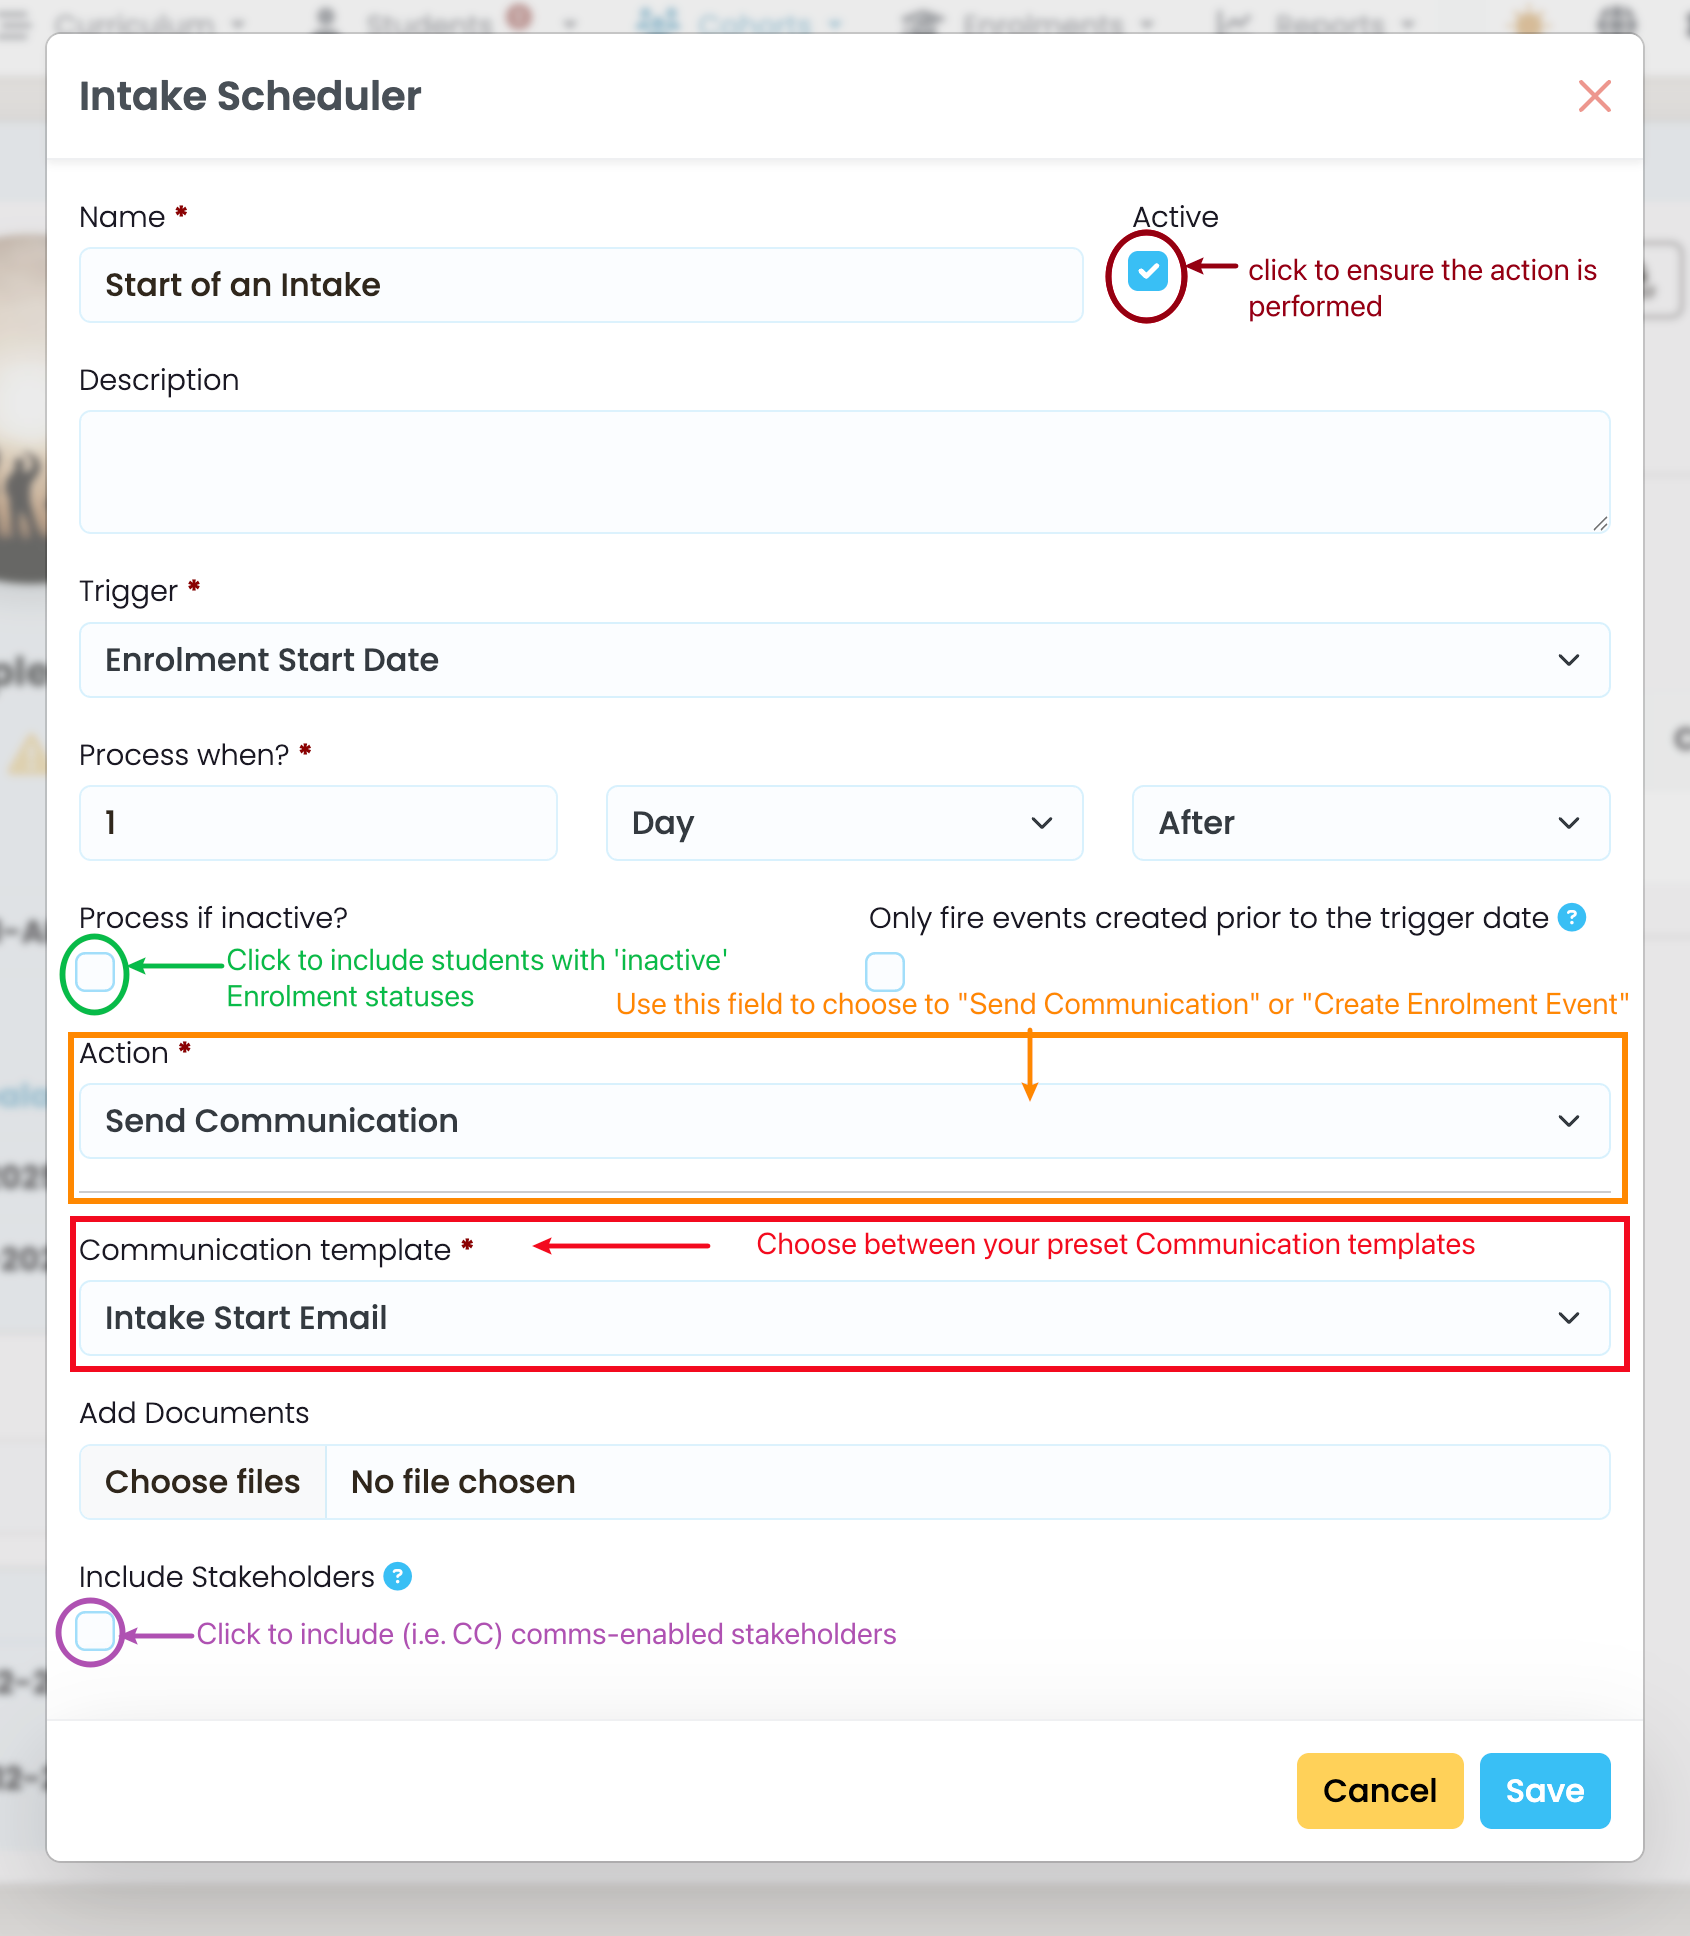
Schedule an Action: Send Communication
You can use a Communication template you have previously set-up, to select and send an email to students. The email can be sent to Stakeholders, too, if they have been enabled to receive communications at the Student level (Figure 5ii.).
See System Settings – Communication Templates in this resource, for more information.
Figure 5ii. Send an email template to Students (red), including those with “inactive” Enrolment Statuses (green), and stakeholders (purple) who have been marked to receive communications.
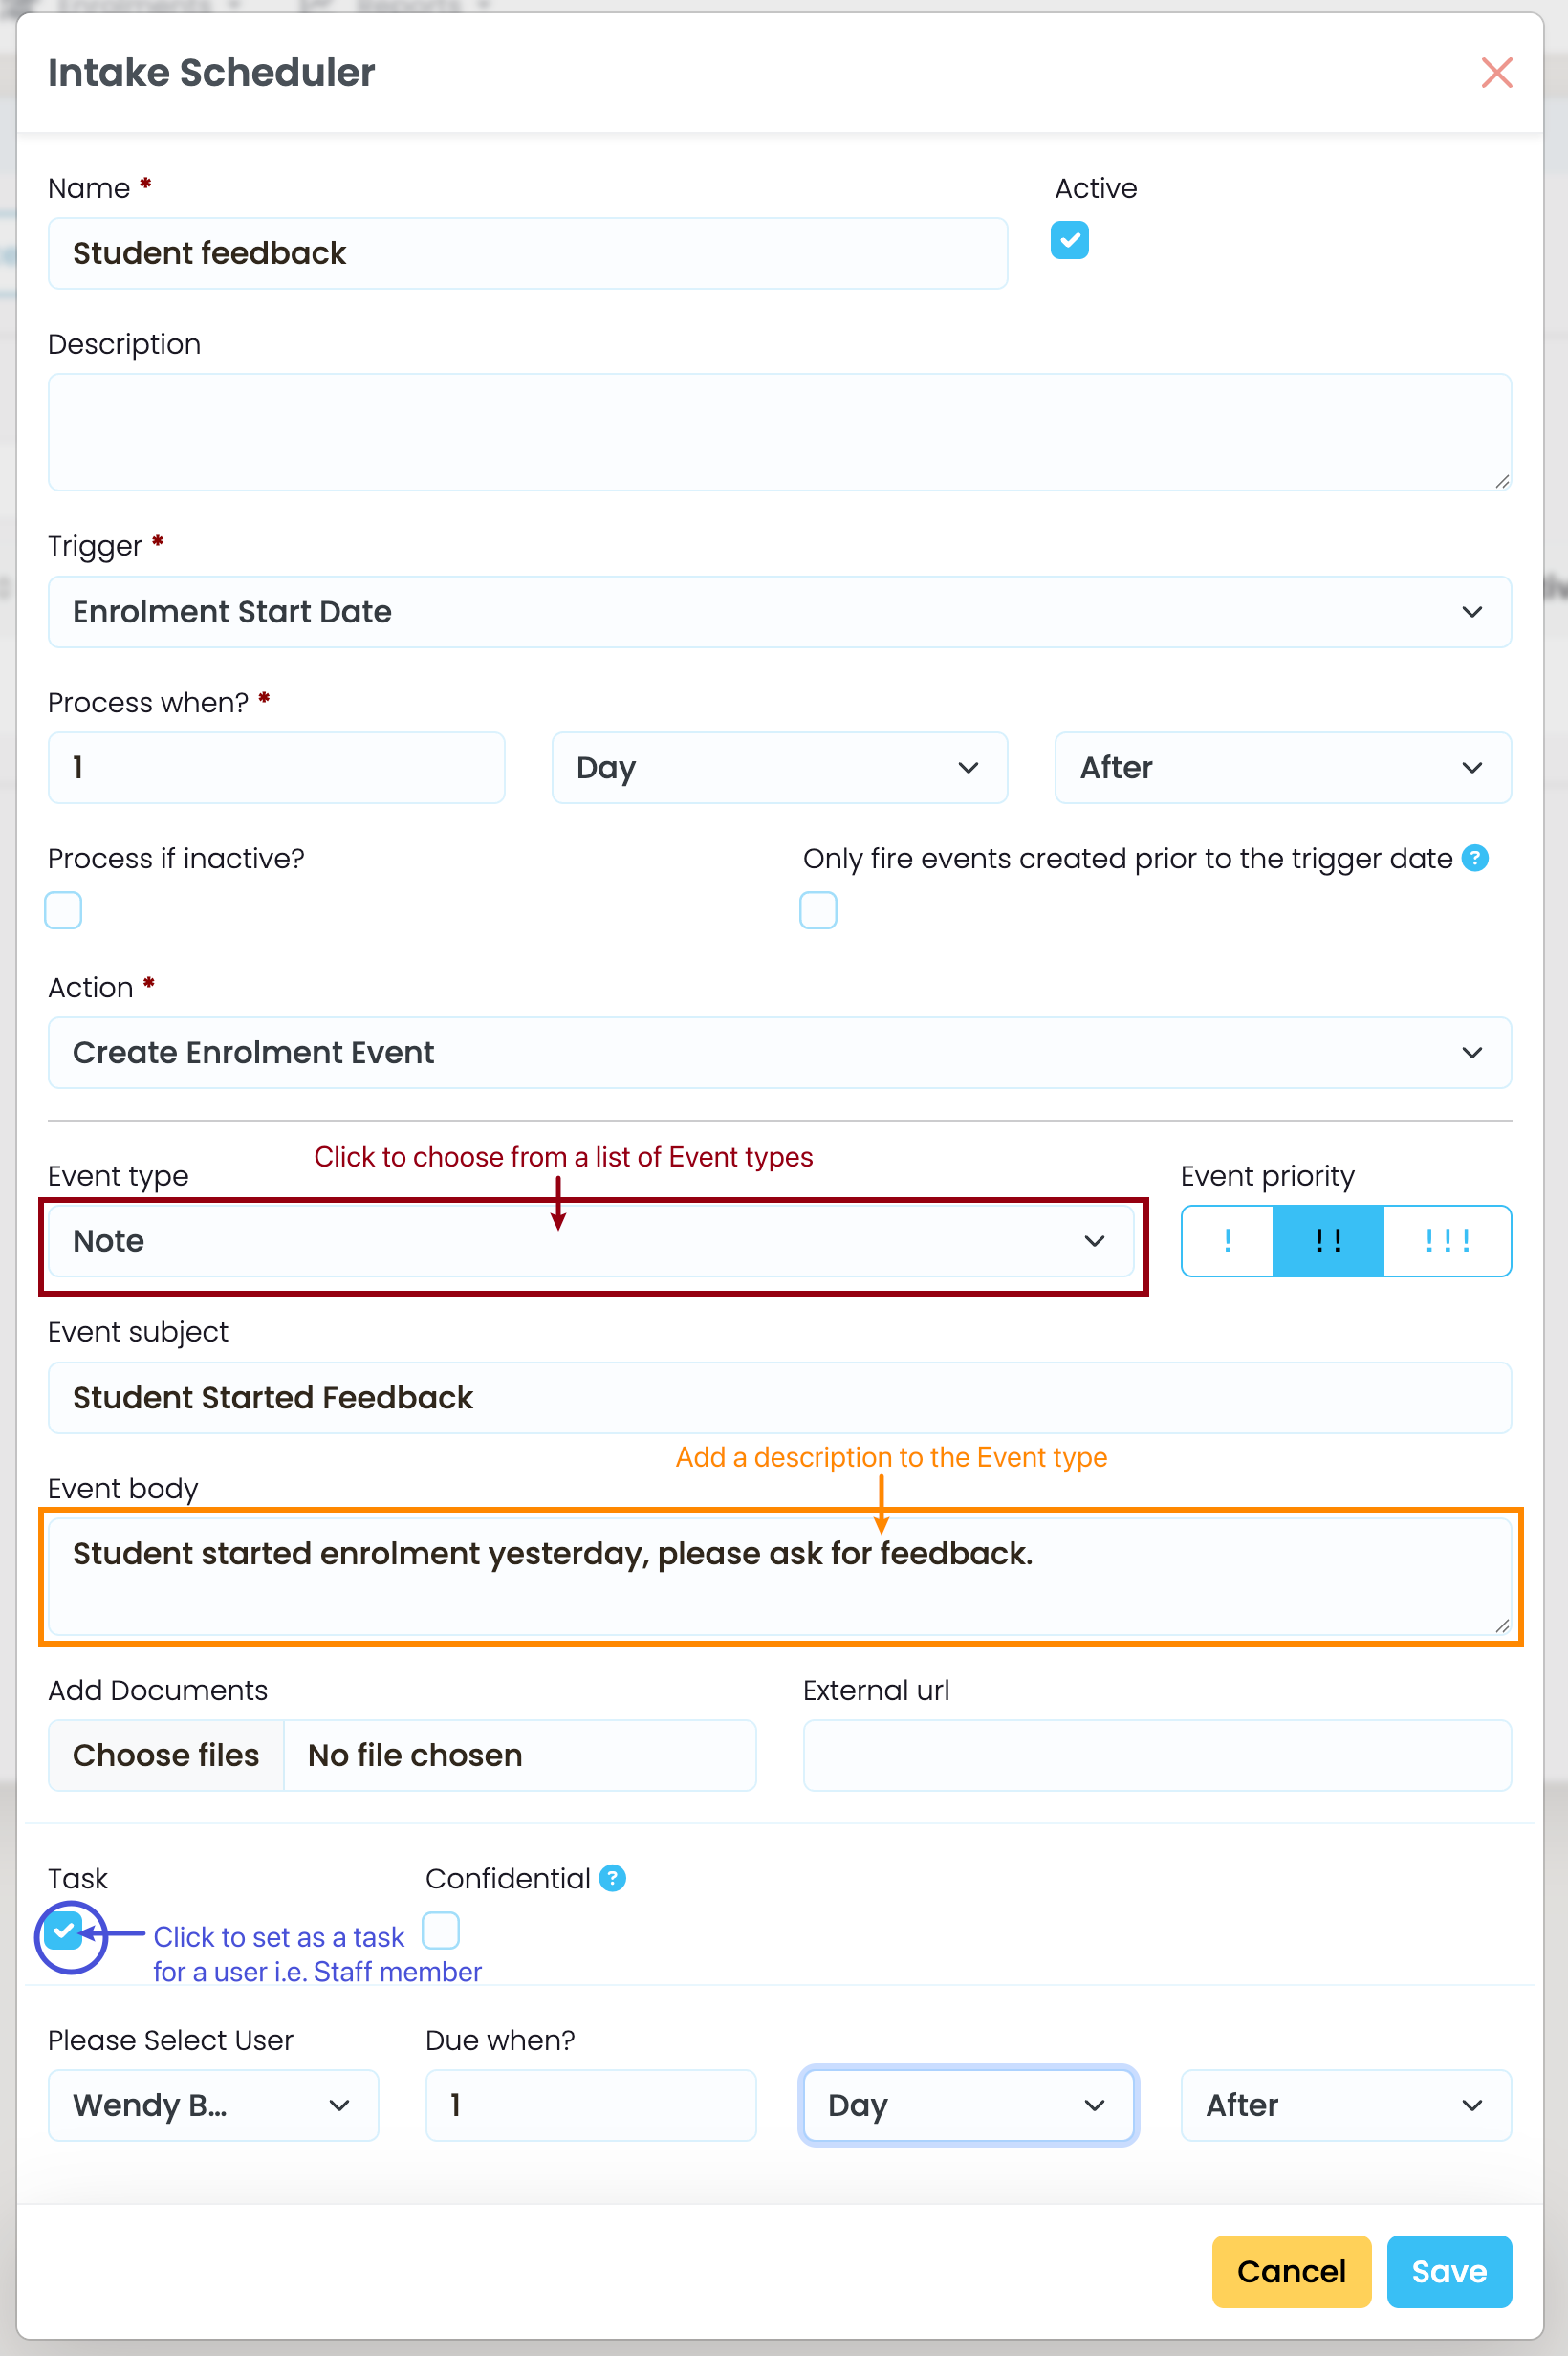
Schedule an Action: Create Enrolment Event
You can schedule an Enrolment Event with someone, such as a note, task, call or visit (Figure 5iii.).
Figure 5iii. When scheduling an Enrolment Event, pick your “Event type” (burgundy) and describe it (orange). Click the “Task” check-box to set this event as a task for a user (blue arrow).
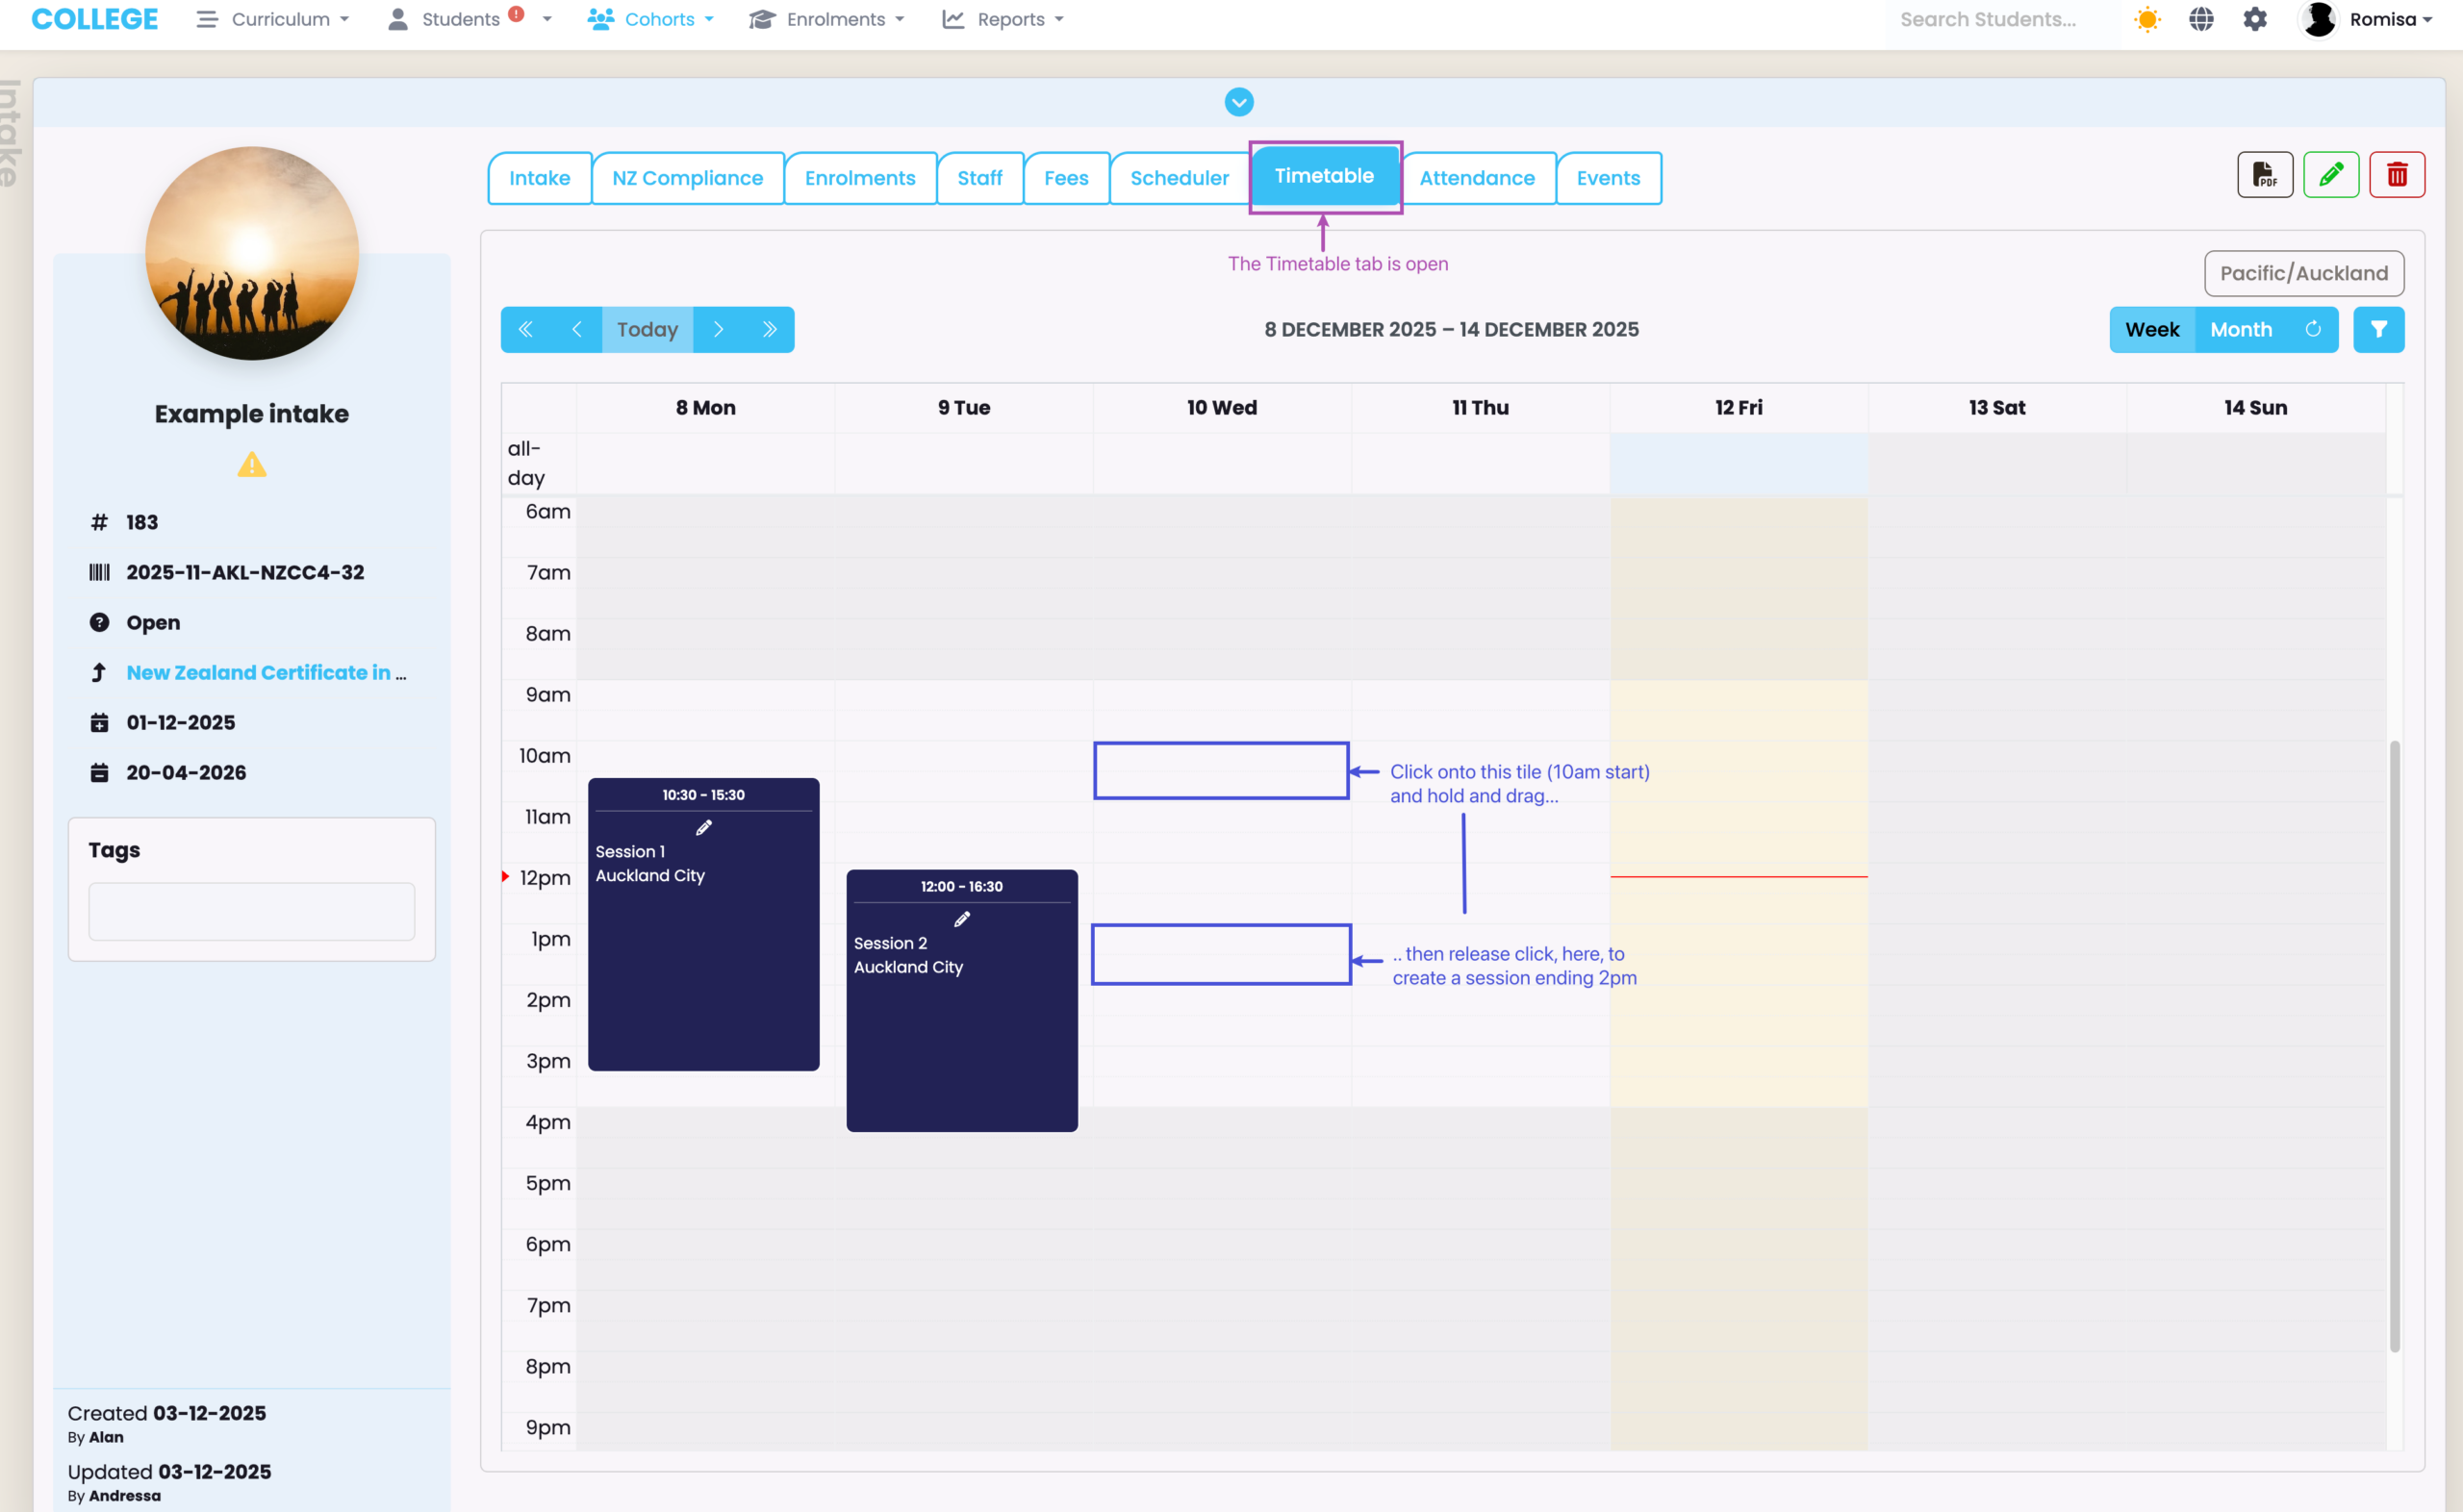
Timetable Tab
This tab allows you to create Timetable sessions for an Intake (Figure 6.), which produces an Attendance register for student enrolments, seen in the following Attendance tab.
Note: When a Session is created, attendance registers are created for marking automatically overnight.
See Attendance – Create Timetables in this resource for a complete guide on creating Timetables.
Figure 6. To create a Timetable session, click and drag your mouse over a particular day, between your specified hours (blue).
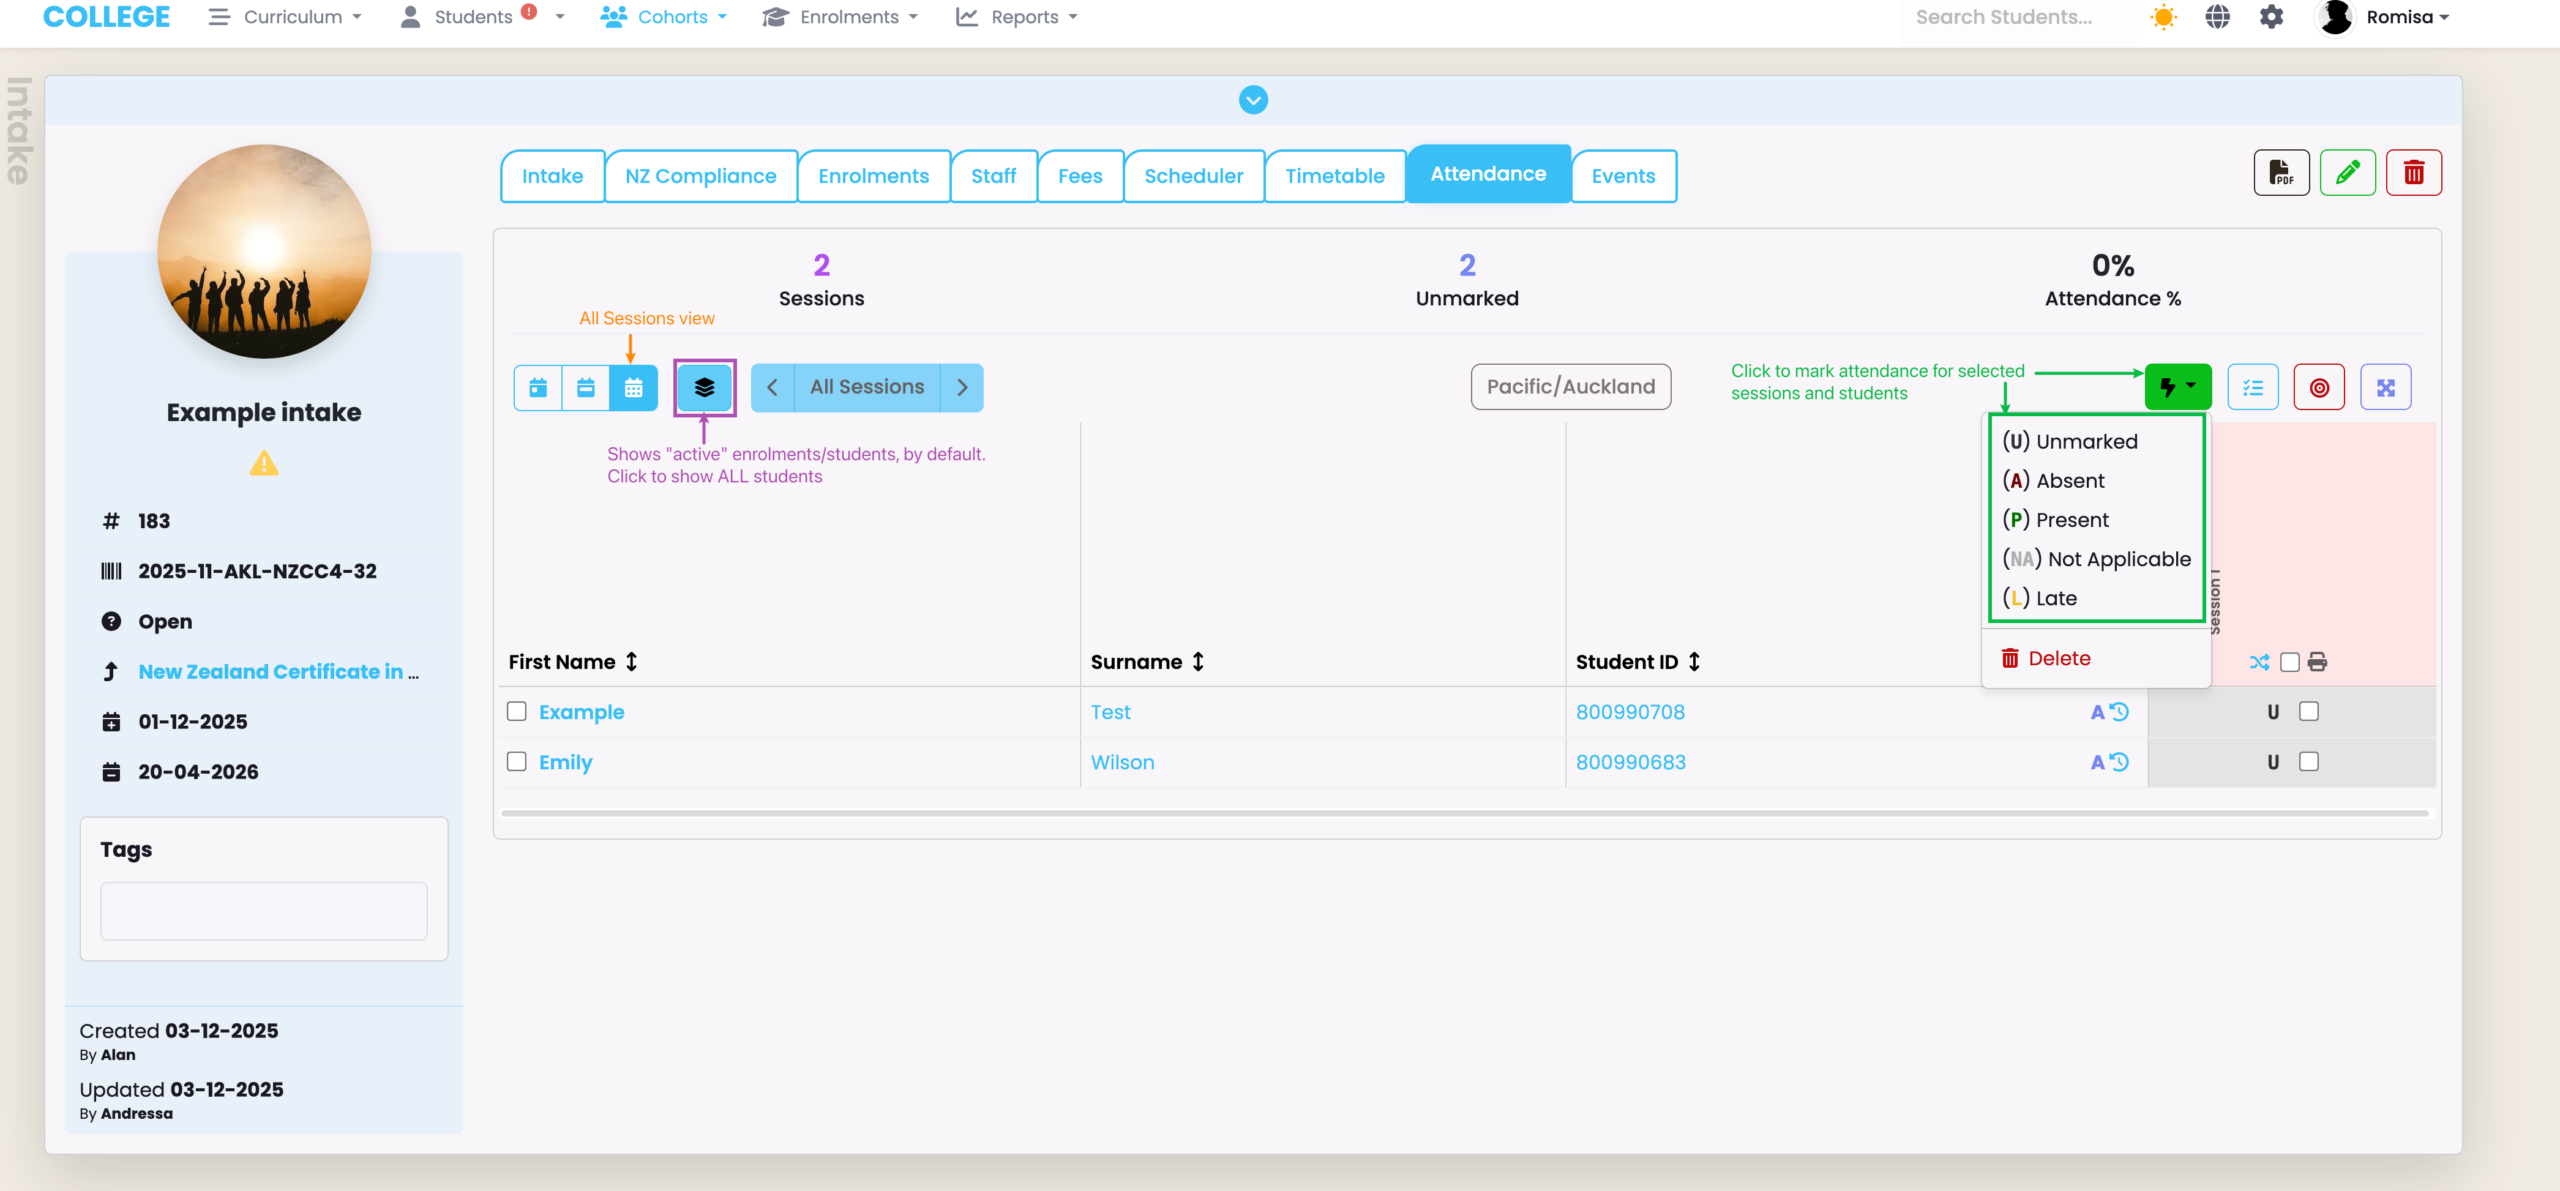
Attendance Tab
The Attendance tab reflects the Timetable sessions created on the Timetable tab, and allows you to mark Student attendance against a session (Figure 7.).
See Attendance – Mark Attendance in this resource for a complete guide on Attendance marking.
Figure 7. Select student enrolments to mark using the flash icon (green). All “active” Enrolments show by default, unless you click the stack icon to show all students (purple).
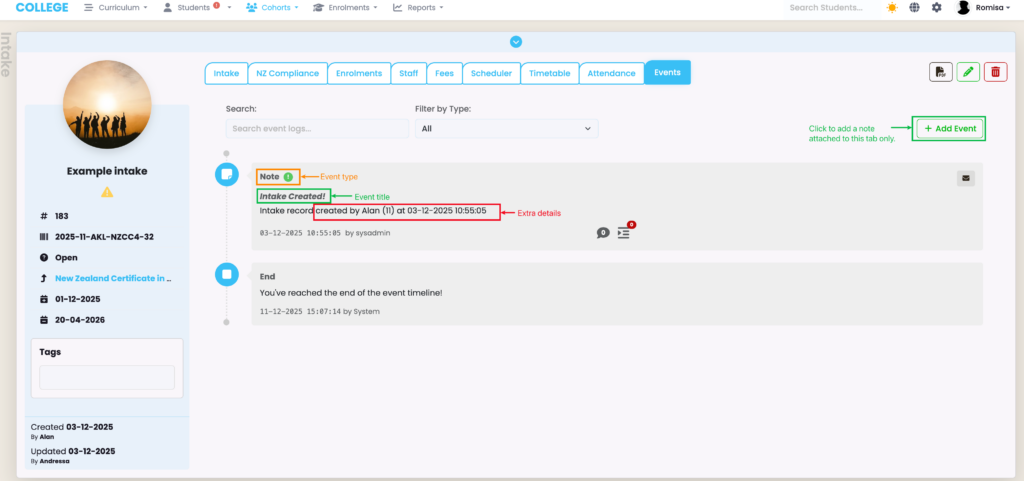
Events Tab
This tab shows System updates regarding the Intake. You can click the “+Add Event” button to attach a note to this tab, specifically (Figure 8.).
See Event Log – The SELMA Event Log in this resource for more information.
Figure 8. Notes include the Event type (orange), the Event title (green) and extra details (red). Click the “+Add Event” button (green) to add a note to this tab.